Once your natural history museum is open, take a guided video tour and send it to me so I can see what you’ve created! Here’s my email: aurora@superchargedscience.com
Once your natural history museum is open, take a guided video tour and send it to me so I can see what you’ve created! Here’s my email: aurora@superchargedscience.com
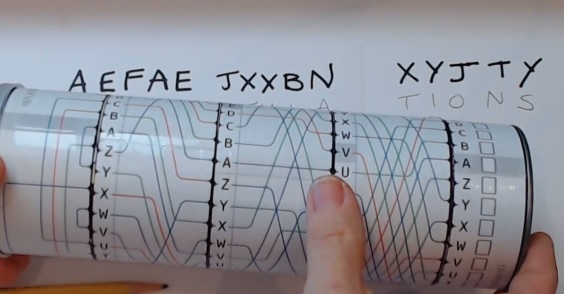
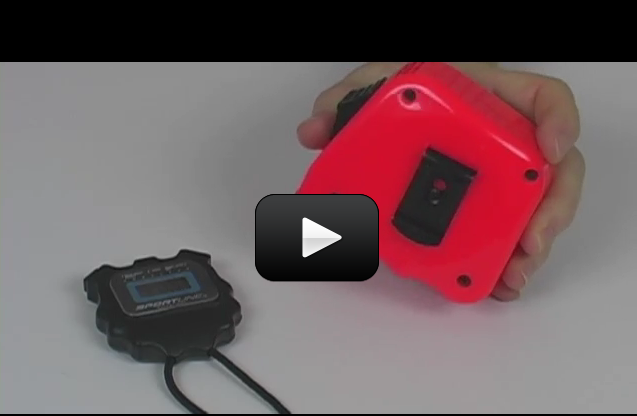
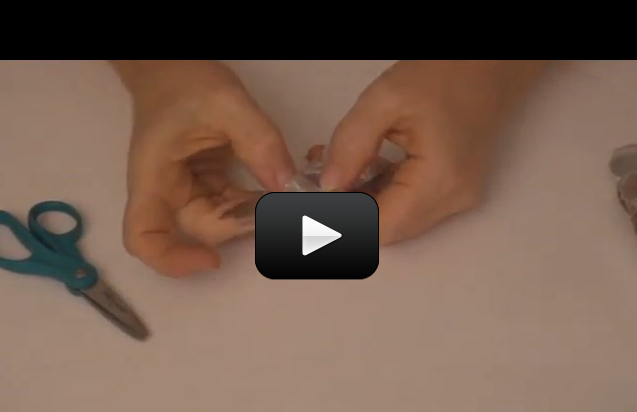
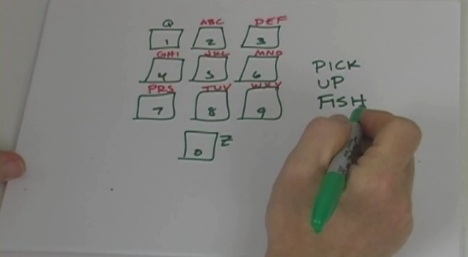
Secret codes and ciphers are so much fun to learn about and create! This particular secret code machine is a simpler model of the original that was so complex, it took a brilliant mathematician, Alan Turing, to devise the techniques which cracked the code.
In order to create this paper machine, you’ll need the templates which you can find here. Before you print and cut them out, watch the first part of the video, because chances are, you’re going to have to re-size it so it will fit your container.
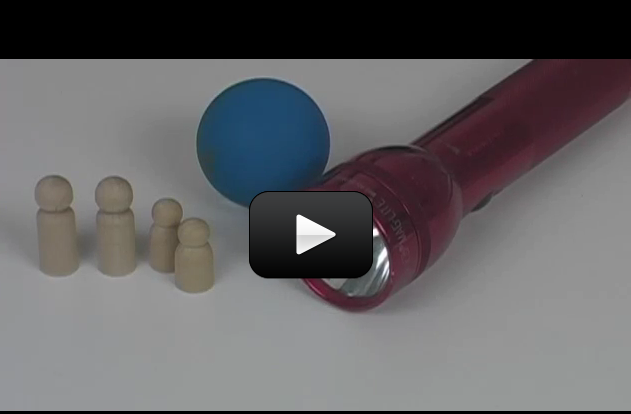
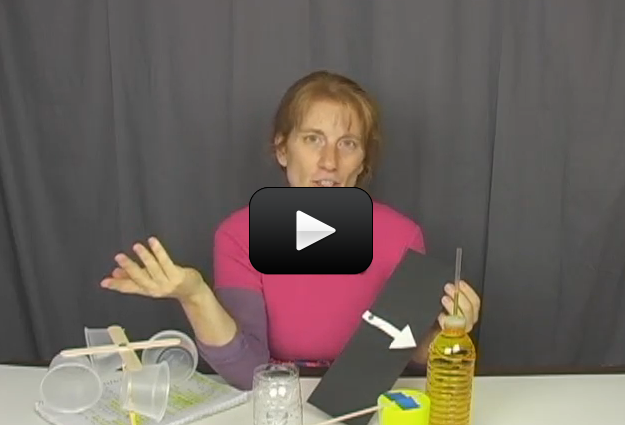
You’re going to do several experiments that change air pressure and mystify your kids. The goal is to set them thinking about how and why things fly (you’ll do this by learning about air pressure and Bernoulli’s law).
While you are playing with the experiments in the video, see if you can notice these important ideas:
[/am4show]
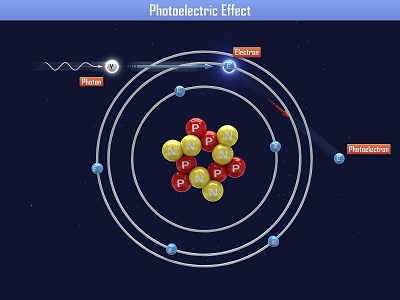 Einstein received a Nobel Prize for figuring out what happens when you shine blue light on a sheet of metal. When he aimed a blue light on a metal plate, electrons shot off the surface. (Metals have electrons which are free to move around, which is why metals are electrically conductive. More on this in Unit 10).
When Einstein aimed a red light at the metal sheet, nothing happened. Even when he cranked the intensity (brightness) of the red light, still nothing happened. So it was the energy of the light (wavelength), not the number of photons (intensity) that made the electrons eject from the plate. This is called the ‘photoelectric effect’. Can you imagine what happens if we aim a UV light (which has even more energy than blue light) at the plate?
This photoelectric effect is used by all sorts of things today, including solar cells, electronic components, older types of television screens, video camera detectors, and night-vision goggles.
This photoelectric effect also causes the outer shell of orbiting spacecraft to develop an electric charge, which can wreck havoc on its internal computer systems.
A surprising find was back in the 1960s, when scientists discovered that moon dust levitated through the photoelectric effect. Sunlight hit the lunar dust, which became (slightly) electrically charged, and the dust would then lift up off the surface in thin, thread-like fountains of particles up ¾ of a mile high.
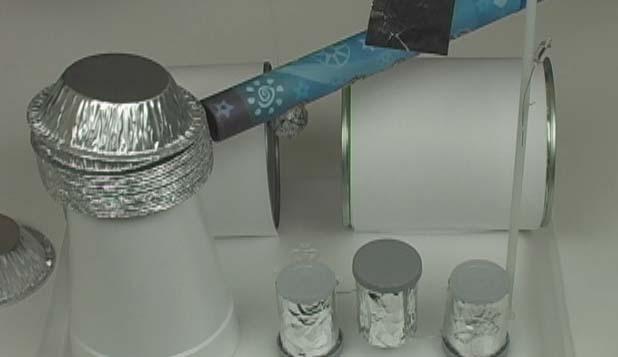
When I was in graduate school, I studied rockets quite a bit, specifically the nozzle section. We had an experiment set up we called the “glass rocket” because the burning section was made of acrylic, and it was really only used to amaze people when they come in to tour our lab. Although that I wasn’t able to get a video made of that particular rocket, I found one even better that not only shows the same principle and experiment, but also shows you how to built one yourself… if you really know what you are doing.
I can imagine most folks not being able to build one of these themselves… it is a bit intimidating! The video below shows you how to build a much easier version using yeast, hydrogen peroxide, and pasta. The pasta contains hydrocarbons and serves the same purpose as the acrylic in the previous video (above).
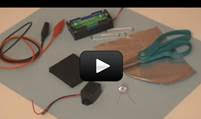
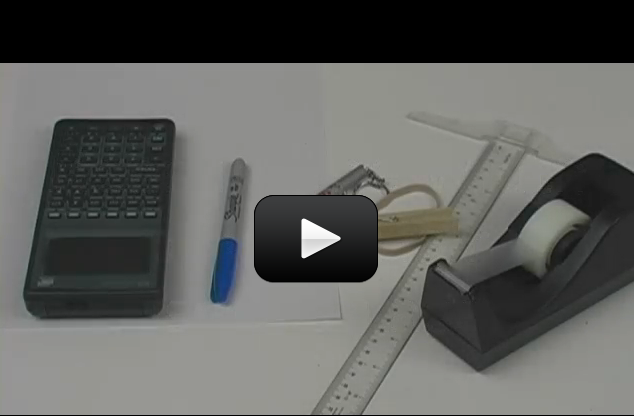
Here’s a list of the supplies you’ll need to complete most of the basic experiments in this series:
Note that the more advanced experiments, including the laser alarms, trip wire, pressure sensors, laser maze, and laser transmitters have their own individual materials listed with each experiment. Please refer to each experiment for a full and complete itemized material list with order links.
Note: there are FOUR videos on this page, and FIVE experiments!
Every crime scene has a silent witness called physical evidence, and fingerprints are one kind of physical evidence. The patterns of ridges on both the finger and toe are unique to each person; no two are alike, which allows fingerprinting to help identify who did what, when, and where. Your fingerprint pattern will never change throughout your entire lifetime, which makes it a handy tool for identification. The main patterns are arch, loop, and whorl.
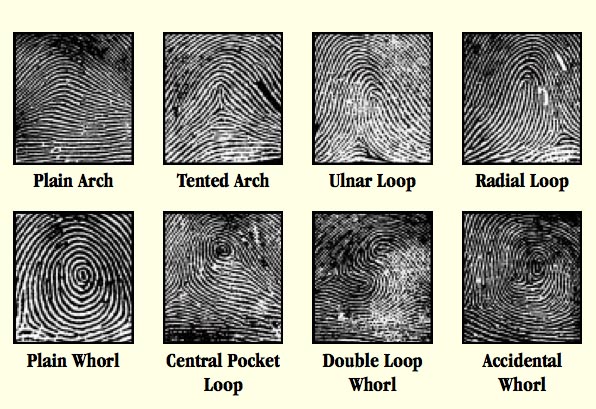
Fingerprints are friction ridges made up of a single row of pores in your skin. When your finger touches a surface, oil and sweat transfer from your finger to the surface and leave an impression of the ridge pattern from your finger.
This super-cool project lets kids have the fun of playing tag in the dark on a warm summer evening, without the “gun” aspect traditionally found in laser tag. Kids not only get to enjoy the sport, but also have the pride that they build the tag system themselves – something you simply can’t get from opening up a laser tag game box.
Burglar alarms not only protect your stuff, they put the intruder into a panic while they attempt to disarm the triggered noisemaker. Our burglar alarms are basically switches which utilize the circuitry from Basic Circuits and clever tricks in conductivity.
Can you spot a fake $10 from the real thing? It’s getting harder these days, but you can still do it using a microscope.
US dollar bills are make of a mix of cotton and linen, which is why they don’t fall apart when you leave them in your pants pocket and they go through the water. They also have trace amounts of iron embedded in them, so they flex slightly toward a strong magnet. Can you find the owl on the dollar bill?
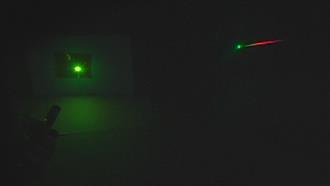
Did you know that when you talk inside a house, the windows vibrate very slightly from your voice? If you stand outside the house and aim a laser beam at the window, you can pick up the vibrations in the window and actually hear the conversation inside the house.
First, I’ll show you how to build your own space-age laser communicator, then you can work on your spy device. The first thing we’re going to do is take the music from your iPOD (or stereo, or MP3 player) and transmit it on a laser beam to a detector on the other side. The detector has a earphone attached, so someone else can listen to the music from your laser. Weird, huh?
If you find a white powder at the scene of a crime, how can you tell if it’s flour or something more dangerous? A detective uses a chemical lab to determine what the substance is. One of the things that scientists look for is pH, which is a measure of how acidic or basic the powder is based on either a color change or how much a substance reacts with baking soda.
Cryptography is the writing and decoding of secret messages, called ciphers. Now for governments these secret ciphers are a matter of national security. They hire special cryptanalysts who work on these ciphers using cryptanalysis. The secret is, solving substitution ciphers can be pretty entertaining! Ciphers are published daily in newspapers everywhere. If you practice encoding and decoding ciphers, you too can become a really great cryptanalyst.
This experiment is for advanced students. There are many different elements inside of a star. But they are so far away that we can’t get close enough to study them… or can we? By studying the special light signature (called “spectral lines”) astronomers can figure out not only which element, but also the approximate temperature and density of the element within the star, in addition to getting an idea of what the magnetic fields look like, which tells us about stellar wing and what the planets might be doing around the star, or if there might be another companion star.
Spectroscopy is a very complicated science, so let’s get started by actually doing it, and we’ll figure out what’s going on along the way.
This project is for advanced students. Make sure you’ve completed the Police Siren project first!
This is a really cool one. You’re actually going to build a miniature radio station. You can broadcast your voice or music to a regular FM radio. It just has a very short range (about 100 feet, or 30 meters).
If you have access to a microscope, then this lab is fun and easy to do. If you’re in the market for a microscope, you can view our microscope recommendations here. If you’ve got a microscope but just haven’t used it for awhile (or never), then look over the experiments here first to get you started. Cloth fibers, wool, human hair, salt, and sugar all look really different under a microscope. It’s especially fun to mix up salt and sugar first, and then look at it under the scope to see if you can tell the difference.
By controlling how and when a circuit is triggered, you can easily turn a simple circuit into a burglar alarm – something that alerts you when something happens. By sensing light, movement, weight, liquids, even electric fields, you can trigger LEDs to light and buzzers to sound. Your room will never be the same.
Switches control the flow of electricity through a circuit. There are different kinds of switches. NC (normally closed) switches keep the current flowing until you engage the switch. The SPST and DPDT switches are NO (normally open) switches.
The pressure sensor we’re building is small, and it requires a fair amount of pressure to activate. Pressure is force (like weight) over a given area (like a footprint). If you weighed 200 pounds, and your footprint averaged 10” long and 2” wide, you’d exert about 5 psi (pounds per square inch) per foot.
However, if you walked around on stilts indeed of feet, and the ‘footprint’ of each stilt averaged 1” on each side, you’d now exert 100 psi per foot. Why such a difference?
The secret is in the area of the footprint. In our example, your foot is about 20 square inches, but the area of each stilt was only 1 square inch. Since you haven’t changed your weight, you’re still pushing down with 200 pounds, only in the second case, you’re pressing the same weight into a much smaller spot… and hence the pressure applied to the smaller area shoots up by a factor of 20.
So how do we use pressure in this experiment? When you squeeze the foam, the light bulb lights up! It’s ideal for under a doormat or carpet rug where lots of weight will trigger it.
If you look carefully at color images inside of books with a magnifying glass or a microscope, you’ll find there are only four colors that make up all the different colors you see. We’re going to learn how to separate the color that makes up different color markers, which work the same was as the colored printed images in books.
This method of decoding messages uses special ink that is invisible until something is done to make them appear on the paper. There are hundreds of formulas to make these special inks and some formulas even have multiple ways to develop the ink. Some recipes involve special chemicals, but many invisible inks can be made using materials that you have in your home. Watch the video and I’ll share a few recipes and teach you more about this method.
I was digging through some old video files and found this hour-long video of a robot competition I attended, and thought you might be interested to see how much robots have changed (or not?) since then!
If you’ll notice in the video below, there are no Arduinos, no VEX pieces… everything was handmade using basic electronics knowledge. In fact, the two robots that were communicating using laptops that were bolted right onto the robot was actually a really innovative idea!
This video was from an event about 20 years ago… was when I was still teaching engineering at the university, and just getting started teaching kids.
The hour-long version of the video was kind of long and tedious (it was just watching competition after competition), so I slimmed it down to just under two minutes so you could really get a taste for it. Hope you enjoy it!
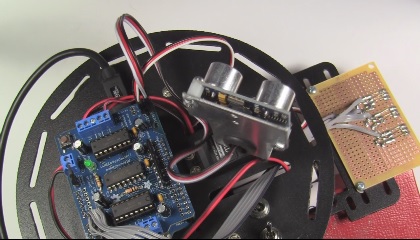
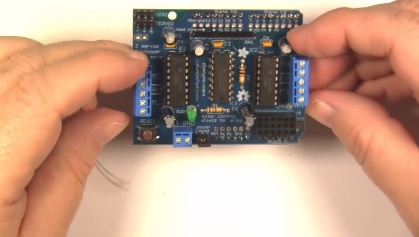
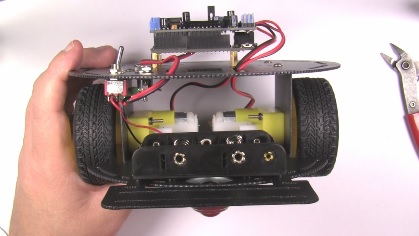
An “Arduino” is a micro-controller that really makes robotics a lot easier and fun to create. First designed in 2005 by an Italian company, these single boards were originally intended for students learning robotics.
The board consists of standardized connectors, which allow a whole host of interchangeable add-on modules (shields) to be used. It’s like the brains of a computer that you can add inputs (like sensors) and outputs connections (like motors) to.
Arduinos are not limited to student robotics. In fact, you’ll find them anywhere there’s automation, from telescope observatories to weather stations to smart home functions.
We’re going to learn how to transform an inexpensive Arduino board into a fully functioning autonomous robot with sensors, just like the one in the image above. This will take several steps, so watch the videos in order so you don’t miss a thing.
The VEX IQ Robotics Competition for elementary and middle school students is open to teams of two or more kids who build a robot to compete in local competitions.
While it’s really exciting and fun, it’s easy to feel overwhelmed due to the open-endlessness, and that’s what we’re going to hep you with. Ready to get started?
This is a recording of a recent live teleclass I did with thousands of kids from all over the world. I’ve included it here so you can participate and learn, too!
We’re going to study electrons and static charge. Kids will build simple electrostatic motor to help them understand how like charges repel and opposites attract. After you’ve completed this teleclass, be sure to hop on over the teleclass in Robotics!
Electrons are strange and unusual little fellows. Strange things happen when too many or too few of the little fellows get together. Some things may be attracted to other things or some things may push other things away. Occasionally you may see a spark of light and sound. The light and sound may be quite small or may be as large as a bolt of lightning. When electrons gather, strange things happen. Those strange things are static electricity.
The summer chemistry section is full of great experiments that are not only fun but also designed to hone your observational skills. Chemistry experiments really speak for themselves, much better than I can ever put into words. And I’m going to provide you with a lot of these experiments to help you develop your observing techniques. Are you ready?
 |
 |
 |
|||
 |
 |
 |
|||
 |
 |
 |
|||
 |
 |
 |
|||
 |
 |
 |
|||
 |
|
 |
Simple Spectrometer and the more advanced Calibrated Spectrometer
|
||
 |
 |
 |
|||
 |
 |
 |
This is a recording of a recent live teleclass I did with thousands of kids from all over the world. I’ve included it here so you can participate and learn, too!
Soar, zoom, fly, twirl, and gyrate with these amazing hands-on classes which investigate the world of flight. Students created flying contraptions from paper airplanes and hangliders to kites! Topics we will cover include: air pressure, flight dynamics, and Bernoulli’s principle.
Materials:

As promised, here’s the Liquid Nitrogen Ice Cream Social video that was only available to a handful of participants at our live summer camp last week! This is probably one of the last times Dr. Tom Frey will be doing this presentation, so we didn’t want to miss the opportunity to record it and share it with you!
Dr. Tom Frey just retired as a chemistry professor at Cal Poly State University, where he taught courses (including how to make your own lab glassware) for 42 years. He’s not only a mentor of mine, but a close personal friend and I am happy to share his talent and passion for science with you through this special, one of a kind video.
I really hope you enjoy it!
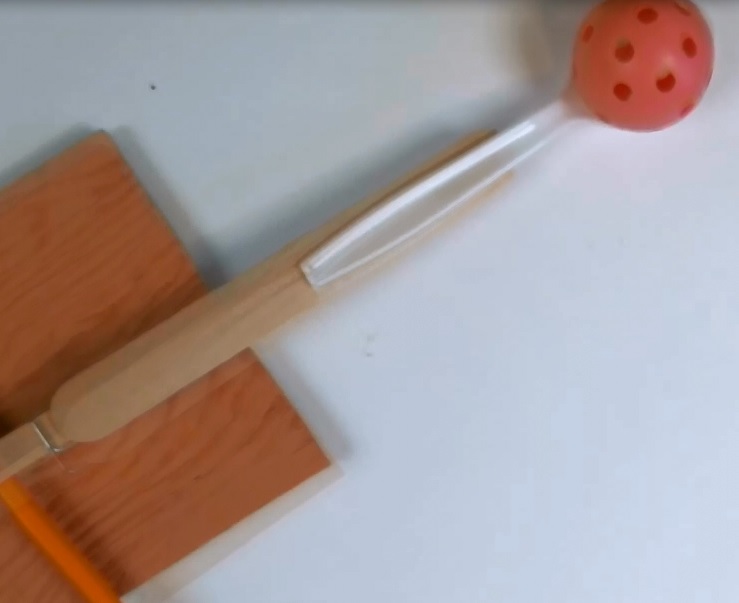
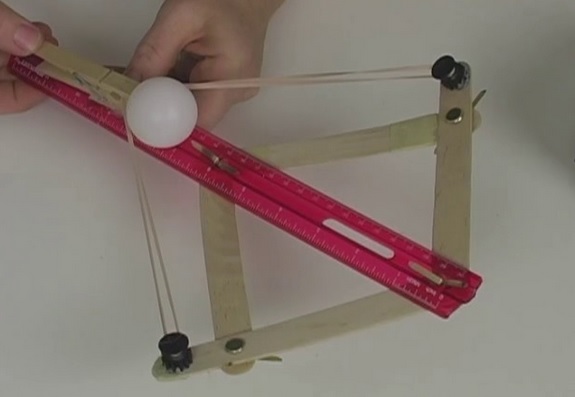
 Ancient people teach us a thing or two about energy when they laid siege to an enemy town. Although we won’t do this today, we will explore some of the important physics concepts about energy that they have to teach us by making a simple catapult. We’re utilizing the “springy-ness” in the popsicle stick, spoon, and the torsion spring to fling the ball around the room. By moving the fulcrum as far from the ball launch pad as possible (on the catapult), you get a greater distance to press down and release the projectile.
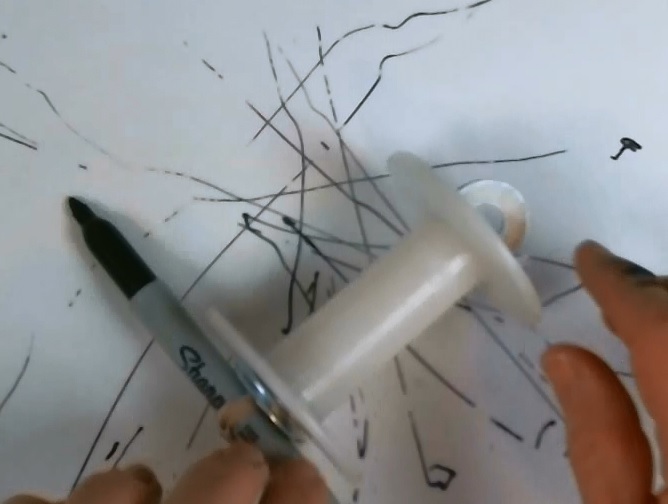
We're going to make a quick and easy drawing machine that will teach your kids about the conservation of energy! By storing energy in the rubber band (called "elastic potential energy"), you can see for yourself how this transforms into movement (called "kinetic energy") while making a picture on your paper.
Everything in the universe takes one of two forms: energy and matter. This experiment explores the idea that energy can never be created or destroyed, but it can transform. All the different forms of energy (heat, electrical, nuclear, sound etc.) can be broken down into two categories, potential and kinetic energy.
Think of potential energy the “could” energy. The battery “could” power the flashlight. The light “could” turn on. I “could” make a sound. That ball “could” fall off the wall. That candy bar “could” give me energy. Potential energy is the energy that something has that can be released. For example, the battery has the potential energy to light the bulb of the flashlight if the flashlight is turned on and the energy is released from the battery. Your legs have the potential energy to make you hop up and down if you want to release that energy (like you do whenever it’s time to do science!). The fuel in a gas tank has the potential energy to make the car move.
Kinetic energy is the energy of motion. Kinetic energy is an expression of the fact that a moving object can do work on anything it hits; it describes the amount of work the object could do as a result of its motion. Whether something is zooming, racing, spinning, rotating, speeding, flying, or diving… if it’s moving, it has kinetic energy. How much energy it has depends on two important things: how fast it’s going and how much it weighs.
We’re utilizing the elasticity of the rubber band to store potential energy to fling the ball around the room. The potential energy in the rubber band is transformed into kinetic energy of the moving ball when you hit the trigger to release the rubber band.
If you’ve ever wondered how glow in the dark toys stay bright even in the dark, this activity is just for you! When light hits a material, it’s either reflected, transmitted, or absorbed as we discovered with the gummy bear activity earlier. However, certain materials will absorb one wavelength and emit an entirely different wavelength, and when this happens it’s called “fluorescence”. Let’s do an experiment first, and then we’ll go over why it does what it does.
 As a kid, I absolutely loved Encyclopedia Brown and Sherlock Holmes. What I really loved most about them was the science behind how they caught the bad guy… and now I’m going to share with you the basics of crime scene investigation in this section on forensic science.
Forensic science is a lot like engineering… it’s a place where you get to use stuff you’ve learned in other fields and apply it to the real world. With forensics, you get to use biology when you identify blood, DNA and diatoms; chemistry when you’re identifying unknown powders and poisons; physics when you’re looking at shattered glass, bullets, and explosions; and earth science with you’re looking at soil evidence.
The basic principle that forensics is based on is that someone either brought something to the crime scene or left something behind, which is called trace evidence. Trace because it’s usually really small, like a fiber of clothing, a hair, bits from a shoe, paint chips, wood splinters, or latent (invisible) fingerprints.
 There’s a lot we’re going to cover! We’re going to several different fingerprinting methods, including how to lift fingerprints so you can study them as well as how to make artificial fingerprints using stuff from around the house. You’ll also learn about chromotography, which is how to separate black ink into its different colors so you can find the pen that actually wrote the mysterious letter.
We’re also going to learn how to do fiber flame tests to be able to help you identify which fibers are which so you can match it with what the suspect is wearing. Chemical analysis is also really important, and you’ll learn how to tell which powder is which using a matrix technique. We’ll also look at counterfeit money by making microscopes, fake documents in different wavelengths of light, and learn how handwriting tells you a lot about a person and how they think and feel.
In addition to collecting and analyzing evidence, we’re also going to learn how to secretly listen to conversations inside the house from the front yard, how to make laser burglar alarms to help you catch the bad guy, make rear-view spy glasses that let you see what’s going on behind you, write in different types of invisible ink, a wireless FM transmitter so you can transmit your voice to your allies without using walkie talkies, and learn how to make your own laser maze by building the home-made transistor detectors (these are the ones we use at Science Camp in the Laser Maze)!
There are over 20 videos to take you step by step into the world of evidence, analysis, investigation, and decoding mysteries! Are you ready?
This lab is a physical model of what happens on Mercury when two magnetic fields collide and form magnetic tornadoes.
You’ll get to investigate what an invisible magnetic tornado looks like when it sweeps across Mercury.
Materials
Using the position of the Sun, you can tell what time it us by making one of these sundials. The Sun will cast a shadow onto a surface marked with the hours, and the time-telling gnomon edge will align with the proper time.
In general, sundials are susceptible to different kinds of errors. If the sundial isn’t pointed north, it’s not going to work. If the sundial’s gnomon isn’t perpendicular, it’s going to give errors when you read the time. Latitude and longitude corrections may also need to be made. Some designs need to be aligned with the latitude they reside at (in effect, they need to be tipped toward the Sun at an angle). To correct for longitude, simply shift the sundial to read exactly noon when indicated on your clock. This is especially important for sundials that lie between longitudinal standardized time zones. If daylight savings time is in effect, then the sundial timeline must be shifted to accommodate for this. Most shifts are one hour.
Today you get to learn how to read an astronomical chart to find out when the Sun sets, when twilight ends, which planets are visible, when the next full moon occurs, and much more. This is an excellent way to impress your friends.
The patterns of stars and planets stay the same, although they appear to move across the sky nightly, and different stars and planets can be seen in different seasons.
Materials:

Kepler’s Laws of planetary orbits explain why the planets move at the speeds they do. You’ll be making a scale model of the solar system and tracking orbital speeds.
Kepler’s 1st Law states that planetary orbits about the Sun are not circles, but rather ellipses. The Sun lies at one of the foci of the ellipse. Kepler’s 2nd Law states that a line connecting the Sun and an orbiting planet will sweep out equal areas in for a given amount of time. Translation: the further away a planet is from the Sun, the slower it goes.
Please login or register to read the rest of this content.
How do astronomers find planets around distant stars? If you look at a star through binoculars or a telescope, you’ll quickly notice how bright the star is, and how difficult it is to see anything other than the star, especially a small planet that doesn’t generate any light of its own! Astronomers look for a shift, or wobble, of the star as it gets gravitationally “yanked” around by the orbiting planets. By measuring this wobble, astronomers can estimate the size and distance of larger orbiting objects.
Doppler spectroscopy is one way astronomers find planets around distant stars. If you recall the lesson where we created our own solar system in a computer simulation, you remember how the star could be influenced by a smaller planet enough to have a tiny orbit of its own. This tiny orbit is what astronomers are trying to detect with this method.
Materials
It just so happens that the Sun’s diameter is about 400 times larger than the Moon, but the Moon is 400 times closer than the Sun. This makes the Sun and Moon appear to be about the same size in the sky as viewed from Earth. This is also why the eclipse thing is such a big deal for our planet.
You’re about to make your own eclipses as you learn about syzygy. A total eclipse happens about once every year when the Moon blocks the Sun’s light. Lunar eclipses occur when the Sun, Moon, and Earth are lined up in a straight line with the Earth in the. Lunar eclipses last hours, whereas solar eclipses last only minutes.
Materials

A meteoroid is a small rock that zooms around outer space. When the meteoroid zips into the Earth’s atmosphere, it’s now called a meteor or “shooting star”. If the rock doesn’t vaporize en route, it’s called a meteorite as soon as it whacks into the ground. The word meteor comes from the Greek word for “high in the air.”
Meteorites are black, heavy (almost twice the normal rock density), and magnetic. However, there is an Earth-made rock that is also black, heavy, and magnetic (magnetite) that is not a meteorite. To tell the difference, scratch a line from both rocks onto an unglazed tile. Magnetite will leave a mark whereas the real meteorite will not.
Materials
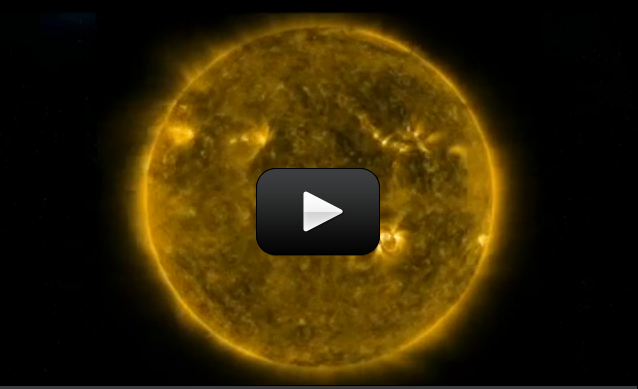
You are going to start observing the Sun and tracking sunspots across the Sun using one of two different kinds of viewers so you can figure out how fast the Sun rotates. Sunspots are dark, cool areas with highly active magnetic fields on the Sun’s surface that last from hours to months. They are dark because they aren’t as bright as the areas around them, and they extend down into the Sun as well as up into the magnetic loops.
Materials

Have you ever wondered why the sky is blue? Or why the sunset is red? Or what color our sunset would be if we had a blue giant instead of a white star? This lab will answer those questions by showing how light is scattered by the atmosphere.
Particles in the atmosphere determine the color of the planet and the colors we see on its surface. The color of the star also affects the color of the sunset and of the planet.
Materials

One common misconception is that the seasons are caused by how close the Earth is to the Sun. Today you get to do an experiment that shows how seasons are affected by axis tilt, not by distance from the Sun. And you also find out which planet doesn’t have sunlight for 42 years.
The seasons are caused by the Earth’s axis tilt of 23.4o from the ecliptic plane.
Materials
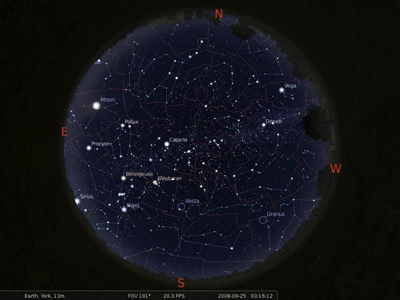
Telescopes and binoculars are pretty useless unless you know where to point them. I am going to show you some standard constellations and how to find them in the night sky, so you’ll never be lost again in the ocean of stars overhead. We’re going to learn how to go star gazing using planetarium software, and how to customize to your location in the world so you know what you’re looking at when you look up into the sky tonight!
Please login or register to read the rest of this content.
Helioseismology is the study of wave oscillations in the Sun. By studying the waves, scientists can tell what’s going on inside the Sun. It’s like studying earthquakes to learn what’s going on inside the earth. The Sun is filled with sound, and studying these sound waves is currently the only way scientists can tell what’s going on inside, since the light we see from the Sun is just from the upper surface.
Molecules are vibrating back and forth at fairly high rates of speed, creating waves. Energy moves from place to place by waves. Sound energy moves by longitudinal waves (the waves that are like a slinky). The molecules vibrate back and forth, crashing into the molecules next to them, causing them to vibrate, and so on and so forth. All sounds come from vibrations.
Materials
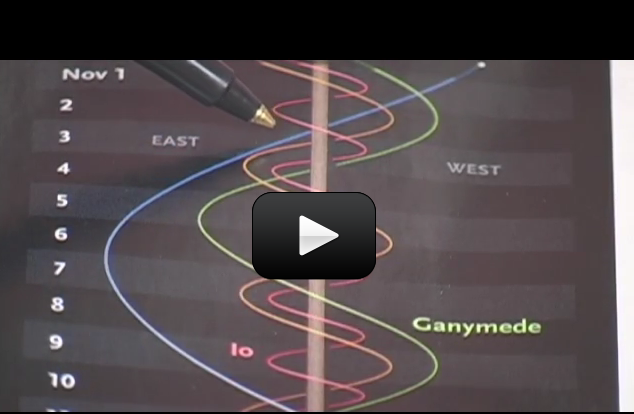
On a clear night when Jupiter is up, you’ll be able to view the four moons of Jupiter (Europa, Ganymede, Io, and Callisto) and the largest moon of Saturn (Titan) with only a pair of binoculars. The question is: Which moon is which? This lab will let you in on the secret to figuring it out.
You get to learn how to locate a planet in the sky with a pair of binoculars, and also be able to tell which moon is which in the view.
Materials
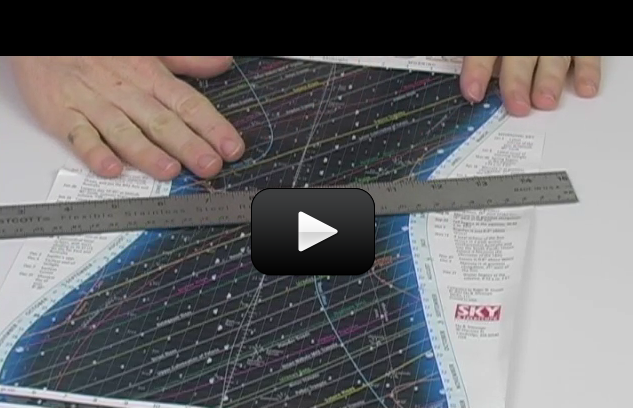
If you want to get from New York to Los Angeles by car, you’d pull out a map. If you want to find the nearest gas station, you’d pull out a smaller map. What if you wanted to find our nearest neighbor outside our solar system? A star chart is a map of the night sky, divided into smaller parts (grids) so you don’t get too overwhelmed. Astronomers use these star charts to locate stars, planets, moons, comets, asteroids, clusters, groups, binary stars, black holes, pulsars, galaxies, planetary nebulae, supernovae, quasars, and more wild things in the intergalactic zoo.
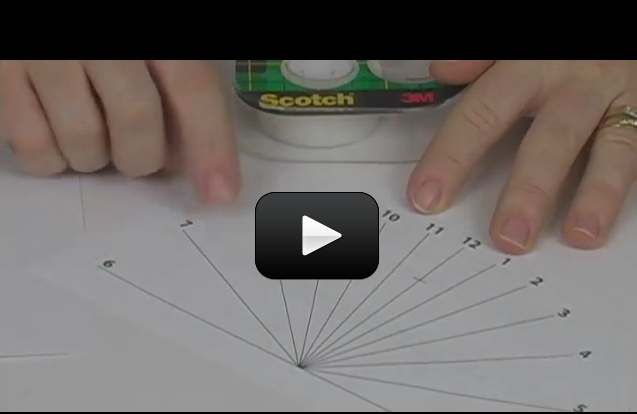
How to find two constellations in the sky tonight, and how to get those constellations down on paper with some degree of accuracy.
Materials
When high energy radiation strikes the Earth from space, it’s called cosmic rays. To be accurate, a cosmic ray is not like a ray of sunshine, but rather is a super-fast particle slinging through space. Think of throwing a grain of sand at a 100 mph… and that’s what we call a ‘cosmic ray’. Build your own electroscope with this video!
The Moon appears to change in the sky. One moment it’s a big white circle, and next week it’s shaped like a sideways bike helmet. There’s even a day where it disappears altogether. So what gives?
The Sun illuminates half of the Moon all the time. Imagine shining a flashlight on a beach ball. The half that faces the light is lit up. There’s no light on the far side, right? For the Moon, which half is lit up depends on the rotation of the Moon. And which part of the illuminated side we can see depends on where we are when looking at the Moon. Sound complicated? This lab will straighten everything out so it makes sense.
Materials
 An “Arduino” is a micro-controller that really makes robotics a lot easier and fun to create. First designed in 2005 by an Italian company, these single boards were originally intended for students learning robotics.
The board consists of standardized connectors, which allow a whole host of interchangeable add-on modules (shields) to be used. It’s like the brains of a computer that you can add inputs (like sensors) and outputs connections (like motors) to.
Arduinos are not limited to student robotics. In fact, you’ll find them anywhere there’s automation, from telescope observatories to weather stations to smart home functions.
We’re going to learn how to transform an inexpensive Arduino board into a fully functioning autonomous robot with sensors, just like the one in the image above. This will take several steps, so watch the videos in order so you don’t miss a thing.
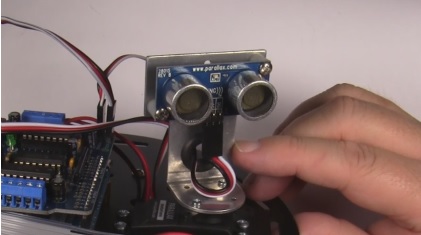
Since the line sensor will be constructed using a generic prototyping PC board, a lot of issues are discovered and solved during the build. A number of design changes are covered in this video dealing mostly with simplifying the line sensor build itself, and solving a connection problem between the line sensor cable and the motor shield. Additional pin strip header will be used in this video to solve one problem.
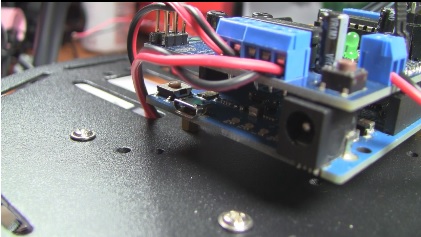
This video covers the installation of the Arduino IDE, driver for the Arduino Leonardo, Install sketch libraries for the robot, test the Arduino with a simple LED blinking program, and then test the motors and the line sensor to make sure they are working correctly.
Do you have thick or thin hair? Let’s find out using a laser to measure the width of your hair and a little knowledge about diffraction properties of light. (Since were using lasers, make sure you’re not pointing a laser at anyone, any animal, or at a reflective surface.)
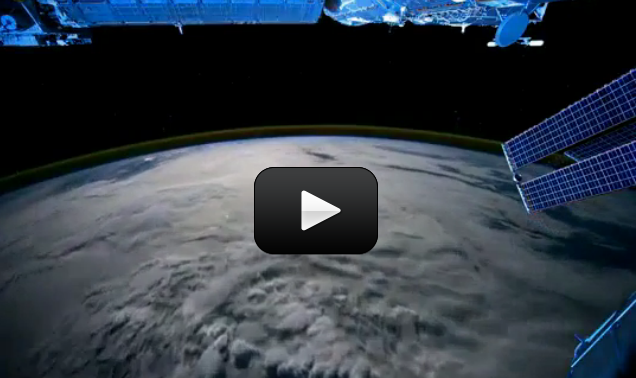
Many wonders are visible when flying over the Earth at night, especially if you are an astronaut on the International Space Station (ISS)! Passing below are white clouds, orange city lights, lightning flashes in thunderstorms, and dark blue seas. On the horizon is the golden haze of Earth’s thin atmosphere, frequently decorated by dancing auroras as the video progresses. The green parts of auroras typically remain below the space station, but the station flies right through the red and purple auroral peaks. You’ll also see solar panels of the ISS around the frame edges. The wave of approaching brightness at the end of each sequence is just the dawn of the sunlit half of Earth, a dawn that occurs every 90 minutes, as the ISS travels at 5 miles per second to keep from crashing into the earth.
Video Credit: Gateway to Astronaut Photography, NASA
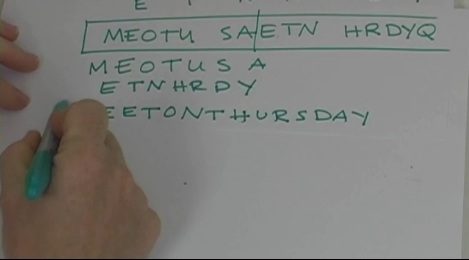
Cryptography is the writing and decoding of secret messages, called ciphers. Now for governments these secret ciphers are a matter of national security. They hire special cryptanalysts who work on these ciphers using cryptanalysis. The secret is, solving substitution ciphers can be pretty entertaining! Ciphers are published daily in newspapers everywhere. If you practice encoding and decoding ciphers, you too can become a really great cryptanalyst.
In this video, I’ll show you how to use the Rail Fence Cipher. Before you start, say this three times fast: cryptanalysts use cryptanalysis to crack ciphers!
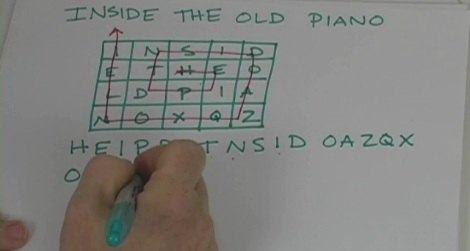
In this video, I demonstrate a Twisted Path Cipher. It uses a matrix and a path in order to encode your message. The shape of the path you create within the matrix of a Twisted Path Cipher determines how difficult it will be to break the code. Watch the video to learn exactly how it works.

Shift ciphers were used by Julius Caesar in Roman times. The key is a number which tells you how many letters you’ll shift the alphabet. These are fairly simple to encode and decode. However, you have to be extra careful when encoding because mistakes can throw off the decoding process. Watch the video to see why it’s important to double check your work!

The Date Shift cipher is a much harder code to break than, for example, the more simple Shift cipher. This is because the shift number varies from letter to letter, and also because it’s polyalphabetic (this means that a single number can represent multiple letters). I’ll explain it all in the video.
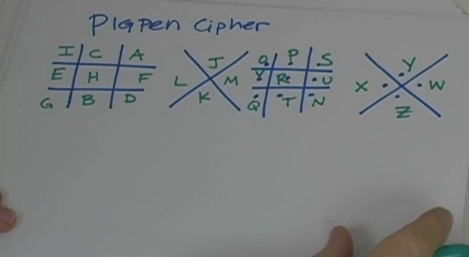
The Pig Pen cipher is of the most historically popular ciphers. It was used by Freemasons a century ago and also by Confederate soldiers during the Civil War. Since it’s so popular, it’s not a very good choice for top secret messages. Lots of people know how to use this one! It starts with shapes: tic-tac-toe grids and X shapes. I really like it because coded messages look like they’re written an entirely different language! Watch the video to learn how it works.
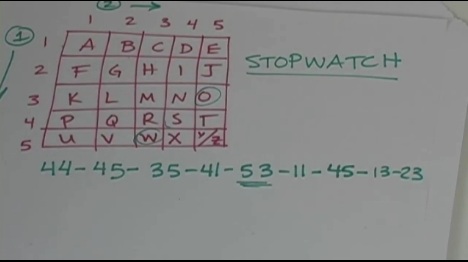
Polybius was an ancient Greek who first figured out a way to substitute different two-digit numbers for each letter. In the Polybius cipher we’ll use a 5×5 square grid with the columns and rows numbered. Take a look at the video and I’ll show you how it works.
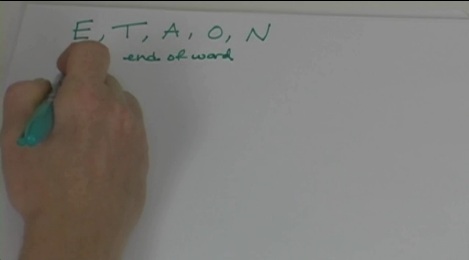
Cryptograms are solved by making good guesses and testing them to see if the results make sense. Through a process of trial and error, you can usually figure out the answer. Knowing some facts about the English language can help you to solve a simple substitution cipher. For example, did you know that an E is the most commonly-used letter in the English alphabet? It’s also the most commonly-used letter to end a word. Watch the video below to learn some more tips and tricks to get you on the right track to being an expert cryptogram solver!
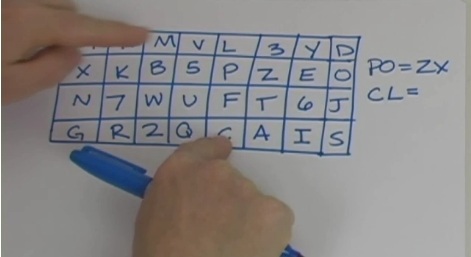
This is a super hard cipher to break. It’s encoded by taking pairs of letters and numbers from a matrix. There are three rules to follow.
Play Fair sounds really complicated, but that also makes it a tough code to crack! Watch the video and I’ll explain it all for you.
 How many of these items do you already have? We’ve tried to keep it simple for you by making the majority of the items things most people have within reach (both physically and budget-wise).
You do not need to do ALL the experiments – just pick the ones you want to do! Look over the experiments and note which items are needed, and off you go!
Click here to print this page.
• aluminum foil
• ball, 12″ in diameter (a beach ball works well)
• balloons (4)
• black paper (like construction paper) or cardboard
• bowl
• cardboard
• CD case, old and empty (the clear, plastic kind)
• CDs (old ones, about 4)
• chalk
• clay
• flashlight
• glass jar (like a clean, empty jam jar)
• glitter or confetti
• golf ball or ping pong ball
• index cards (any size)
• magnet (any size, but the stronger you have the better it will work to detect meteorites)
• magnifying lenses, handheld (2)
• marble, shooter-size (big)
• marbles, 3 regular-size
• measuring tape (the longest one you have)
• metal ball (like a ball bearing) or a magnetic marble
• paper
• pencil
• pennies (10)
• peppercorns or similar size (3)
• protractor
• regular copy paper (any size)
• rocks (about ten the size of a quarter)
• sand or white sugar (1 tsp)
• sand paper
• saran wrap (or cut open a plastic shopping bag so it lays flat)
• scissors
• skewer or chopstick
• small bouncy balls (2 or 3)
• soda bottles, 2L clear plastic
• steel washer with a 3/8″ hole
• string
• tape
• tennis ball and/or basketball
• thumbtack
• vice grips or hacksaw
• wire coat hanger
• yardsticks or meter sticks (2)
If you have a Fun Fly Stick, then pull it out and watch the video below. If not, don’t worry – you can do most of these experiments with a charged balloon (one that you’ve rubbed on your hair). Let’ play with a more static electricity experiments, including making things move, roll, spin, chime, light up, wiggle and more using static electricity!
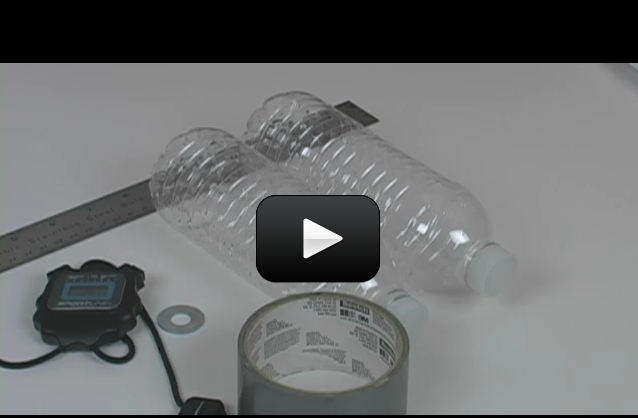
Rene Descartes (1596-1650) was a French scientist and mathematician who used this same experiment show people about buoyancy. By squeezing the bottle, the test tube (diver) sinks and when released, the test tube surfaces. You can add hooks, rocks, and more to your set up to make this into a buoyancy game!
Please login or register to read the rest of this content.
A ferrofluid becomes strongly magnetized when placed in a magnetic field. This liquid is made up of very tiny (10 nanometers or less) particles coated with anti-clumping surfactants and then mixed with water (or solvents). These particles don’t “settle out” but rather remain suspended in the fluid.
The particles themselves are made up of either magnetite, hematite or iron-type substance.
Ferrofluids don’t stay magnetized when you remove the magnetic field, which makes them “super-paramagnets” rather than ferromagnets. Ferrofluids also lose their magnetic properties at and above their Curie temperature points.
Ferrofluids are what scientists call “colloidal suspensions”, which means that the substance has properties of both solid metal and liquid water (or oil), and it can change phase easily between the two. (We as show you this in the video below.) Because ferrofluids can change phases when a magnetic field is applied, you’ll find ferrofluids used as seals, lubricants, and many other engineering-related uses.
Here’s a video on toner cartridges and how to make your own homemade ferrofluid. It’s a bit longer than our usual video, but we thought you’d enjoy the extra content.
You’d be surprised at where vitamin C pops up in your kitchen – I know I was! I found it in my broccoli, butternut squash, sweet potatoes, swiss chard, spinach, carrots, kale, peas, leeks, tomatoes, guava, watermelon, grapefruit, pecans, raspberries, bell peppers, onion, papaya, pineapple, and pistachios!
Vitamin C is essential for humans and some animals (mostly primates), protecting the body from oxidative stress (involved in many diseases) and helping heal wounds. When humans don’t get enough vitamin C, they get sick with scurvy (bleeding from all mucus membranes, brown spots on the skin…), which is actually how scientists discovered vitamin C in the first place.
Plants and most animals actually make their own vitamin C by converting glucose (sugar).
Latest research (2008) discovered that the red blood cells in humans and primates more efficiently use vitamin C already in the body by recycling DHA. The neat part about t his discovery is that only humans and some primates have this ability – plants and most other animals do not.
Let’s find out how much of this vitamin is already in your home – are you ready?
There are two videos to watch – the first shows you how to make your own homemade indicator, and the second shows you how to use it.
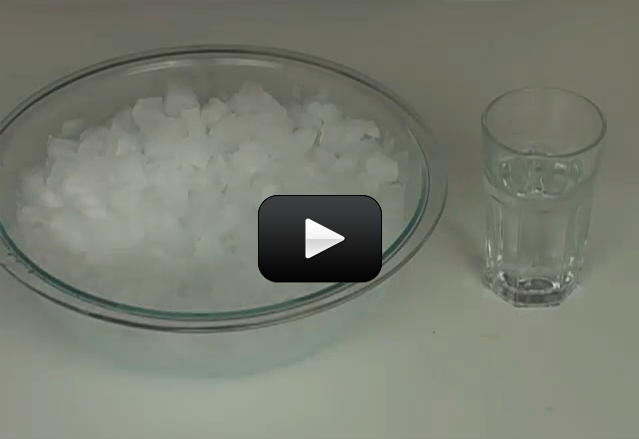
Supercooling a liquid is a really neat way of keeping the liquid a liquid below the freezing temperature. Normally, when you decrease the temperature of water below 32oF, it turns into ice. But if you do it gently and slowly enough, it will stay a liquid, albeit a really cold one!
In nature, you’ll find supercooled water drops in freezing rain and also inside cumulus clouds. Pilots that fly through these clouds need to pay careful attention, as ice can instantly form on the instrument ports causing the instruments to fail. More dangerous is when it forms on the wings, changing the shape of the wing and causing the wing to stop producing lift. Most planes have de-icing capabilities, but the pilot still needs to turn it on.
We’re going to supercool water, and then disturb it to watch the crystals grow right before our eyes! While we’re only going to supercool it a couple of degrees, scientists can actually supercool water to below -43oF!

Did you know that supercooled liquids need to heat up in order to freeze into a solid? It’s totally backwards, I know…but it’s true! Here’s the deal:
A supercooled liquid is a liquid that you slowly and carefully bring down the temperature below the normal freezing point and still have it be a liquid. We did this in our Instant Ice experiment.
Since the temperature is now below the freezing point, if you disturb the solution, it will need to heat up in order to go back up to the freezing point in order to turn into a solid.
When this happens, the solution gives off heat as it freezes. So instead of cold ice, you have hot ice. Weird, isn’t it?
Sodium acetate is a colorless salt used making rubber, dying clothing, and neutralizing sulfuric acid (the acid found in car batteries) spills. It’s also commonly available in heating packs, since the liquid-solid process is completely reversible – you can melt the solid back into a liquid and do this experiment over and over again!
The crystals melt at 136oF (58oC), so you can pop this in a saucepan of boiling water (wrap it in a towel first so you don’t melt the bag) for about 10 minutes to liquify the crystals.
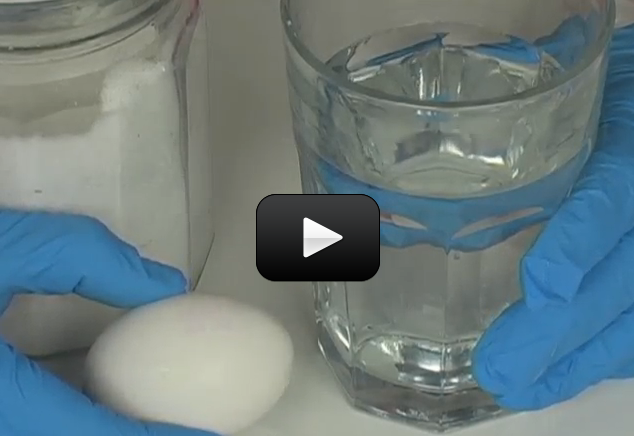
Did you know that most people can’t crack an egg with only one hand without whacking it on something? The shell of an egg is quite strong! Try this over a sink and see if you can figure out the secret to cracking an egg in the palm of your hand…(Hint: the answer is below the video – check it out after you’ve tried it first!)
How can you tell if an egg is cooked or raw? Simply spin it on the counter and you’ll get a quick physics lesson in inertia…although you might not know it. A raw egg is all sloshy inside, and will spin slow and wobbly. A cooked egg is all one solid chunk, so it spins quickly. Remember the Chicken and the Clam experiment?

If you soak chicken bones in acetic acid (distilled vinegar), you’ll get rubbery bones that are soft and pliable as the vinegar reacts with the calcium in the bones. This happens with older folks when they lose more calcium than they can replace in their bones, and the bones become brittle and easier to break. Scientists have discovered calcium is replaced more quickly in bodies that exercise and eating calcium rich foods, like green vegetables.
This is actually two experiments in one – here’s what you need to do:
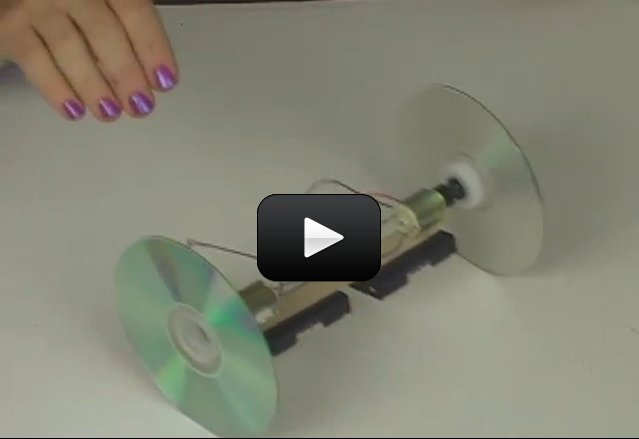
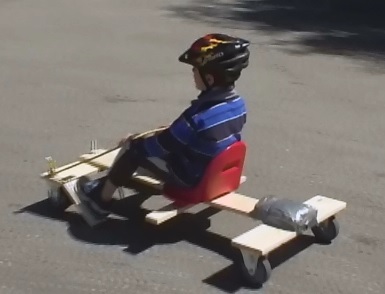
If you’ve ever ridden a two-wheel bicycle, you know that you have to not only pedal to move forward, but also balance in order to stay upright while you move.
Two wheeler robots are difficult to make because they need to balance in addition to carry out commands. The balance is done autonomously, meaning that the robot must be programmed to figure out how to balance itself.
We’re going to skip this complicated step and instead use gravity to balance for us. While this makes the robot a lot smaller, it’s also a lot quicker and easier to build than the model in this image. Are you ready?
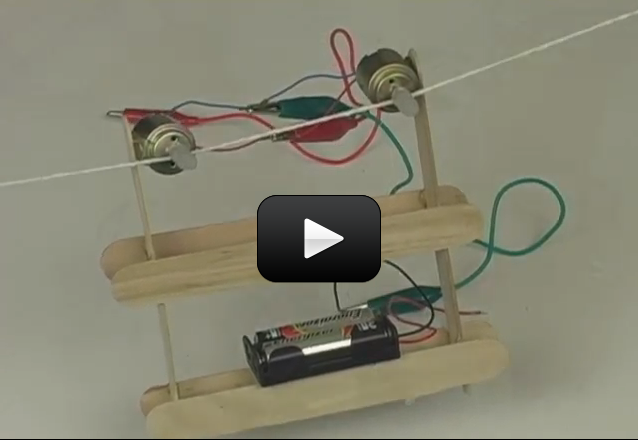
A cable car transports people or things in a vehicle that uses a strong cable to pull at a steady speed. Also called aerial lift, aerial tramway, or gondola, these are different from the cable cars associated with San Francisco, which use buried cables to move the car up steep streets.
The world’s longest working cable car is in Sweden and covers 26 miles. Sweden used to operate a 60-mile cable car, but only a 8.2 miles (13.2 km) of it still works today, however this section is the longest passenger cable car in operation currently.
We’re going to make a durable cable car that can travel as long as you have string for it to move along! It’s really a cool and simple project, and you can add cups or berry baskets below to transport cargo. Here’s what you need to do:

Have you ever tried washing dishes without soap? It doesn’t work well, especially if there’s a lot of grease, fat, or oil on the dish!
The oils and fats are slippery and repel water, which makes them a great choice for lubration of bearing and wheels, but lousy for cleaning up after dinner.
So what’s inside soap that makes it clean off the dish? The soap molecule looks a lot like a snake, with a head and a tail. The long tail loves oil (hydrophobic) and the head loves water (hydrophilic). The hydrophilic end dissolves in water and the hydrophobic end wraps itself around fat and oil in the dirty water, cleaning it off your dishes.
Let’s do an experiment that will really make you appreciate soap and fat:
Being able to predict tomorrow's weather is one of the most challenging and frequently requested bits of information to provide. Do you need a coat tomorrow? Will soccer practice be canceled? Will the crops freeze tonight?
Scientists use different instruments to record the current weather conditions, like temperature, barometric pressure, wind speed, humidity, etc. The real work comes in when they spend time looking over their data over days, months, even years and search for patterns.
But where does the weather station get its weather from?
One of the greatest leaps in meteorology was using numbers to predict the flow of the atmosphere. The math equations needed for these (using fluid dynamics and thermodynamics) are enough to make even a graduate student quiver with fear. Even today's most powerful computers cannot solve these complex equations! The best they can do is make a guess at the solution and then adjust it until it fits well enough in a given range. How do the computers know what to guess?
Several weather stations around the world work together to report the current weather every hour. These stations can be land-based, mounted on buoys in the ocean, or launched on radiosondes and report back to a home station as they rise through the different layers of the atmosphere. Pilots will also give weather reports en route to their destination, which get recorded and added to the database of weather knowledge.
We're going to build our own homemade weather station and start keeping track of weather right in your own home town. By keeping a written record (even if it's just pen marks on the wall), you'll be able to see how the weather changes and even predict what it will do, once you get the hang of the pattern in your local area. For example, if you live in Florida, what happens to the pressure before the daily afternoon thunderstorm? Or if you live in the deserts of Arizona, what does a sudden increase in humidity tell you?
Please login or register to read the rest of this content.

