Although you can’t see electricity, you can certainly detect its effects – a buzzer sounding, a light flashing, a motor turning… all of these happen because of electricity. Which is why electricity experiments are among the most frustrating. You can’t always tell where the problem is in a circuit that refuses to work right.
We’re going to outline the different electronic components (resistors, capacitors, diodes, transistors, etc) so you get a better feel for how to use them in a circuit. While we’re not going to spend time on why each of these parts work (which is a topic best reserved for college courses), we are going to tackle how to use them to get your circuit to do what you want. The steps to building several different electronics projects are outlined very carefully so you can really understand this incredible micro-world.
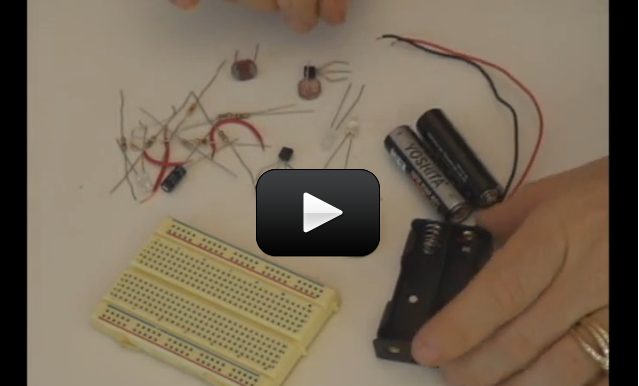
In this video, you’ll learn how to identify each electronic component. You’ll also learn how to use a breadboard to quickly build circuits that can be easily changed. Plus, you’ll learn how to make sure you don’t damage your components.
Before you use a breadboard, you need to know how the “holes” in it connect to each other. Once you get this, they’re easy to use, but until you understand their secret, they can be totally confusing. Be sure to pay attention to this part, and it will make things a lot easier. Once you have this down, you’ll wire up a few simple circuits on the breadboard just to try out your new knowledge.
Which part is which? Click here to access a reference sheet so you can tell which resistor is which.
The purpose of this video is to help you identify different kinds of parts. No specific materials are needed for this video.
Can you attach the materials list above the video so we can be able to tell what we need before watching the video?
Information on the individual parts and on the kit from FutureVision Research is available here: https://www.sciencelearningspace2.com/2010/02/shopping-list-for-unit-14/
where do I get the stuff for this Breadboard?
The best way is to use two jumper wires and insert them into the JP2411-2P plug. As shown in this picture: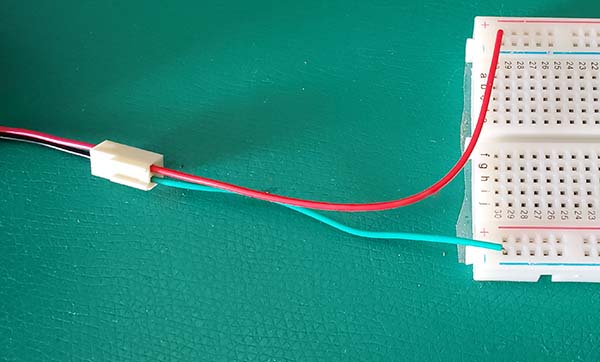
We ordered the kit from future vision. How do we connect the battery to the breadboard. It comes with a 9V Battery Snap with JP2411-2P Connector. It does not look like what is in the video. Thank you.
My team will connect with you right away!
can I plz have access to the unit
THANKS!
THANK YOU!
Look at the shopping list for Unit 14, and you’ll find direct order links and part numbers for everything.
I have no idea where I can get the stuff we will need I have a flashlight with a beam on it that’s it
PLEASE HELP!
Thanks Chloe
Did you have a particular question that I can answer about surface mount resistors?
Hi Aurora,
I was wondering if you are going to be teaching us anything about surface mount resistors?
Thanks!
-Ethan
It’s a special board that has wires built in so you can do your electronics experiments on it. Watch the video and you’ll see how it is used.
Look at the shopping list for Unit 14 and you’ll see a link – click on it and you can order it to be shipped directly to you, or just look at the picture so you know what to get at Radio Shack.
and what it it?
where can you get a bread board?
Yes, the first video teaches you which thing is what, and even tells you how to identify each resistor using the color bands. Be sure to watch the videos in order, as they go from easiest to hardest projects and build on each other. I’d recommend leaving them in the bags until you need them, as often the bags have labels right on them.
Here’s a quick reference sheet you can use. Also, at the start of each video, I tell you which resistor you’re going to use when (by numerical value and colors) so you should be just fine. If you have any questions, though, just ask! I know you’re kids are going to love these projects… they are some of my favorites!
Aurora
Aurora,
There are many tiny parts on this list, and with our untrained eye, we are going to get some of these things mixed up once they are out of the bags. Do you have a recommendation on how to store these tiny parts, and is there a code to identify one resistor from another?
Thanks,
Micki