 What happens when you shine a laser beam onto a spinning mirror? In the Laser Maze experiment, the mirrors stayed put. What happens if you took one of those mirrors and moved it really fast?
It turns out that a slightly off-set spinning mirror will make the laser dot on the wall spin in a circle. Or ellipse. Or oval. And the more mirrors you add, the more spiro-graph-looking your projected laser dot gets.
Why does it work? This experiment works because of imperfections: the mirrors are mounted off-center, the motors wobble, the shafts do not spin true, and a hundred other reasons why our mechanics and optics are not dead-on straight. And that’s exactly what we want – the wobbling mirrors and shaky motors make the pretty pictures on the wall! If everything were absolutely perfectly aligned, all you would see is a dot.
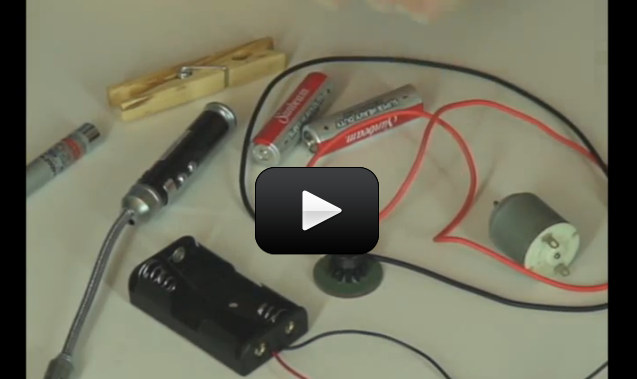
Here’s how to do this experiment:
Please login or register to read the rest of this content.
Please login or register to read the rest of this content.
No, only the direction, and that’s only if you connect them the way as shown in the video. The potentiometer controls the speed, so you use both the pot and the DPDT together.
Does the ‘DPDT with center off’ switch control the direction as well as the speed of the motors? A few years ago when we made the advanced laser light show, I remember we had at least two controls, one to change the direction of the motor, and one to adjust the speed of the motor. Does the DPDT do both? Does it also act as the on/off switch, or do we need that as well?
Thank you!
You want to email us things like this personally so we can get it working for you. I’ll have my team get back to you right away.
I can’t get the second video to work either and I have a subscription that includes grades 9-12.
The e-Science online learning program has two different levels: K-8 and K-12. The higher level is appropriate for advanced 5-8th graders as well, as it includes textbook downloads and more involved projects than you’ll find in the K-8 section. Any projects/activities which involve flames, power tools, chemicals, soldering, or are just harder to do skill-wise are in this section (the underwater ROV robot, BEAM robots, electronics, advanced chemistry experiments, laser light show (which has soldering and power tools) etc.) all fall into this category. You can see the difference in the access levels when you find an experiment that says “This experiment is for grades 9-12.” as you won’t be able to access the content or watch the accompanying video with the K-8 access. You can always request an upgrade/downgrade at any time – just send us a request.
is the advanced one relly so advanced that it has to be in the 9-12??????
Find the DPDT switch with a center off at Radio Shack: 275-1533.
Where can you buy the on off switch
The videos and experiments (or in this case, part of the experiment) that are marked “for grades 9-12” will play for members that have the advanced K-12 enrollment to e-Science. Sorry for the confusion!
We can’t get the second video (the one for grades 9-12) to play. All the others work fine.