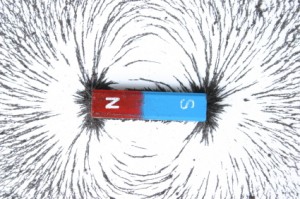
The electromagnetic field is a bit strange. It is caused by either a magnetic field or an electric field moving. If a magnetic field moves, it creates an electric field. If an electric field moves, it creates a magnetic field.
[am4show have=’p8;p9;p11;p38;p92;’ guest_error=’Guest error message’ user_error=’User error message’ ]
A moving electric field creates a moving magnetic field, which creates a moving electric field, which creates a moving magnetic field and on and on. Pretty strange huh? So an electromagnetic field is both an electric field and a magnetic field all rolled into one. Light, radio waves, and microwaves are examples of electromagnetic waves created by moving self-creating electronic and magnetic fields.
Until 1820, magnetic fields and electric fields were thought of as two completely separate things. A fellow by the name of Hans Christian Ørsted was preparing for a lecture when he noticed that a compass needle jumped when he flipped a switch that caused electricity to flow through some wires. This chance observation caused him to investigate further and discover that electric fields create magnetic fields and vice-versa.
Thus, through a completely random observation, electromagnetism was discovered. Without that discovery we wouldn’t have electric engines, radios, cell phones, television or Filbert the Flounder electric toothbrushes! Hooray for Ørsted!
A Summary of Force Fields and Objects
Type of Force Field | Objects That Create Force | Objects Are Affected By Force | Force Field Can Attract and Repel |
Gravitational | Any object | Any object | Only attract |
Magnetic | Moving Electrons | A metal that can be magnetic | Attract and repel |
Electric | An electrically charged body | Any body | Attract and repel |
Electromagnetic | A moving magnetic field or a moving electric field | A magnetic or electric field | Attract and repel |
The rest of this experiment (below) is for advanced students: (Hint: you need to have access to upper level content.)
[/am4show][am4show have=’p9;p38;p90;p44;’ guest_error=’Guest error message’ user_error=’User error message’ ]
Measuring the Earth’s Magnetic Pulse
When you stare at a compass, the needle that indicates the magnetic field from the Earth appears to stand still, but we’re going to find how it fluctuates and moves by creating a super-sensitive instrument using everyday materials (for comparison, you would spend over $100 for a scientific instrument that does the same thing).
Today you get to learn how to amplify tiny pulses in the Earth’s magnetic field using a laser and a couple of magnets. It’s a very cool experiment, but it does take patience to make it work right.
Materials
- Index card or scrap of cardboard
- 2 small mirrors
- 2 rare earth magnets
- Nylon filament (thin nylon thread works, too)
- 4 doughnut magnets
- Laser pointer (any kind will work – even the cheap key-chain type)
- Clean glass jar (pickle, jam, mayo, etc… any kind of jar that’s heavy so it won’t knock over easily)
- Wooden spring-type clothespin
- Hot glue gun, scissors and tape
Download Student Worksheet & Exercises
- Sandwich the twine between the two rare earth magnets. These are the stronger magnets.
- Use a tiny dab of glue on one of the magnets and attach a mirror to the magnet. Do this on the other side for the second magnet and mirror.
- Lower the mirror-magnets into the container, leaving it hanging an inch above the bottom of the jar. Cut the twine at the mouth level of the container.
- Glue the top of the twine to the bottom of the lid, right in the center.
- When the glue has dried, place your mirror-magnets inside the jar and close the lid. Make sure that the mirror-magnets don’t touch the side of the jar, and are free to rotate and move.
- You’ve just built a compass! The small magnets will align with the Earth’s magnetic field. Slowly rotate the jar, and watch to see that the mirror-magnets inside always stay in the same configuration, just like the needle of a standard compass.
- Set your new compass aside and don’t touch it. You want the mirror-magnets to settle down and get very still.
- You are going to build the magnet array now. Stack your four doughnut magnets together in a tall stack.
- Fold your index card in half, and then open it back up. On one side of the crease you’re going to glue your magnets. When the magnets are attached, you’ll fold the card over so that it sits on the table like a greeting card with the magnets facing your glass jar.
- Tape your index card down to the table as you build your magnet array. (Otherwise the paper will jump up mid-way through and ruin your gluing while you are working.)
- Place a strip of glue on the bottom magnet of your stack and press it down onto the paper, gluing it into place.
- Lift the stack off (the bottom magnet should stay put on the paper) and place glue on the bottom magnet. Glue this one next to the first.
- Continue with the array so you have a rectangle (or square) arrangements of magnets with their poles oriented the same way. Don’t flip the magnets as you glue them, or you’ll have to start over to make sure they are lined up right.
Since we live in a gigantic magnetic field that is 10,000 times more powerful than what the instrument is designed to measure, we have to “zero out” the instrument. It’s like using the “tare” or “zero” function on a scale. When you put a box on a scale and push “zero”, then the scale reads zero so it only measures what you put in the box, not including the weight of the box, because it’s subtracting the weight of the box out of the measurement. That’s what we’re going to do with our instrument: we need to subtract out the Earth’s magnetic field so we just get the tiny fluctuations in the field. - Place your instrument away from anything that might affect it, like magnets or anything made from metal.
- Fold the card back in half and stand it on the table. We’re normally going to keep the array away from the jar, or the magnet array will influence the mirror-magnets just like bringing a magnet close to a compass does. But to zero out our instrument, we need to figure out how far away the array needs to be in order to cancel out the Earth’s field.
- Bring the array close to your jar. You should see the mirror-magnets align with the array.
- Slowly pull the magnet array away from the compass to a point where if it were any closer, the mirror-magnets would start to follow it, but any further away and nothing happens. It’s about 12 inches away. Measure this for your experiment and write it on your array or jar so you can quickly realign if needed in the future.
- Insert your laser pointer into the clothespin so that the jaws push the button and keep the laser on. Place it at least the same distance away as the array. You might have to prop the laser up on something to get the height just right so you can aim the laser so that it hits the mirror inside. (Note that you’ll have a reflection from the glass as well, but it won’t be nearly as bright.)
- Find where the laser beam is reflected off the mirror and hits the wall in your room. Walk over and tape a sheet of paper so that the dot is in the middle of the paper. Use a pen and draw right on top of the dot, and mark it with today’s date.
- Do you notice if it moves or it is stays put? Sometimes the dot will move over time, and other times the dot will wiggle and move back and forth. The wiggles will last a couple of seconds to a couple of minutes, and those are the oscillations and fluctuations you are looking for!
- Tape a ruler next to the dot so you can measure the amount of motion that the dot makes. Does it move a lot or a little when it wiggles? Two inches or six?
What’s Going On?
The reason this project works is because of tiny magnetic disturbances caused by the ripples in the ionosphere. Although these disturbances happen all the time and on a very small scale (usually only 1/10,000th of the Earth’s magnetism strength), we’ll be able to pick them up using this incredibly simple project. Your reflected laser beam acts like an amplifier and picks up the movement from the magnet in the glass.
Construction tip for experiment:
You need to use a filament that doesn’t care how hot or humid it is outside, so using one of the hairs from your head definitely won’t work. Cotton tends to be too stretchy as well. Professionals use fine quartz fibers (which are amazingly strong and really don’t care about temperature or humidity). Try extracting a single filament from a multi-stranded nylon twine length about 30″ long. If you happen to have a fine selection of nylon twine handy, grab the one that is about 25 microns (0.01″) thick. Otherwise, just get the thinnest one you can find.
You can tape a wooden clothespin down to the table and insert your laser pointer inside – the jaws will push the button of the laser down so you can watch your instrument and take your measurements. When you’re ready, tape a sheet of paper to the wall where your reflected beam (reflected from the mirror, not the glass… there will be two reflected beams!) hits the wall and mark where it hits. Over periods of seconds to minutes, you’ll see deflections and oscillations (wiggles back and forth) – you are taking the Earth’s magnetic pulse!
In order for this experiment to work properly, ALL magnets (including the penny described below) need to be in the same plane. That is, they all need to be the same height from the ground. You can, of course, rotate the entire setup 90 degrees to investigate the magnetic ripples in the other planes as well!
To make this instrument even more sensitive, glue a copper penny (make sure it’s minted before 1982, or you’ll get an alloy, not copper, penny) to the glass jar just behind the magnets (opposite the laser). When your magnets move now, they will induce eddy currents in the penny that will induce a (small) magnetic field opposite of the rotation of the magnets to dampen out “noise” oscillation. In short, add a penny to the glass to make your instrument easier to read.
Also, note that big, powerful magnets will not respond quickly, so you need a lightweight, powerful magnet.
You can walk around with your new instrument and you’ll find that it’s as accurate as a compass and will indicate north. You probably won’t see much oscillation as you do this. Because the Earth has a large magnetic field, you have to “tare” the instrument (set it to “zero”) so it can show you the smaller stuff. Use the doughnut magnets about 30 centimeters away as shown in the video.
Exercises
- Does the instrument work without the magnet array?
- Why did we use the stronger magnets inside the instrument?
- Which planet would this instrument probably not work on?
Advanced Students: Download your Electromagnetic Field Lab here.
[/am4show]