Make sure you've completed the How to Use a Microscope and also the Wet Mount and Staining activities before you start here!

If you tried looking at animal cells already, you know that they wiggle and squirm all over the place. And if you tried looking when using the staining technique, you know it only makes things worse.

The heat fix technique is the one you want to use to nail your specimen to the slide and also stain it to bring out the cell structure and nuclei. This is the way scientists can look at things like bacteria.

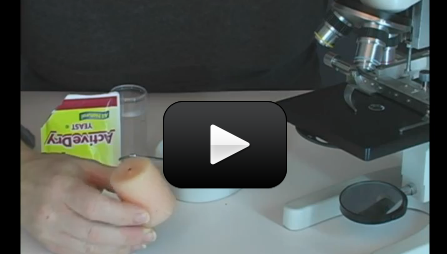
You're going to need your microscope, slides, cover slips, eyedropper, toothpicks or tweezers, candle and matches (with adult help), stain (you can use regular iodine or Lugol's Stain), sugar, yeast, and a container to mix your specimen in. Here's what you do:

[am4show have='p8;p9;p11;p38;p92;p26;p53;p74;p86;p87;' guest_error='Guest error message' user_error='User error message' ]


Download Student Worksheet & Exercises

1. Fill your container with warm water.  Add about a tablespoon of yeast (one packet is enough) along with a teaspoon of sugar.  The warm water activates the yeast and the sugar feeds it.  You should see a foam top form in about 10 minutes.

2. Using your eyedropper, grab a bit of your sample (you want the liquid, not the foam) and place a drop on a fresh slide. Spread the drop out with a toothpick.  You want to smear it into a thin layer.

3. Light the candle (with adult help). Heat the slide in the flame by gently waving it back and forth. Don't stop it in the flame, or you'll get black soot on the underside of the slide and possibly crack it because the glass heats up and expands too fast. You also don't want to cook the yeast, as it will destroy what you want to look at. Just wave it around to evaporate the water.

4. Add a drop of iodine (or stain) to the slide. Wait 15 seconds.

5. Rinse it under water. (You can optionally stain it again if you find it's particularly difficult to see your specimen, but make sure to look at it first before repeat staining.)

6. Place a drop of water (use a clean eyedropper) on the specimen and add the cover slip.

7. Lower the stage to the lowest setting and rotate the nose piece to the lowest magnification power.

8. Place the slide on the stage in your clips.

9. Focus by looking through the eyepiece and slowly turning the coarse adjustment knob. When you're close to focus, switch to the fine adjustment knob until it pops into sharp view.

10. Adjust the light level to get the greatest contrast so you can see better.

11. Move the slide around (this is where a mechanical stage is wonderful to have) until you spot something interesting. Place it in the center of your field of view, and switch magnification power to find a great view (not too close, not to far away). Adjust your focus as needed.

12. Open your science notebook and draw a circle. Sketch what you see (don't forget the title and mag power!)

NOTE: What other things can you look at?  You can scrape the inside of your cheek with a toothpick and smear it on a fresh slide, take a mold sample from last week's leftovers in the fridge, or...? Have fun!

Exercises

  1. Why do we use heat fixes?
  2. Briefly describe how to do a heat fix.
  3. What is a specimen that needs a heat fix?

[/am4show]


Have a question ?

Tell us what you're thinking...

Comments

One Response to “Slide Preparation: Heat Fixes”

  1. I think I killed the yeast when I used fire. I see nothing moving. It still looks beautiful, though.