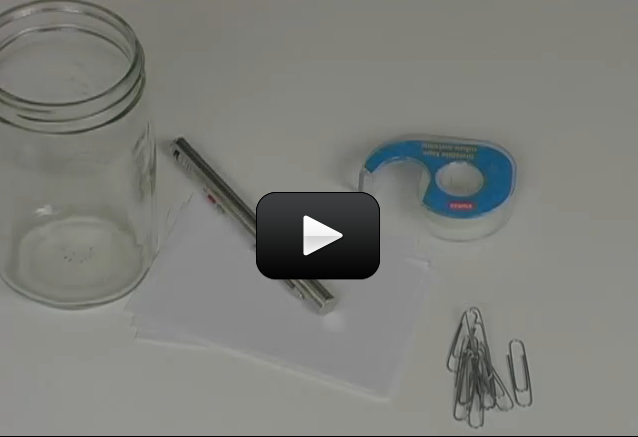
This simple activity has surprising results! We’re going to bend light using plain water. Light bends when it travels from one medium to another, like going from air to a window, or from a window to water. Each time it travels to a new medium, it bends, or refracts. When light refracts, it changes speed and wavelength, which means it also changes direction.


[am4show have=’p8;p9;p19;p46;p89;p99;’ guest_error=’Guest error message’ user_error=’User error message’ ]


Materials:


  • Red and green laser
  • Paperclip
  • Index card
  • Tape
  • Rubber band
  • Water glass


  1. Open the paperclip into an “L” shape, and tape it to an index card so the card stands up. This is your projection screen.
  2. Use the rubber band to attach the laser pointers together. You’ll want them very close and parallel to each other. Place the rubber band close to the ON button so the laser will stay on when you put the rubber band over it.
  3. Place the laser pointers on a stack of books and put switch them on with the rubber band.
  4. Shine the lasers through the middle of an empty glass jar and onto the screen.
  5. Put a mark where the red and green laser dots are on the screen.
  6. With the lasers still on, slowly fill the container with water. What happened to the dots?
  7. You can add a couple of drops of milk or a tiny sprinkling of cornstarch to the water to see the beams in the water.

Here’s a quick activity you can do if the idea of refraction is new to you… Take a perfectly healthy pencil and place it in a clear glass of water.  Did you notice how your pencil is suddenly broken? What happened? Is it defective? Optical illusion?  Can you move your head around the glass in all directions and find the spot where the pencil gets fixed? Where do you need to look to see it broken?


When light travels from water to air, it bends. The amount it bends is measured by scientists and called the index of refraction, and it depends on the optical density of the material. The more dense the water, the slower the light moves, and the greater the light gets bent. What do you think will happen if you use cooking oil instead of water?


So the idea is that light can change speeds, and  depending on if the light is going from a lighter to an optically denser material (or vice versa), it will bend different amounts.  Glass is optically denser than water, which is denser than air. Here’s a couple of values for you to think about:


Vacuum 1.0000
Air 1.0003
Ice 1.3100
Water 1.3333
Pyrex 1.4740
Cooking Oil 1.4740
Diamond 2.4170


This means if you place a Pyrex container inside a beaker of vegetable oil, it will disappear, because it’s got the same index of refraction! This also works for some mineral oils and Karo syrup. Note however that the optical densities of liquids vary with temperature and concentration, and manufacturers are not perfectly consistent when they whip up a batch of this stuff, so some adjustments are needed.


Questions to Ask


1. Is there a viewing angle that makes the pencil whole?


2. Can we see light waves?


3. Why did the green and red laser dots move?


4. What happens if you use an optically denser material, like oil?
[/am4show]


Have a question ?

Tell us what you're thinking...

Comments

3 Responses to “Refraction using Lasers and Water”

  1. jesuiscele says:

    It absolutely does! Thanks a lot!!

  2. Thank you for your request. We provide over 700 worksheets for the kids, and I totally understand how it helps students stay organized. We do also want to encourage kids create their own data tables and lab worksheets – we spend time each month during the live classes outlining exactly how to do this just like a real scientist. The key here is to use the worksheets as a training tool, but not to always rely on other people giving you worksheets to fill out.

    The purpose of the worksheet is to organize your thoughts around your experiment. The purpose of doing experiments is to answer questions that you have about something you are curious about.

    This means that after a bit, we want your kids to learn how to ask better questions and start to design experiments around those questions, and then be able to take data and figure out a result – an answer to that question. That way, the worksheets are about what your student is interested in and learning about. Does that make sense?

    The experiments we provide you with in the instructional videos are just the first step, we want the students to do above and beyond what we’re showing with their ideas and their curious questions. At first, it’s fine to just follow the video and fill out the worksheet. Eventually we want kids confident enough in their own skills and curious about the world around them to use the framework structure we’ve had them practice with the worksheets and videos and start their own investigations, asking us for help along the way if they need it. We demonstrate how to do this during our live classes quite a bit.

    I hope this perspective about how we teach science is helpful!

  3. jesuiscele says:

    Hi Aurora! I’ve noticed you don’t have a worksheet for this experiment. Could you be able to make one? It really helps my kids to organize their experiment. Thanks a lot!