In this experiment you’ll learn how to use the one of the Learning Lab’s push button swtiches to turn on the buzzer, then we’ll add in the DPDT (Double Throw Double Pole) switch to see how two switches can be used to control the buzzer.
Please login or register to read the rest of this content.
Oh ok thanks, i tried testing it, and i think i have a normally open version.
A pushbutton switch connects two electrical connections so electricity can flow. This video shows an example of a “normally open momentary” pushbutton. “Open” means no electricity is flowing. When you push the button, the switch is circuit is “closed” which allows electricity to flow.
I know this is advanced, but me and my mom didn’t know how much content was in advanced, so sorry about that. I just wanted to ask, can you give a quick overview of this button because I want to use it, or even tell me where to find one that I have access too.
Thank you for explaining that in more depth. Now I truly understand why the videos didn’t make sense to me! I’m sad I won’t be able to make these circuits, but I can understand how the filming (etc.) of a lot of videos requires a lot of time. I will just watch some of these videos, then.
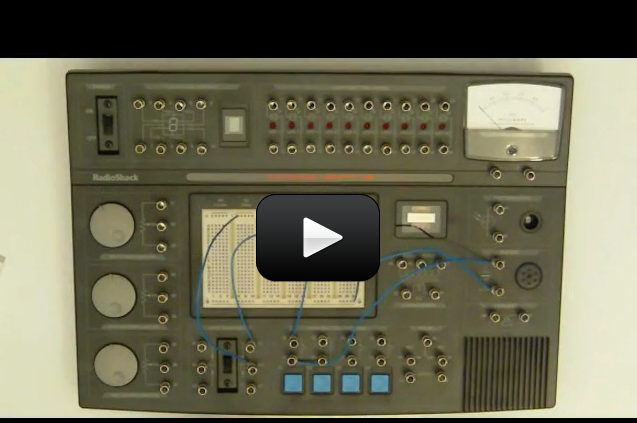
You’ve found our videos for the Electronic Learning Lab by Radio Shack. Unfortunately, since Radio Shack is no longer making these, it’s near-impossible to do these labs using these videos. We’re actually working on creating an entirely new set of videos for Modules 3 & 4 that use easy-to-get electronics components, like resistors, capacitors, and breadboard. These videos will be released next year, as we have about a hundred of these to re-make. I am sorry I don’t have better news… it is frustrating when a manufacturer discontinues their product!
I have seen unused Electronic Learning Lab by Radio Shack (don’t buy a used one – it will be missing many components you will need) on eBay, that’s the only suggestion I have at the moment if you want to do these right away.
If you really want to do these projects without the lab, you’ll need to get additional components that are built into the original Learning Lab board, like potentiometers, transformers, speakers, etc. It’s not as simple as it seems, which is why we’re making a new set of videos that will walk you through each step. I am sorry about this – and we’re working to fix it as quickly as we can, but this project is going to take us time to do the right way.
I am ready to do Module 3 now, but after I’ve watched this first video, I don’t see how I can do this circuit with my simple white bread board. You recommended in your response to “wire up each component separately”. How do I do this? (Note: Our subscription to your program is expiring in a couple of weeks so I need to be able to do Module 3 soon, please.)
Ok. Thanks for explaining that. I’ll look forward to the new videos.
Thanks for writing! There’s been an change in the materials, since Radio Shack is no longer in business, making it hard to find the Electronics Learning Lab that is needed for Modules 3 & 4. We’re currently looking into a suitable replacement (which also means shooting a new set of videos that will match the replacement).
For now, you can use the same white breadboard for Module 1 as for the gray one that is used in Modules 3 and 4 (it will be a different color, but it’s the same thing).
Also, the components in the Electronics Learning Lab are built into the console, so for now, you’ll just be wiring up each component separately. The resistors, switches, buzzers, potentiometers, etc. I am working on a video that will explain all of this and will post it as soon as its ready.
Hi, Mrs. Aurora!
I’m going to be starting Unit 14 soon and am looking ahead…
Question: I’m going to buy the breadboard listed, however, I noticed in Module 3 videos the instructor does not just have a breadboard, but a whole large thingy which the breadboard sits on top of.
I’m confused! Does the little white breadboard on Jameco’s website come with the large gray platform too?
Perhaps explaining why AC is used might help clear things up. The problem with DC is that over long distances it loses voltage and will, eventually, drop to 0 and this can be a real problem when sending power from a power
plant to a home that’s 25 miles away. AC helps resolved this issue by:
* First, when the positive phase charges the cable (or wire) a magnetic field is created around the cable.
* As the positive phase begins to transition to the negative phase, that magnetic field around the wire begins to collapse, and this reinforces the power traveling through the cable. The magnetic field continues to collapse
as the voltage on the cable (or wire) reaches zero.
* At this point the negative phase begins building up and so does another magnetic field, and the whole process repeats. In the U.S., this cycle is happening 60 times every second.
Almost every electronic product we use in our homes take the AC power signal and convert that inside to DC. However, most lamps can use the AC directly, and don’t need to convert the power signal to DC. However, this is not true, for LED lights, they use DC so they do convert the AC signal to DC.
I have had some difficulty understanding alternating current. For instance, if you hooked up ac to a circuit, would the leads alternate between positive and negative, thereby alternating current flow direction? Or would the leads remain the same polarity, but the current would flow in pulses? Can appliances such as lamps use ac directly, or must it be converted to dc first?
I am sorry it wasn’t clear… in the supply list for this unit, it says “Grades 9-12″… normally we do put this in the experiment but since there are 80+ videos in this section, we omitted this. I apologize for the confusion!
i am sorry, it doesn’t say 9 – 12 grade only, and that’s what i looked for to tell me, so i didn’t know. 🙂
You need to be a member of the upper level K-12 program to access these projects.
i can’t access any of the stuff in this section. how soon will it be released???