 As a kid, I absolutely loved Encyclopedia Brown and Sherlock Holmes. What I really loved most about them was the science behind how they caught the bad guy… and now I’m going to share with you the basics of crime scene investigation in this section on forensic science.
Forensic science is a lot like engineering… it’s a place where you get to use stuff you’ve learned in other fields and apply it to the real world. With forensics, you get to use biology when you identify blood, DNA and diatoms; chemistry when you’re identifying unknown powders and poisons; physics when you’re looking at shattered glass, bullets, and explosions; and earth science with you’re looking at soil evidence.
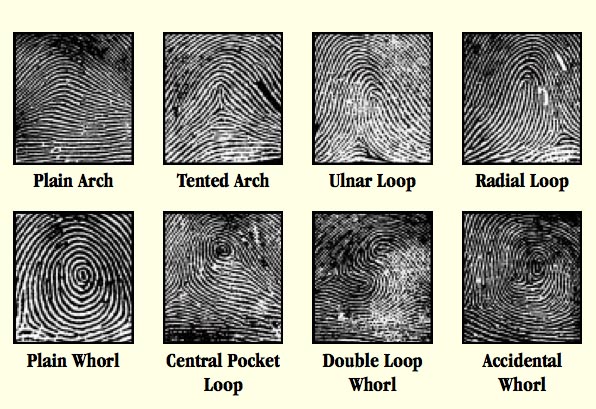
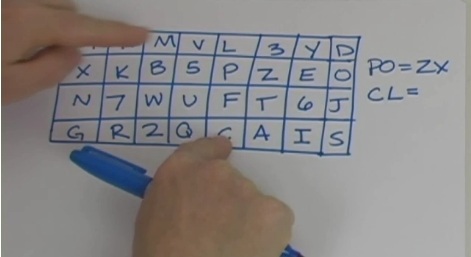
The basic principle that forensics is based on is that someone either brought something to the crime scene or left something behind, which is called trace evidence. Trace because it’s usually really small, like a fiber of clothing, a hair, bits from a shoe, paint chips, wood splinters, or latent (invisible) fingerprints.
 There’s a lot we’re going to cover! We’re going to several different fingerprinting methods, including how to lift fingerprints so you can study them as well as how to make artificial fingerprints using stuff from around the house. You’ll also learn about chromotography, which is how to separate black ink into its different colors so you can find the pen that actually wrote the mysterious letter.
We’re also going to learn how to do fiber flame tests to be able to help you identify which fibers are which so you can match it with what the suspect is wearing. Chemical analysis is also really important, and you’ll learn how to tell which powder is which using a matrix technique. We’ll also look at counterfeit money by making microscopes, fake documents in different wavelengths of light, and learn how handwriting tells you a lot about a person and how they think and feel.
In addition to collecting and analyzing evidence, we’re also going to learn how to secretly listen to conversations inside the house from the front yard, how to make laser burglar alarms to help you catch the bad guy, make rear-view spy glasses that let you see what’s going on behind you, write in different types of invisible ink, a wireless FM transmitter so you can transmit your voice to your allies without using walkie talkies, and learn how to make your own laser maze by building the home-made transistor detectors (these are the ones we use at Science Camp in the Laser Maze)!
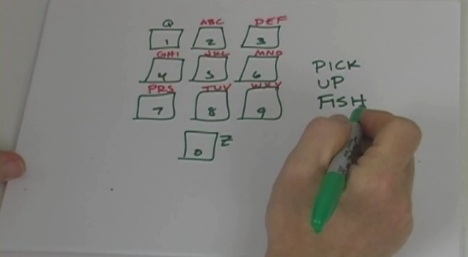
There are over 20 videos to take you step by step into the world of evidence, analysis, investigation, and decoding mysteries! Are you ready?