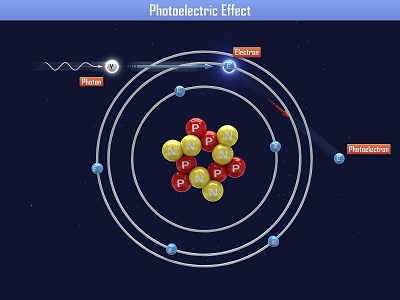
 Einstein received a Nobel Prize for figuring out what happens when you shine blue light on a sheet of metal. When he aimed a blue light on a metal plate, electrons shot off the surface. (Metals have electrons which are free to move around, which is why metals are electrically conductive. More on this in Unit 10).
When Einstein aimed a red light at the metal sheet, nothing happened. Even when he cranked the intensity (brightness) of the red light, still nothing happened. So it was the energy of the light (wavelength), not the number of photons (intensity) that made the electrons eject from the plate. This is called the ‘photoelectric effect’. Can you imagine what happens if we aim a UV light (which has even more energy than blue light) at the plate?
This photoelectric effect is used by all sorts of things today, including solar cells, electronic components, older types of television screens, video camera detectors, and night-vision goggles.
This photoelectric effect also causes the outer shell of orbiting spacecraft to develop an electric charge, which can wreck havoc on its internal computer systems.
A surprising find was back in the 1960s, when scientists discovered that moon dust levitated through the photoelectric effect. Sunlight hit the lunar dust, which became (slightly) electrically charged, and the dust would then lift up off the surface in thin, thread-like fountains of particles up ¾ of a mile high.
Please login or register to read the rest of this content.
This is a recording of a recent live teleclass I did with thousands of kids from all over the world. I’ve included it here so you can participate and learn, too!
We’re going to study electrons and static charge. Kids will build simple electrostatic motor to help them understand how like charges repel and opposites attract. After you’ve completed this teleclass, be sure to hop on over the teleclass in Robotics!
Electrons are strange and unusual little fellows. Strange things happen when too many or too few of the little fellows get together. Some things may be attracted to other things or some things may push other things away. Occasionally you may see a spark of light and sound. The light and sound may be quite small or may be as large as a bolt of lightning. When electrons gather, strange things happen. Those strange things are static electricity.
Please login or register to read the rest of this content.
If you have a Fun Fly Stick, then pull it out and watch the video below. If not, don’t worry – you can do most of these experiments with a charged balloon (one that you’ve rubbed on your hair). Let’ play with a more static electricity experiments, including making things move, roll, spin, chime, light up, wiggle and more using static electricity!
Please login or register to read the rest of this content.
How many of these items do you already have? We’ve tried to keep it simple for you by making the majority of the items things most people have within reach (both physically and budget-wise).
You do not need to do ALL the experiments – just pick the ones you want to do! Look over the experiments and note which items are needed, and off you go!
Click here for a printer-friendly version of this page.
We’re going to reuse some of the materials listed here that are more expensive, like the motors, batteries, wires, switches, lights, etc. in the Laser Lab and the Robot Lab, so you can get a couple extras if you don’t want to tear apart your projects after you’ve built them.
Note to e-Science students: These materials are from Unit 10.
Materials
- Regular sized latex balloon
- Ping pong ball
- Bubble solution (make your own with 1 cup clear Ivory dish soap + 12 cups cold water)
- Yard stick (AKA meter stick)
- Soup spoon (bigger is better)
- 3 large paper clips
- 8 brass fasteners
- 2 index cards or scraps of cardboard
- AA battery pack
- LEDs
- 3VDC motor
- 10 alligator clip leads
- SPST push-button switch
- 1K potentiometers
- Metal jewelry
- AA batteries for your battery case (Cheap dollar-store “heavy duty” type are perfect. Do NOT use alkaline batteries like Duracell or Energizer!)
- Optional: Buzzer (Jameco 24872)
Tools
- Tape
- Scissors
 Click here for a printer-friendly version of this page.
Objective You’re going to take a deeper look at the atom by stripping off part of it called the electron and messing around with it to make things move, stick, jump, and have bad hairdos. This is an excellent time to hone their observation skills and get them into the habit of changing and testing only one thing at a time.
Main Ideas While the kids are playing with the experiments see if you can get them to notice these important ideas. When they can explain these concepts back to you (in their own words or with demonstrations), you’ll know that they’ve mastered the lesson.
- Opposite charges attract, like charges repel.
- Electrons cannot be seen, but they are very small particles that are easy to move around.
About the Experiments The experiments in this section are mostly the same ones found in Unit 10, for two reasons. First, these are the activities we do when we teach Science Camp Workshops during the summer, and we’ve added live video from these workshops so you can see us in action. Second, have you seen how massive Unit 10 is? We took the feedback we received to heart and now we’ve made Unit 10 a lot more doable by chunking the experiments down into three main categories and minimized the academics so you can focus on getting your kids excited just by doing the coolest experiments from the section.
Electricity experiments can be frustrating because unlike other activities, you can’t tell where you’re going wrong if the circuit doesn’t work. Here are the things we test for when troubleshooting a circuit with the students:
- Are the batteries in right? (Flat side goes to the spring.)
- Is the connection between the alligator clip and the wire a metal-to-metal connection? (Often kids will clip the alligator clip onto the plastic insulation.)
- If it’s an LED that you’re trying to light up, remember that those are picky about which way you hook up the plus and minus (red and black). Switch the wires if you’re having trouble.
- Change out the wires. Sometimes the wire can break inside – it can get disconnected from the alligator clip inside the plastic insulation, but you can’t see it. When it doubt, swap out your wires.
The How and Why Explanation Blow up a balloon. If you rub a balloon on your head, the balloon is now filled up with extra electrons, and now has a negative charge. Your head now has a positive charge because your head was electrically balanced (same number of positive and negative charges) until the balloon stole your negative electrons, leaving you with an unbalanced positive charge. When you put the balloon close to your head, notice how your hair reaches out for the balloon. Your hair is positive, the balloon is negative, and you can see how they are attracted to each other!
Your hair stands up when you rub it with a balloon because your head is now positively charged, and all those plus charges don’t like each other (repel). They are trying to get as far away from each other as possible, so they spread far apart.
The triboelectric series is a list that ranks different materials according to how they lose or gain electrons. Near the top of the list are materials that take on a positive charge, such as air, human skin, glass, rabbit fur, human hair, wool, silk, and aluminum. Near the bottom of the list are materials that take on a negative charge, such as amber, rubber balloons, copper, brass, gold, cellophane tape, Teflon, and silicone rubber.
When you rub a glass rod with silk, the glass takes on a positive charge and the silk holds the negative charge. When you rub your head with a balloon, the hair takes on a positive charge and the balloon takes on a negative charge.
When you scuff along the carpet in socks, you gather up an electric charge in your body. That charge was static until you zapped someone else. The movement of electric charge is called electric current. When electric current passes through a material, it does it by electrical conduction. There are different kinds of conduction, such as metallic conduction, where electrons flow through a conductor (like metal) and electrolysis, where charged atoms (called ions) flow through liquids.
An electrical circuit is like a NASCAR raceway. The electrons (race cars) zip around the race loop (wire circuit) super-fast to make stuff happen. Although you can’t see the electrons zipping around the circuit, you can see the effects: lighting up LEDs, sounding buzzers, clicking relays, etc.
There are many different electrical components that make the electrons react in different ways, such as resistors (limit current), capacitors (collect a charge), transistors (gate for electrons), relays (electricity itself activates a switch), diodes (one-way street for electrons), solenoids (electrical magnet), switches (stoplight for electrons), and more. We’re going to use a combination diode-light-bulb (LED), buzzers, and motors in our circuits right now.
A CIRCUIT looks like a CIRCLE. When you connect the batteries to the LED with wire and make a circle, the LED lights up. If you break open the circle, electricity (current) doesn’t flow and the LED turns dark. LED stands for “Light Emitting Diode”. Diodes are one-way streets for electricity – they allow electrons to flow one way but not the other.
Let’s get started building circuits!
Questions to Ask When you’ve worked through most of the experiments ask your kids these questions and see how they do:
- Why does the hair stick to the balloon? Does the shape of the balloon matter? Does hair color matter? Hair texture? How much goop you have in your hair?
- What other things does the balloon stick to?
- What happens when you bring the balloon close to a pile of confetti?
- Why do you think the ping pong ball moved? Are there other objects you can try instead of the ping pong ball?
- Why does the water wiggle and move when you bring the balloon close to it? What if you bring the balloon close to a pan full of water?
- Are you able to make the yardstick rotate all the way around in a full circle?
- Can we see electrons? What charge does the electron have?
- Why does the balloon stick to the wall?
- How do you get rid of extra electrons?
An electrical circuit is like a raceway or running track at school. The electrons (racecars) zip around the race loop (wire circuit) superfast to make stuff happen. Although you can’t see the electrons zipping around the circuit, you can see the effects: lighting up LEDs, sounding buzzers, clicking relays, etc.
There are many different electrical components that make the electrons react in different ways, such as resistors (limit current), capacitors (collect a charge), transistors (gate for electrons), relays (electricity itself activates a switch), diodes (one-way street for electrons), solenoids (electrical magnet), switches (stoplight for electrons), and more. We’re going to use a combination diode-light-bulb (LED), buzzers, and motors in our circuits right now.
A CIRCUIT looks like a CIRCLE. When you connect the batteries to the LED with wire and make a circle, the LED lights up. If you break open the circle, electricity (current) doesn’t flow and the LED turns dark.
LED stands for “Light Emitting Diode”. Diodes are one-way streets for electricity – they allow electrons to flow one way but not the other.
Remember when you scuffed along the carpet? You gathered up an electric charge in your body. That charge was static until you zapped someone else. The movement of electric charge is called electric current, and is measured in amperes (A). When electric current passes through a material, it does it by electrical conduction. There are different kinds of conduction, such as metallic conduction, where electrons flow through a conductor (like metal) and electrolysis, where charged atoms (called ions) flow through liquids.
 Make yourself a grab bag of fun things to test: copper pieces (nails or pipe pieces), zinc washers, pipe cleaners, Mylar, aluminum foil, pennies, nickels, keys, film canisters, paper clips, load stones (magnetic rock), other rocks, and just about anything else in the back of your desk drawer.
Certain materials conduct electricity better than others. Silver, for example, is one of the best electrical conductors on the planet, followed closely by copper and gold. Most scientists use gold contacts because, unlike silver and copper, gold does not tarnish (oxidize) as easily. Gold is a soft metal and wears away much more easily than others, but since most circuits are built for the short term (less than 50 years of use), the loss of material is unnoticeable.
Please login or register to read the rest of this content.
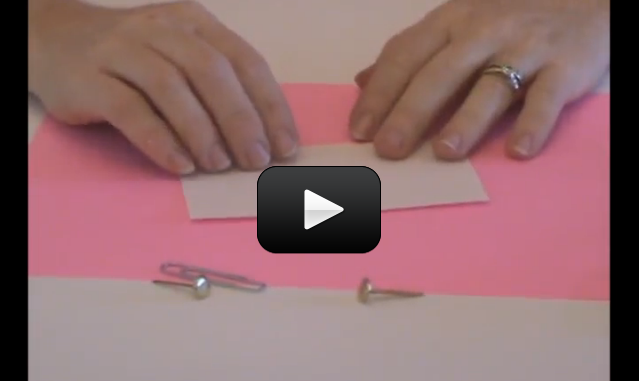
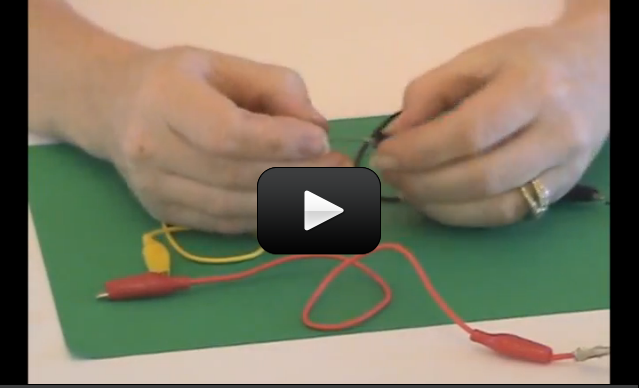
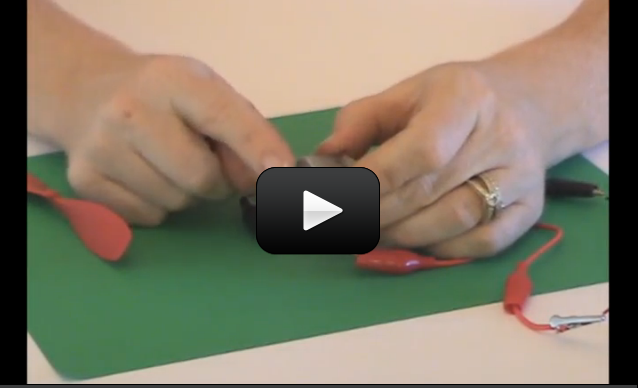
 When you turn on a switch, it’s difficult to really see what’s going on… which is why we make our own from paperclips, brass fasteners, and index cards.
Kids can see the circuit on both sides of the card, so it makes sense why it works (especially after doing ‘Conductivity Testers’).
SPST stands for Single Pole, Single Throw, which means that the switch turns on only one circuit at a time. This is a great switch for one of the robots we’ll be making soon, as it only needs one motor to turn on and off.
Please login or register to read the rest of this content.
Imagine you have two magnets. Glue one magnet on an imaginary record player (or a ‘lazy susan’ turntable) and hold the other magnet in your hand. What happens when you bring your hand close to the turntable magnet and bring the north sides together?
The magnet should repel and move, and since it’s on a turntable, it will circle out of the way. Now flip your hand over so you have the south facing the turntable. Notice how the turntable magnet is attracted to yours and rotates toward your hand. Just as it reaches your hand, flip it again to reveal the north side. Now the glued turntable magnet pushes away into another circle as you flip your magnet over again to attract it back to you. Imagine if you could time this well enough to get the turntable magnet to make a complete circle over and over again… that’s how a motor works!
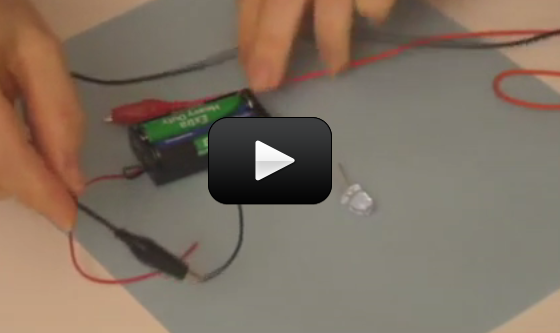
After you get the buzzer and the light or LED to work, try spinning a DC motor:
Please login or register to read the rest of this content.
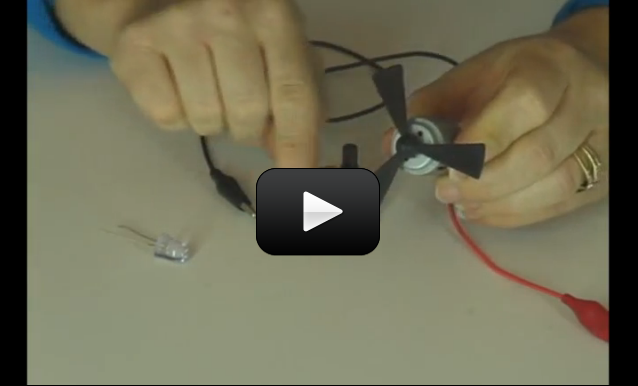
 So now you know how to hook up a motor, and even wire it up to a switch so that it goes in forward and reverse. But what if you want to change speeds? This nifty electrical component will help you do just that.
Once you understand how to use this potentiometer in a circuit, you’ll be able to control the speed of your laser light show motors as well as the motors and lights on your robots. Ready?
Please login or register to read the rest of this content.

Once you’ve made a a simple switch, you’re ready to use more advanced electrical components, such as the DPDT switch you picked up from an electronics store (refer to shopping list for this section). When you wire up this nifty device, you’ll be able to get your motors to go forward, reverse, and stop… all with the flip of a switch.
You can use this component along with a potentiometer so you can not only control the direction but also the speed of a motor, like in a robot or laser light show. And don’t feel limited on using this switch just with motors – it works with bi-polar LEDs and other things as well. For example, you can hook this up so that when it’s in the UP position, the buzzer sounds, and the DOWN position makes the headlights go on. Are you ready to learn how to wire this one up?
Please login or register to read the rest of this content.
You can use the idea that like charges repel (like two electrons) and opposites attract to move stuff around, stick to walls, float, spin, and roll. Make sure you do this experiment first.
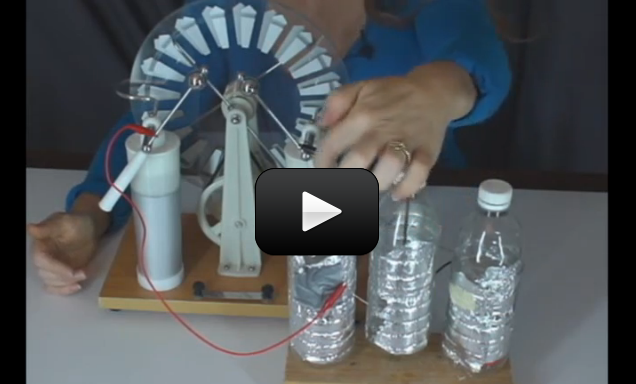
I’ve got two different videos that use positive and negative charges to make things rotate, the first of which is more of a demonstration (unless you happen to have a 50,000 Volt electrostatic generator on hand), and the second is a homemade version on a smaller scale.
Did you know that you can make a motor turn using static electricity? Here’s how:
Please login or register to read the rest of this content.
 This is a super-cool and ultra-simple circuit experiment that shows you how a CdS (cadmium sulfide cell) works. A CdS cell is a special kind of resistor called a photoresistor, which is sensitive to light.
A resistor limits the amount of current (electricity) that flows through it, and since this one is light-sensitive, it will allow different amounts of current through depends on how much light it "sees".
Photoresistors are very inexpensive light detectors, and you'll find them in cameras, street lights, clock radios, robotics, and more. We're going to play with one and find out how to detect light using a simple series circuit.
Materials:
- AA battery case with batteries
- one CdS cell
- three alligator wires
- LED (any color and type)
This is a super-cool and ultra-simple circuit experiment that shows you how a CdS (cadmium sulfide cell) works. A CdS cell is a special kind of resistor called a photoresistor, which is sensitive to light.
A resistor limits the amount of current (electricity) that flows through it, and since this one is light-sensitive, it will allow different amounts of current through depends on how much light it "sees".
Photoresistors are very inexpensive light detectors, and you'll find them in cameras, street lights, clock radios, robotics, and more. We're going to play with one and find out how to detect light using a simple series circuit.
Materials:
- AA battery case with batteries
- one CdS cell
- three alligator wires
- LED (any color and type)
 The smallest thing around is the atom, which has three main parts – the core (nucleus) houses the protons and neutrons, and the electron zips around in a cloud around the nucleus.
The proton has a positive charge, and the electron has a negative charge. In the hydrogen atom, which has one proton and one electron, the charges are balanced. If you steal the electron, you now have an unbalanced, positively charge atom and stuff really starts to happen. The flow of electrons is called electricity. We’re going to move electrons around and have them stick, not flow, so we call this ‘static electricity’.
These next experiments rely heavily on the idea that like charges repel and opposites attract. Your kids need to remember that these activities are all influenced by electrons, which are very small, easy to move around, and are invisible to the eye.
Please login or register to read the rest of this content.