Note: there are FOUR videos on this page, and FIVE experiments!
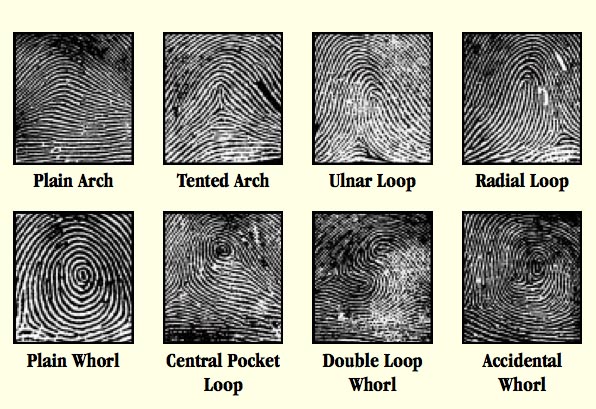
Every crime scene has a silent witness called physical evidence, and fingerprints are one kind of physical evidence. The patterns of ridges on both the finger and toe are unique to each person; no two are alike, which allows fingerprinting to help identify who did what, when, and where. Your fingerprint pattern will never change throughout your entire lifetime, which makes it a handy tool for identification. The main patterns are arch, loop, and whorl.
Fingerprints are friction ridges made up of a single row of pores in your skin. When your finger touches a surface, oil and sweat transfer from your finger to the surface and leave an impression of the ridge pattern from your finger.
[am4show have=’p8;p9;p11;p38;p102;’ guest_error=’Guest error message’ user_error=’User error message’ ]
There are three types of fingerprints: plastic, patent, and latent. Plastic is when a fingerprint is intended and makes a three-dimensional impression, like pressing your finger onto soft wax. Patent fingerprints are visible – these are the ones your mom gets upset about when she sees your prints all over her mirror or windows. The most common type of fingerprint is the invisible mark (latent), which require either a chemical reaction to be made visible or physical treatment.
Materials:
- pen
- index card (or download this FBI fingerprint card)
- number 2 pencil and pencil sharpener
- 3/4″ transparent sticky tape
- magnifying glass
- ink pad
- photocopier
- small ball of clay (golf ball size)
- 4 microscope slides
- graphite powder with adult supervision
- goggles and gloves
- paint brush or old makeup brush
- disposable paper cup
- scissors
- clear silicone (hardware store) OR gummy bear candy (see variation step #11 in Experiment Part 3)
- 4″ square of aluminum foil
- 3 feet of string
- string
- duct tape
- empty clean glass jar with a lid (pickle, jam ,or mayo jars work great)
- black sheet of paper
- crazy glue or super glue
- black objects (glass, metal, or plastic)
- iodine crystals (adults only)
Experiment Part 1: Lifting Patent Fingerprints
- Sharpen your pencil.
- Lay a piece of tape down sticky-side up by touching only the edge of the tape.
- Rub your pencil on your fingertip using the side of the pencil.
- Touching the finger to the sticky side of the tape.
- Gently pull your finger from the tape and pace it on the card. Trim off any excess tape.
- Repeat for all fingers (and toes if you wish).
- Carefully examine the prints under a magnifying glass. What type of fingerprint do you have? Look at the ridge pattern (loop, arch, or whorl). You can use a photocopier to enlarge the prints so they are easier to see.
- Are the prints clearer and easier to read using an ink pad or a pencil?
Experiment Part 2: Lifting Latent Fingerprints
(This next part works well if you have two friends to help you out.)
- Clean all microscope slides using a soft cloth.
- Close your eyes and ask one of your friends to secretly (without telling you which friend) rub their finger against the side of the nose or across the forehead (to oil up the fingertip) and then press it gently to the center of the microscope slide. Place this slide on the table face up.
- Now have both friends oil up their fingertips using their foreheads or side of their nose, and touch the center of a slide (one friend per slide).
- Put on your goggles and gloves, and do NOT inhale the dust! Sprinkle a small amount of graphite powder into a disposable paper cup (just enough to cover the bottom of the cup).
- Dip the brush into the cup and lightly dist the center area of a microscope slide and twirl the brush to make a thin coating of graphite on the surface of the slide. As the print shows through, remove the excess by lightly brushing it away in the direction of the ridge lines.
- Use the tape to lift the print from the slide to your card. Remember to hold only the edge of the tape!
- Use your magnifying lens to match the prints and be able to tell which friend touched the first slide.
- Now let your friends handle different objects, like a water glass, newspaper, magazine picture, construction paper, and other materials. Make sure they know which finger is making the print so you can match it to their original print from the slide. Practice lifting prints from different objects and transferring them to the index / fingerprint card.
- What if you use cocoa powder instead of graphite?
There are a number of ways to make invisible prints visible, depending on what the material is made out of. For porous materials like paper, rubber, cardboard or wood, you can use iodine fuming or ninhydrin to chemically react with the fingerprint and make the print visible (more on that in Part 5 below). For non-porous materials like glass or tile, you can use graphite powder, talcum powder (when you need the print to show up white instead of black), or cyanoacrylate fuming (refer to Part 4). The difference in the two types of materials arises because the porous materials can absorb liquid whereas non-porous are sealed , solid and smooth.
You can not leave fingerprints if you create a barrier between the surface you’re touching and your fingertips. You can either wear gloves, or use hand cream like DEB Hand Barrier which makes a second skin over your hand.
Experiment Part 3: Making an Artificial Fingerprint
- Make a good fingerprint in the clay. Make sure you see ridgelines.
- Cut off the tip of the silicone using scissors.
- Apply a layer of caulk over the fingerprint, extending 1/2″ margin on all sides around the fingerprint. Press the caulk down with the tip to make sure you don’t have any air bubbles.
- Let dry 24 hours.
- Lift the caulk from the print using a fingernail and a lot of patience. Try not to bend, stretch, or deform the caulk print as you separate it from the clay.
- Use your magnifying glass to look at the ridges in the caulk print.
- Find a clean microscope slide.
- Rub your finger against your nose or forehead, and rub that finger onto the ridges of the caulk print (artificial finger) and press the caulk print ridge-side down onto the slide.
- Using the procedures from above, apply graphite to make the print visible and then transfer the print using tape to your card.
- Compare the print from the artificial print with the original fingerprint. What do you notice?
Experiment Part 4: Superglue Reaction with Latent Fingerprints
- Make a foil tray by bending up the edges of the square of foil. Place this in the bottom of the jar.
- Attach the string to a black colored object using duct tape. The other end of the string is attached to the inside lid of the jar so that the black object hovers an inch or two above the foil tray.
- Wipe the black object clean of all fingerprints.
- Make a single, clear fingerprint on one side of the black object (rub your finger against your nose or forehead first).
- Using gloves on your hands, place 20 drops of superglue in the tray. Don’t get this on your fingers!
- Carefully lower the black object into the jar. Make sure it hovers above the tray. Screw the lid on tight.
- Let it sit for 3 hours to develop the print.
- When ready, unscrew the lid and remove the object and place it fingerprint-side-down on a photocopier and make a copy of the exposed print.
- Roll up the superglue foil tray and throw in the trash. Be careful to handle this with your gloves on!
- What other objects can you use for this fuming process?
Superglue contains a chemical called cyanoacrylate, which has fumes that react with the moisture in the fingerprint to make it visible.
TEACHER DEMO ONLY Experiment Part 5: Developing Latent Fingerprints with Iodine Crystals
Do NOT let kids do this experiment on their own. This is for adult / teacher demo purposes only as it involves handling iodine.
Never handled or worked with iodine? Do this experiment first.
- After rubbing your finger on your forehead or nose, make a single, clear fingerprint on an index card.
- Using foil, make a small tray (same procedure as Part 4 above) and place in the bottom of a glass jar.
- Putting on your gloves and goggles, add about 10 iodine crystals to the tray. DO NOT INHALE FUMES OR TOUCH IODINE WITH YOUR BARE HANDS!
- Suspend the index card with the fingerprint from the inside lid of the jar using string (same procedure as Part 4 above).
- Lower the card into the jar and screw on the lid. Let this develop for 3-5 minutes. Look for a yellow fingerprint.
- Open the jar. (Do you have your gloves on?) Remove the paper sample. Reseal the jar.
- Look carefully at the exposed print. (Look quickly as this may fade.) Take a photocopy of this exposed print.
- Open the jar. Place iodine crystals back in the original container and dispose of the foil in the trash.
[/am4show]
I found some!
Let me see if I can find the right one for you and post it directly to the shopping list. 🙂
Thanks for letting us know so we can fix those links right away! If you find any others that are broken, please forward me the page they’re on and I’ll update it.
thank you the information. But I’m still a little uncertain as to what Iodine crystals are. I searched on the links above and I saw several different things; iodine solution, some kits….are you able to give me specifics please?
The link is from the page in Advanced Chemistry Introduction under “Iodine”. The link “MSDS” for the potassium chloride and a few other chemicals has been moved to another site. I clicked on the link for that site and tried searching for the chemicals. It gave me several selections and I’m not experienced enough to know which is the right one.
Make sure an adult is handling iodine crystals. You can find them at Fisher, Flinn, and here.
Iodine is included in the C3000 kit on the shopping list. Which link isn’t working (on which page?) I can fix it right away.
Where can I get the iodine crystals for this experiment?