NOTE: If you haven’t already, please log in using the form on the right of your screen. If there’s no login box, then you’re already logged in!

Lesson 26: Domes & Roofs
Lesson 27: Dome Challenge
Lesson 28: Sports Arena Roof
Lesson 29: Sports Arena Roof
Lesson 30: Skyscrapers
Lesson 31: Earthquakes!
Lesson 32: Roads
Lesson 33: Water Supply
Lesson 34: Water Purification
Lesson 35: Water Purification Experiment
Lesson 36: Engineering Team
Lesson 37: Student Engineers
Lesson 38: Moving Forward
Quick Links:
Civil Engineering 1
Civil Engineering 2
[am4show have=’p144;’ guest_error=’Guest error message’ user_error=’User error message’ ]
Lesson 26: Domes & Roofs
Domes are curved structures (no angles, no corners) that enclose a huge amount of space without any supports or columns to help hold them up. They’re usually pretty thin for their size, and oddly enough, domes are super strong and super stiff because of their geometry.
Lesson 27: Dome Challenge
I have two different types of roofs that we need to build… but how will we do it?
Lesson 28: Sports Arena Roof
Lesson 29: Sports Arena Roof
This roof can support over 400 times its own weight, and you don’t need tape! One of the great things about net forces is that although the objects can be under tremendous force, nothing moves! For every push, there’s an equal and opposite pull (or set of pulls) that cancel each other out.
This barrel roof is an excellent example of how to the forces all cancel out and the roof stands strong (hopefully!) If you have trouble with this experiment, just use cardstock or other heavy weight paper instead of regular copy paper.
Here’s what you need:
- Print out this template.
- Scissors
- 2 pencils
- Thread
- Flat book or light clipboard
- Extra paper to load the roof
Watch the video:
Download Student Worksheet & Exercises
Exercises
- What is Newton’s Third Law?
- What kind of groups do forces come in?
- What is another name for Newton’s Third Law?
Lesson 30: Skyscrapers
A skyscraper is a tall building over 40 floors, higher than 150 meters (492 feet). Let’s learn about them as well as design them for the environment.
Lesson 31: Earthquakes!
When two blocks of the Earth slip past each other suddenly, that’s what we call an earthquake! From a physics point of view, earthquakes are a release of the elastic potential energy that builds up. Most energy is released as heat, not as shaking, during an earthquake. 90% of all earthquakes happen along the Ring of Fire, which is the active zone that surrounds the Pacific Ocean.
The Earth has four main layers: the hard skin on the surface is the crust which extends only 30 miles; the hot magma section is a soupy mass of rock that extends approximately 1800 miles; and the core which is made out of two parts: the hot liquid metal outer core surrounds the solid nickel -iron inner core.
The plates on the crust float on magma, which is a lot like the consistency tar. The crust has seven main tectonic plates that slide around and can either slide apart from each other (called a normal fault that is usually found on the sea floor), collide into each other (called a thrust fault), or move in opposite directions (strike-slip fault) at different speeds. Where the plates are sliding apart on the sea floor, the temperature of the water can rise over 1200oF. Scientists measure the speeds of the plates moving from 1 to 10 inches per year.
There are three different waves that travel through the planet when an earthquake happens. The first waves are the compression-type “P-waves” (primary waves), which travel through the entire planet, including liquid water and solid rock. Most people don’t notice the P-waves, but they do notice the secondary “S-waves”, which follow 60-90 seconds after the P-waves. Following the S-waves are the surface waves, which are like when you wave a bed sheet up and down.
Earthquakes are detected and measured by many different types of instruments, like strain gauges, creep meters, tilt sensors, seismometers, x-ray imagery, and more. These detectors aren’t perfect, though. Earthquake detectors not only discover earthquakes but also glacier movement, nuclear explosions, meteor impacts, and volcano eruptions!
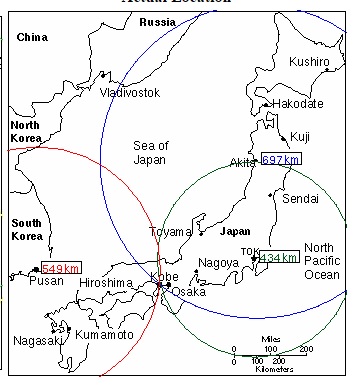
After you watch the video, click the link to do your seismology calculations to figure out both the epicenter and the magnitude of four different earthquakes:
- Japan Earthquake 1995 (map answer)
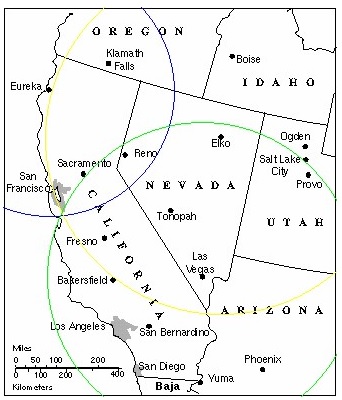
- Los Prieta California Earthquake 1989 (map answer)
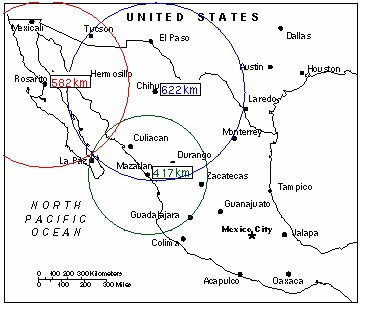
- Mexico Earthquake 1978 (map answer)
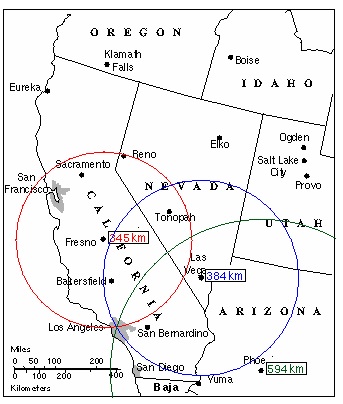
- Northridge California Earthquake 1994 (map answer)
If you’d like to measure the Earth’s Magnetic Pulse, you can do that here.
Lesson 32: Roads
To build a road, you just can’t pour a strip of pavement from a cement truck and call it a road. There’s several steps you have to do first. After you’ve planned out what you want your road to be able to do and who it will serve (a lot or a little traffic, how fast will people go on it, connect to other existing roads so people can get on it), you then plan where you want your road to go (do you need tunnels or bridges for your road? Are you going through a mountain or over someone’s farmland?)
Lesson 33: Water Supply
Used water (wastewater) travels through sewage pipes to treatment plants where it is treated and either returned to streams, rivers, and oceans, or used for irrigation.
Lesson 34: Water Purification
There are five stages to water filtration: coagulation, sedimentation, filtration, disinfection, and storage.
Lesson 35: Water Purification Experiment
Ever wonder how the water draining down your sink gets clean again? Think about it: The water you use to clean your dishes is the same water that runs through the toilet. There is only one water pipe to the house, and that source provides water for the dishwasher, tub, sink, washing machine, toilet, fish tank, and water filter on the front of your fridge. And there’s only one drain from your house, too! How can you be sure what’s in the water you’re using?
This experiment will help you turn not only your coffee back into clear water, but the swamp muck from the back yard as well. Let’s get started.
- clean play sand
- alum (check the spice section of the grocery store)
- distilled water
- water sample (a cup of coffee with the ground put back in works great)
- activated carbon (check an aquarium store)
- cheese cloth
- clear disposable cups
- popsicles
- medicine dropper or syringe (no needle)
- funnel
- 2 cotton balls
- measuring spoon (1/4 tsp and 1/2 tsp)
Download Student Worksheet & Exercises
There are several steps you need to understand as we go along:
- Aeration: Aerate water to release the trapped gas. You do this in the experiment by pouring the water from one cup to another.
- Coagulation: Alum collects small dirt particles, forming larger, sticky particles called floc.
- Sedimentation: The larger floc particles settle to the bottom of the cup.
- Filtration: The smaller floc particles are trapped in the layer of sand and cotton.
- Disinfection: A small amount of disinfectant is added to kill the remaining bacteria. This is for informational purposes only — we won’t be doing it in this experiment. (Bleach and kids don’t mix!)
Preparing the Sample
Make your “swamp muck” sample by filling a small pitcher with water, coffee, and the coffee grounds. Fill up another small pitcher with clean water. In a third small pitcher, pour a small scoop of charcoal carbon and cold water.
Fill one clear plastic cup half full of swamp muck. Stir in ½ teaspoon aluminum sulfate (also known as alum) and ¼ teaspoon calcium hydroxide (also known as lime; it’s nasty stuff to breathe in so keep it away from kids). You have just made floc, the heavy stuff that settles to the bottom.
Aside: For pH balance, you can add small amounts of lime to raise the pH (level 7 is optimal), if you have pH indicators on hand (find these at the pharmacy).
Stir it up and sniff — then don’t touch for 10 minutes as you make the filter.
Making the Filter
Grab a cotton ball and fluff it out HUGE. Then stuff it into the funnel. The funnel will take two or three balls. (Don’t stuff too hard, or nothing will get through!) Strain out the carbon granules from the pitcher, and put the black carbon water back into the pitcher. Place the funnel over a clean cup and pour the black water directly over the cotton balls. Run the dripped-out water back through the funnel a few times. Those cotton balls will turn gray-black! Discard all the carbon water.
Add a layer of sand over the top of the cotton balls. It should cover the balls entirely and come right up to the top of the funnel. Fill a third empty cup half-full of clean water from the pitcher. Drip (using a dropper) clean water into the funnel. (This gets the filter saturated and ready to filter.)
Showtime!
It’s time to filter the swamp muck. Without disturbing the sample, notice where the floc is… the dark, solid layer at the bottom. You’ve already filtered out the larger particles without using a filter! Using a dropper, take a sample from the layer above the floc (closer to the top of your container) and drip it into the funnel. If you’ve set up your experiment just right, you’ll see clear water drip out of your funnel.
Continue this process until the liquid starts to turn pale – which indicates that your filter is saturated and can’t filter out any more particles.
To dissect the filter and find out where the muck got trapped, invert the funnel over four layers of paper towel. Usually the blacker the cotton, the better the filter will work. Look for coffee grounds in the sand.
“Radioactive” Sample
Activate a disposable light stick. Break open the light stick (use gloves when handling the inner liquid), and using the dropper, add the liquid to the funnel. You can also drip the neon liquid by the drop into the swamp muck sample and pass it through your filter.
You can test out other types of “swamp muck” by mixing together other liquids (water, orange juice, etc.) and solids (citrus pulp, dirt, etc.). Stay away from carrot juice, grape juice, and beets — they won’t work with this type of filter.
Lesson 36: Engineering Team
Engineers rarely work alone. They know that working together, they can do much more than trying to single-handedly wrangle with a project all by themselves. You already know about architects and civil engineers. What other types of engineers will you run into when you build projects?
Lesson 37: Student Engineers
So how do you get started with becoming a civil engineer? By actually doing civil engineering of course! There are several civil engineering project-based competitions that students can participate in. Here’s a few to give you an idea as to what’s out there:
Lesson 38: Moving Forward
You did it! You completed this course on Civil engineering! I hope you’ve enjoyed it as much as I did creating it for you. Here’s a last couple of things to think about before you go…
[/am4show]