NOTE: If you havent already, please log in using the form on the right of your screen. If theres no login box, then youre already logged in!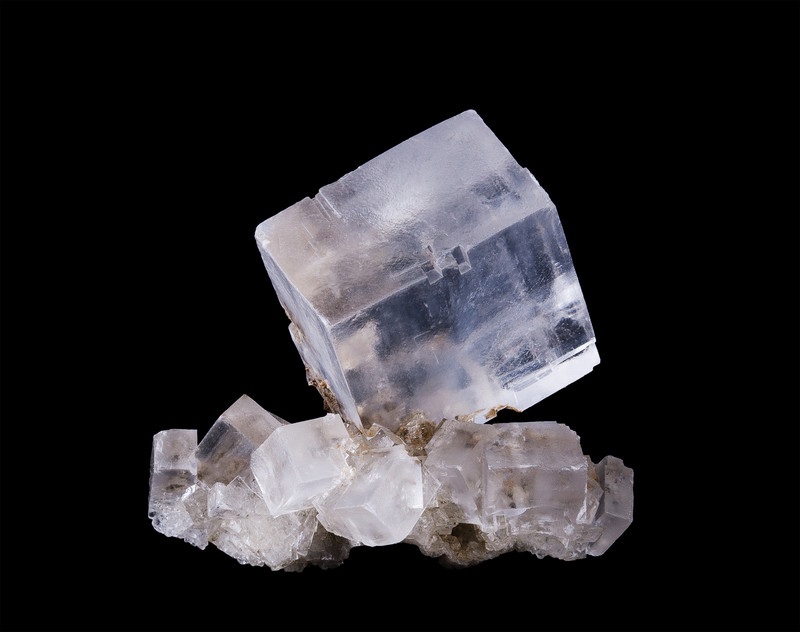
Lesson 20: Foam Pumice
Lesson 21: Test tube Cannon
Lesson 22: Making Fossils
Lesson 23: Geology Field Trip
Lesson 24: Rock Workshop
Lesson 25: Giant Crystals
Lesson 26: Laundry Soap Crystals
Lesson 27: Penny Crystal Structure
Lesson 28: Rock Candy Crystals
Lesson 29: Salt and Vinegar Crystals
Lesson 30: Salt Stalactites
Lesson 31: Eggshell Geodes
Lesson 32: Metal Crystals
Lesson 33: Charcoal Crystals
Lesson 34: Earthquakes
Quick Links:
Geology 1
Geology 2
[am4show have=p147; guest_error=Guest error message user_error=User error message ]
Lesson 20: Foam Pumice
Today we’re making polyurethane foam, which looks a lot like pumice in that it’s lightweight, porous, and cream colored. Polyurethane is a polymer that is used to make a variety of products, including seat cushions, insulation panels, seals and gaskets, roller coaster wheels, escalator rollers, carpet underlay, and wheels for skateboards.
Materials:
- Two disposable plastic cups (must be disposable)
- Craft stick
- Tart pan
- Polyurethane A & B
- Sample of pumice for observation
Download worksheet and exercises
Pumice is used to make concrete, cinder blocks, and cement. The Roman Pantheon and aqueducts used pumice as one of their construction materials. Today, you’ll find pumice in polishes because it’s an abrasive. It’s also on the tip of your pencil as an eraser and on your toothbrush inside your toothpaste. If you’ve ever owned a pair of stone-washed jeans, you now know what stone was used to get that look on the pants. Beauty salons use pumice stones for pedicures and chinchillas use powdered pumice to bathe in, since they don’t like to get wet.
- Put on your goggles and gloves – NO EXCEPTIONS.
- Now, move your entire experiment outside, because this experiment generates fumes that you don’t want to breathe in.
- Put the two cups in the pan.
- Pour a couple tablespoons of polyurethane A into the first cup.
- Pour a couple tablespoons of polyurethane B into the second cup. You need a 1:1 ratio unless otherwise indicated on your package of the product.
- Pour one cup into the other, and stir, stir, stir! Your solution will look like honey, so keep stirring. When it starts to get cloudy and foam up, stop stirring.
- Touch the bottom of the cup every 10 seconds with a gloved finger (do not touch the liquid itself). What do you notice?
- After about a minute, the foam should be rising up and out of the cup. This is polyurethane foam, but don’t touch it yet.
- The foam will continue to build up until it spills out over the cup’s lip. DO NOT TOUCH the foam. When the foam is reacting, you should notice heat being released by holding a hand over (without touching!) the top of the rising solution. This reaction is exothermic because it releases heat energy.
- When it’s cool, you can touch it with a gloved finger (it’s irritating to the skin, so always use gloves). Record your observations and clean up thoroughly following the instructions for disposal on your package.
Exercises
- Name three characteristics of pumice.
- How is pumice different from scoria?
- What can you use pumice for?
Lesson 21: Test tube Cannon
You’ll learn about the key ingredient in an explosive eruption like the one we’re simulating in lab today.
Materials:
- test tube
- rubber stopper
- toilet paper
- goggles
- distilled white vinegar
- baking soda powder
- measuring tape
- scale that weighs in grams
- ruler
Download worksheet and exercises
Active volcanoes create domes inside the eruption chamber which act like giant plugs, stopping up the magma and building up pressure until … BOOM! The dome explodes and out comes all the material from inside, just like the plug in the test tube.
Baking soda (sodium bicarbonate) and vinegar (acetic acid) chemically react and combine to form carbon dioxide bubbles and a solid form of sodium acetate, which looks like little white flakes at the bottom of the solution.
For baking soda and vinegar, the chemical equation for the reaction looks like this:
NaHCO3 + HC2H3O2 → NaC2H3O2 + H2O + CO2
The chemical reaction actually occurs in two steps. The first reaction looks like this as the vinegar reacts with the baking soda to form sodium acetate and carbonic acid:
NaHCO3 + HC2H3O2 → NaC2H3O2 + H2CO3
But the carbonic acid isn’t a stable molecule, so it breaks down to make the carbon dioxide gas like this:
H2CO3 → H2O + CO2
Since the bubbles are heavier than air, the carbon dioxide builds up and overflows, and stays in the test tube until you dump it out.
- Put on your safety goggles. NO EXCEPTIONS!
- Tear off a single sheet of toilet paper.
- Pour a small pile of baking soda right in the middle of the toilet paper.
- Fold the toilet paper in half, and then wrap the sides around until you make a mini-burrito or mini-plug. You want it to fit snugly into your test tube (but don’t put it in there yet!)
- Carefully pour vinegar into your test tube. You want about an inch (2-3 cm) of vinegar.
- Gently push the toilet paper burrito plug into the test tube, but don’t let it touch the vinegar yet.
- Push in your rubber stopper, making sure it’s nice and snug.
- Point the stopper away from you or anyone else … like straight up.
- Place a thumb on the stopper and shake the tube several times. Remove your thumb before the stopper pops!
- After you’ve tried this a few times, it’s time to start taking real measurements. Here’s what you do:
- Place the sheet of toilet paper on the scale and zero it (hit “tare”).
- Add baking soda and record the mass of the baking soda (in grams) on your data table.
- Fill your test tube with vinegar. Rest the bottom of the test tube on the table, and using a ruler, measure many centimeters of vinegar you added and record this number on your data table.
- Roll up the toilet paper into the burrito plug and insert it into the test tube.
- Add the stopper and shake!
- Measure the distance that your stopper traveled in your data sheet and repeat the experiment until you’ve found the perfect ratio of baking soda and vinegar to make the stopper fly the farthest.
Exercises
- Does the stopper go further when you add more or less vinegar?
- Look at your answer for #1 above. Why is that?
- Which gases are produced by this reaction?
Lesson 22: Making Fossils
Today you get to make your own glop of earth that holds an embedded fossil. If you close the dough over the top of the fossil, you can hammer it apart after it’s had two days to dry.
Materials:
- ½ cup dirt
- ½ cup flour
- ½ water
- ½ cup salt
- shallow pan
- oil
- shell or other object to make a fossil impression of
Download worksheet and exercises
There are lots of collecting sites listed in geology field guides and books. Even if sites are popular, new fossils are exposed each spring after the winter’s weather. Another great resource is local fossil clubs, geologic societies, and local museums, especially those that participate in field trips. It’s a lot of fun to go collecting with a group, and many colleges and universities provide unique hands-on opportunities to students interested in earth science classes. Always make sure you’re allowed to collect before you go out with your tools … many local areas require permits.
- Mix the dry ingredients together (dirt, flour, and salt) with your hands (or with a spoon).
- Add the water and mix together well. Discard any pebbles or gravel from the dirt. You want a gloppy, clay-like mixture that holds together. Add more dry ingredients if needed.
- Press the dough ball into the pan, making it ½- to 1-inch thick with ragged edges (fossils aren’t perfect).
- Let dry overnight, or at least for a few hours if you’re in a hurry.
- Coat the shell or object with oil and press it gently into the dough.
- Let it dry thoroughly until it’s hardened. Remove your object and admire!
Lesson 23: Geology Field Trip
Field trip time! Today you get to sift through sand and excavate your rock samples right on your own desk. This inexpensive set of rock samples contain pieces of not only fossils and gems, but true minerals and rocks also, so take your time and follow the video instructions carefully.
Materials:
- “Geology Field Trip” rock samples: dinosaur bone, horn coral, gastropod, brachiopod, trilobite, oyster, shark’s tooth, petrified wood, crinoid stem, pyrite, magnetite, gypsum, hematite, sulfur, pumice, selenite, limonite, quartz, mica, fluorite, calcite, feldspar, coal, red sandstone, conglomerate, obsidian, scoria, mica schist, quartzite, shale, gneiss, turquenite, rock crystal, agate, and amethyst.
- Penny
- Nail
- Streak plate
- Glass plate
- Water in a graduated container
- Sunlight
- Pencil and paper
- Handheld magnifier
Download worksheet and exercises
NEW! Ive improved the worksheet, so you can download the latest edition here.
- You’re first going to classify your pile of rocks right along with the instructional step–by-step video. So fire up the video and get your materials out as you complete the data table.
- Use the table on the next page to place your rocks once you’ve identified them. Enjoy your second real geologist rock hunt
- dinosaur bone
- horn coral
- gastropod
- brachiopod
- trilobite
- oyster
- shark’s tooth
- petrified wood
- crinoid stem
- pyrite
- magnetite
- gypsum
- hematite
- sulfur
- pumice
- selenite
- limonite
- quartz
- mica
- fluorite
- calcite
- feldspar
- coal
- red sandstone
- conglomerate
- obsidian
- scoria
- mica schist
- quartzite
- shale
- gneiss
- turquenite
- rock crystal
- agate
- amethyst
Lesson 24: Rock Workshop
Today you get to sort and identify as many rocks as you can as you test for streak, hardness, fluorescence, color, magnetism, chemical reactions, and more with this unique set of rocks. You may have to do a little research on the ones that are not yet familiar to you!
Materials:
- “Washington Student Rock Pack” (see list below for samples that are included)
- Penny
- Nail
- Streak plate
- Water in a graduated container
- Scale that measures in grams
- Longwave UV light source
Download worksheet and exercises
NEW! Ive improved the worksheet, so you can download the latest edition here.
- You’re first going to classify your pile of rocks right along with the instructional step–by-step video. So fire up the video and get your materials out as you complete the data table.
- You’ll be testing for color, streak, hardness, density, luster, cleavage, fracture, tenacity, acid reaction, and fluorescence. Enjoy your third real geologist rock hunt!
- Here are the minerals and rocks included with this set:
- Calcite
- Calcareous Tufa
- Pyroxene
- Limestone
- Gypsum
- Conglomerate
- Amphibole
- Fossiliferous Limestone
- Quartz
- Sandstone
- Mica - Muscovite
- Shale
- Feldspar - Microcline
- Bituminous Coal
- Feldspar - Plagioclase
- Clay
- Bauxite - Aluminum Ore
- Porphyry
- Limonite - Iron Ore
- Obsidian (or Pitchstone)
- Hematite - Iron Ore
- Felsite
- Pyrolusite - Manganese Ore
- Pumice
- Magnetite - Iron Ore
- Basalt
- Copper Ore
- Gabbro
- Pyrite - Iron-Sulfur Ore
- Granite
- Fluorite
- Slate
- Sulfur
- Gneiss
- Barite
- Marble
- Graphite
- Mica Schist
- Talc
- Quartzite
Lesson 25: Giant Crystals
The Cave of Crystals in Mexico has the worlds largest selenite (gypsum) crystals about 1,000 feet below the surface in a hot cavern. Some of the crystals are over 50 tons in weight and 35 feet in length!
Scientists that study these crystals have to wear special suits filled with ice packs along with respirators so they can stay cool and comfortable, since the air is thick with water 99% humidity and temperatures from 110-136 degrees Fahrenheit. Without these special suits, people would last only ten minutes, which means that most of the cave is still largely unexplored.
If youre interested in these caves, look up information on the Naica Project to learn more.
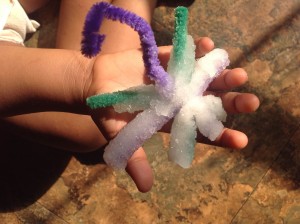
Lesson 26: Laundry Soap Crystals
Can we really make crystals out of soap? You bet! These crystals grow really fast, provided your solution is properly saturated. In only 12 hours, you should have sizable crystals sprouting up.
You can do this experiment with either skewers, string, or pipe cleaners. The advantage of using pipe cleaners is that you can twist the pipe cleaners together into interesting shapes, such as a snowflake or other design. (Make sure the shape fits inside your jar. )
Heres what you need:
- pipe cleaners (or string or skewer)
- cleaned out pickle, jam, or mayo jar
- water
- borax (AKA sodium tetraborate)
- adult help, stove, pan, and stirring spoon
Heres what you do:
1. Cut a length of string and tie it to your pipe cleaner shape; tie the other end around a pencil or wooden skewer. You want the shape suspended in the jar, not touching the bottom or sides.
2. Bring enough water to fill the jar (at least 2 cups) to a boil on the stove (food coloring is fun, but entirely optional).
3. Add 1 cup of borax (aka sodium tetraborate or sodium borate) to the solution, stirring to dissolve. If there are no bits settling to the bottom, add another spoonful and stir until you cannot dissolve any more borax into the solution. When you see bits of borax at the bottom, you’re ready. (Youll be adding in a lot of borax, which is why we asked you to get a full box). You have made a supersaturated solution. Make sure your solution is saturated, or your crystals will not grow.
4. Wait until your solution has cooled to about 130oF (hot to the touch, but not so hot that you yank your hand away). Pour this solution (just the liquid, not the solid bits) into the jar with the shape. Put the jar in a place where the crystals can grow undisturbed overnight, or even for a few days. Warmer locations (such as upstairs or on top shelves) is best.
Download worksheet and exercises
DO NOT EAT!!! Keep these crystals out of reach of small kids, as they look a lot like the Rock Candy Crystals.
Here are photos from kids ages 2, 7, 9 that made their own! Great job to the Fluker Family!!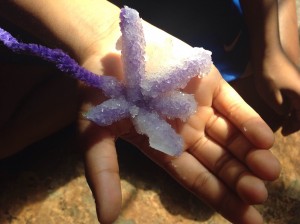
Lesson 27: Penny Crystal Structure
 The atoms in a solid, as we mentioned before, are usually held close to one another and tightly together. Imagine a bunch of folks all stuck to one another with glue. Each person can wiggle and jiggle but they can’t really move anywhere.
Atoms in a solid are the same way. Each atom can wiggle and jiggle but they are stuck together. In science, we say that the molecules have strong bonds between them. Bonds are a way of describing how atoms and molecules are stuck together.
There’s nothing physical that actually holds them together (like a tiny rope or something). Like the Earth and Moon are stuck together by gravity forces, atoms and molecules are held together by nuclear and electromagnetic forces. Since the atoms and molecules come so close together they will often form crystals.
Try this experiment and then we will talk more about this:
Heres what you need:
- 50 pennies
- ruler
Download worksheet and exercises
Lay about 20-50 pennies on the table so that they are all sitting flat on the table. Now, use the ruler (or your hand) to push the pennies toward one another so that you have one big glob of pennies on the table all touching one another. Don’t push so hard that they pile on top of one another. Just get one nice big flat blob of pennies.
Pretty simple huh? However, take a look at the pennies, do you notice anything? You may notice that the pennies form patterns. How could that happen? You just shoved them together you didn’t lay them out in any order. Taa daa! That’s what often happens when solids form.
The molecules are pulled so close to one another that they will form patterns, also known as matrices. These patterns are very dependent on the shape of the molecule so different molecules have a tendency to form different shaped crystals. Salt has a tendency to be “cubey”. Go take a look... and youll find that they are like little blocks!
Water has a tendency to from triangle or hexagon shapes which is why snowflakes have six sides. Your pennies also form a hexagon shape. Solids don’t always form crystals but they are more common than you might think. A solid that’s not in a crystalline form is called amorphous. Before you put your pennies away I want you to notice one more thing.
Heres what you do:
1. Take your pennies and lay them flat on the table.
2. Push them together so they all touch without overlapping.
3. Place your ruler on the right hand side of your penny blob so that it’s touching the bottom half of your pennies.
4. Slowly push the ruler to the left and watch the pennies.
You may have noticed that the penny “crystal” split in quite a straight line. This is called cleavage. Since crystals form patterns the way they do they will tend to break in pretty much the same way you saw your pennies break.
Break an ice cube and take a look. You may see many straight sections. This is because the ice molecules “cleave” according to how they formed. The reason you can write with a pencil is due to this concept. The pencil is formed of graphite crystal. The graphite crystal cleaves fairly easily and allows you to write down your amazing physics discoveries!
(The image here is a graphite crystal.)
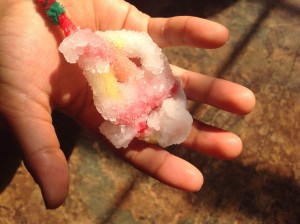
Lesson 28: Rock Candy Crystals
Crystals are formed when atoms line up in patterns and solidify. There are crystals everywhere — in the form of salt, sugar, sand, diamonds, quartz, and many more!
To make crystals, you need to make a very special kind of solution called a supersaturated solid solution. Heres what that means: if you add salt by the spoonful to a cup of water, you’ll reach a point where the salt doesn’t disappear (dissolve) anymore and forms a lump at the bottom of the glass.
The point at which it begins to form a lump is just past the point of saturation. If you heat up the saltwater, the lump disappears. You can now add more and more salt, until it can’t take any more (you’ll see another lump starting to form at the bottom). This is now a supersaturated solid solution. Mix in a bit of water to make the lump disappear. Your solution is ready for making crystals. But how?
Heres what you need:
- pencil or wooden skewer
- string
- glass jar (cleaned out pickle, jam or may jars work great)
- 8 cups of sugar
- 3 cups water
- paper clip
- adult help and a stove
- food coloring is optional but fun!
If you add something for the crystals to cling to, like a rock or a stick, crystals can grow. If you “seed” the object (coat it with the stuff you formed the solution with, such as salt or sugar), they will start forming faster. If you have too much salt (or other solid) mixed in, your solution will crystallize all at the same time and youll get a huge rock that you cant pull out of the jar. If you have too little salt, then you’ll wait forever for crystals to grow. Finding the right amount takes time and patience.
Download Student Worksheet & Exercises
1. If you plan on eating the sugar crystal when you’re done you probably want to boil water with the jar and the paper clip in it to get rid of any nasties. Be careful, and don’t touch them while they are hot.
2. Tie one end of the string to the pencil and the opposite end to the paper clip. (You can alternatively use a skewer instead of a piece of string to make it look more like the picture above, but youll need to figure out a way to suspend the skewer in the jar without touching the sides or bottom of the jar.)
3. Wet the string a bit and roll it in some sugar. This will help give the sugar crystals a place to start.
4. Place the pencil across the top of the jar. Make sure the clip is at the bottom of the jar and that the string hangs straight down into the jar. Try not to let the sting touch the side of the jar.
5. Heat 3 cups of water to a boil
6. Dissolve 8 cups of sugar in the boiling water (again be careful!). Stir as you add. You should be able to get all the sugar to dissolve. You can add more sugar until you start to see undissolved bits at the bottom of the pan. If this happens, just add a bit of water until they disappear.
7. Feel free to add some food coloring to the water.
 8. Pour the sugar water into the jar. Put the whole thing aside in a quiet place for 2 days to a week. You may want to cover the jar with a paper towel to keep dust from getting in.
You should see crystals start to grow in about 2 days. They should get bigger and bigger over the few days. Once you’re happy with how big your crystals get, you can eat them! It’s nothing but sugar! (Be sure to brush your teeth!) This one (left) us about 6 months old.
There you go! Next time you hold a pencil, throw a ball, or put on a shoe try to keep in mind that what you’re doing is using an object that is made of tiny strange atoms all held tightly together by their bonds.
Lesson 29: Salt and Vinegar Crystals
Were going to take two everyday materials, salt and vinegar, and use them to grow crystals by creating a solution and allowing the liquids to evaporate. These crystals can be dyed with food coloring, so you can grow yourself a rainbow of small crystals overnight.
The first thing you need to do is gather your materials. You will need:
Heres what you need:
- 1 cup of warm water
- 1/4 cup salt (non-iodized works better)
- 2 teaspoons to 2 tablespoons of vinegar (you decide how much you want to use)
- a shallow dish (like a pie plate)
- a porous material to grow your crystals on (like a sponge)
First, mix together the salt, vinegar, and water in a cup. (You cal alternatively boil the water on the stove and stir in as much salt as the water will dissolve.) Add the vinegar after you turn off the heat. Next, place your sponge in a bowl and pour the solution over the sponge, submerging the sponge in the solution. Leave out, undisturbed, until the liquids evaporate, leaving behind a sheet of crystals.
Download worksheet and exercises
You can add more liquid carefully to the bowl to continue the growth of your crystals for long after the first solution dries up. Also, as your crystals grow, dot the sponge with drops of food coloring to crow various colors of crystals.
Although it takes awhile for the crystals to start growing, once they do, they will continue to grow quickly!
Lesson 30: Salt Stalactites
This is a continuation of the Laundry Soap and Rock Candy experiments, so make sure youve done those before trying this one.
Heres what you need:
two clean glass jars
yarn or string
epsom salts
water
tin foil or cook sheet
adult help, sauce pot, and a stove.
Make a supersaturated saturated solution from warm water and Epsom salts (magnesium sulfate). (Add enough salt so that if you add more, it will not dissolve.) Fill two empty glass jars with the salt solution. Space the jars a foot apart on a layer of foil or on a cookie sheet. Suspend a piece of yarn or string from one jar to the other. Wait impatiently for about three days. A stalactite should form from the middle of the string!
Download worksheet and exercises
Lesson 31: Eggshell Geodes
Geodes are formed from gas bubbles in flowing lava. Up close, a geode is a crystallized mineral deposit that is usually very dull and ordinary-looking on the outside. When you crack open a geode, however, it’s like being inside a crystal cave. We’ll use an eggshell to simulate a gas bubble in flowing lava.
We’re going to dissolve alum in water and place the solution into an eggshell. In real life, minerals are dissolved in groundwater and placed in a gas bubble pocket. In both cases, you will be left with a geode.
Note: These crystals are not for eating, just for looking.
Heres what you need:
- clean egg shells
- alum (check the spice section of the grocery store)
- food dye
- water
Download worksheet and exercises
This is a continuation of the Laundry Soap and Rock Candy experiments, so make sure youve done those before trying this one.
Find a clean half eggshell. Fill a small cup with warm water and dissolve as much alum in the water as you can to make a saturated solution (meaning that if you add any more alum, it will fall to the bottom and not dissolve).
Fill the eggshells with the solution and set aside. Observe as the solution evaporates over the next few days. When the solution has completely evaporated, you will have a homemade geode. If no crystals formed, then you had too much water and not enough alum in your solution.
Lesson 32: Metal Crystals
This experiment is for advanced students. Water Glass is another name for Sodium Silicate (Na2SiO3), which is one of the chemicals used to grow underwater rock crystal gardens. Metal refers to the metal salt seed crystal you will use to start your crystals growing. You can use any of the following metals listed. Note however, that certain metals will give you different colors of crystals.
Your crystals begin growing the instant you toss in the seed crystals. These crystals are especially delicate and fragile - just sloshing the liquid around is enough to break the crystal spikes, so place your solution in a safe location before adding your seed crystals.
After your garden has finished growing to the height and width you want, simply pour out the sodium silicate solution and replace with fresh water (or no water at all). Due do the nature of these chemicals, keep out of reach of small children, and build your garden with adult supervision.
Heres what you need to get:
- Clean glass jar
- Sodium silicate (check shopping list for online ordering)
- One (or more) of the following for different colors:
- White - calcium chloride (found on the laundry aisle of some stores)
- Purple - manganese (II) chloride
- Blue - copper (II) sulfate (common chemistry lab chemical, also used for aquaria and as an algicide for pools)
- Red - cobalt (II) chloride
- Orange - iron (III) chloride
Download worksheet and exercises
The seed crystals are metal salts that react with the water/sodium silicate solution to climb upwards in the solution, as the products are less dense than the surrounding solution.
Troubleshooting: If you add too many seed crystals, your solution will turn cloudy and youll need to start all over again! Add your seed crystals sparingly - you can always add more later.
Lesson 33: Charcoal Crystals
Charcoal crystals uses evaporation to grow the crystals, which will continue to grow for weeks afterward. Youll need a piece of very porous material, such as a charcoal briquette, sponge, or similar object to absorb the solution and grow your crystals as the liquid evaporates. These crystals are NOT for eating, so be sure to keep your growing garden away from young children and pets! This project is exclusively for advanced students, as it more involves toxic chemicals than just salt and sugar.
The materials you will need for this project:
- Charcoal Briquettes (or pieces of sponge or brick or porous rock)
- Distilled Water
- Uniodized Salt
- Ammonia (Keep this out of reach of children!)
- Laundry Bluing
- Food Coloring (optional)
- Pie Plate (glass or tin)
- Measuring Spoons
- Disposable Cup
- Popsicle Stick
Download worksheet and exercises
The first thing youll need to whip up a batch of solution, then youll start growing your garden. Heres how you do it:
1. Into a disposable cup, stir together (use a popsicle stick to mix it up, not your good silverware) 1 cup of water, 1 tablespoon of ammonia, 1/2 cup of laundry bluing, and 1/2 cup of salt (non-iodized).
2. Place your charcoal or sponge in a pie tin and pour your solution from step 1 over it.
3. Wait impatiently for a few days to one week. As the liquid evaporates, the salts are left behind, forming your crystals.
4. Continue to add more solution (to replace the evaporated solution) to keep your crystals growing. Think of it as watering (with your special solution) your crystals, which are growing in your soil (sponge).
5. You can dot the sponge with drops of food coloring to grow different colors in your garden.
Questions to Consider...
Why do you think you needed ammonia and laundry bluing for this experiment? What is laundry bluing, anyway? Why do the crystals form just on the porous object and not the glass/metal pie plate? Let us know in the comment field below what you think:
Lesson 34: Earthquakes
When two blocks of the Earth slip past each other suddenly, thats what we call an earthquake! From a physics point of view, earthquakes are a release of the elastic potential energy that builds up. Most energy is released as heat, not as shaking, during an earthquake. 90% of all earthquakes happen along the Ring of Fire, which is the active zone that surrounds the Pacific Ocean.
The Earth has four main layers: the hard skin on the surface is the crust which extends only 30 miles; the hot magma section is a soupy mass of rock that extends approximately 1800 miles; and the core which is made out of two parts: the hot liquid metal outer core surrounds the solid nickel -iron inner core.
The plates on the crust float on magma, which is a lot like the consistency tar. The crust has seven main tectonic plates that slide around and can either slide apart from each other (called a normal fault that is usually found on the sea floor), collide into each other (called a thrust fault), or move in opposite directions (strike-slip fault) at different speeds. Where the plates are sliding apart on the sea floor, the temperature of the water can rise over 1200oF. Scientists measure the speeds of the plates moving from 1 to 10 inches per year.
There are three different waves that travel through the planet when an earthquake happens. The first waves are the compression-type "P-waves" (primary waves), which travel through the entire planet, including liquid water and solid rock. Most people dont notice the P-waves, but they do notice the secondary "S-waves", which follow 60-90 seconds after the P-waves. Following the S-waves are the surface waves, which are like when you wave a bed sheet up and down.
Earthquakes are detected and measured by many different types of instruments, like strain gauges, creep meters, tilt sensors, seismometers, x-ray imagery, and more. These detectors arent perfect, though. Earthquake detectors not only discover earthquakes but also glacier movement, nuclear explosions, meteor impacts, and volcano eruptions!
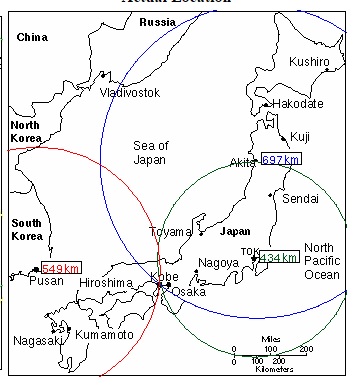
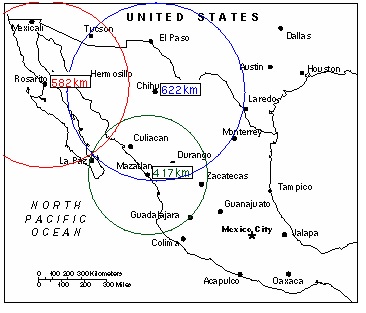
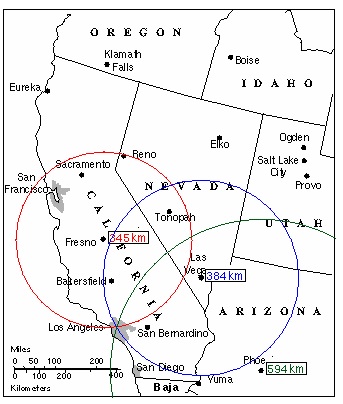
After you watch the video, click the link to do your seismology calculations to figure out both the epicenter and the magnitude of four different earthquakes:
- Japan Earthquake 1995 (map answer)
- Los Prieta California Earthquake 1989 (map answer)
- Mexico Earthquake 1978 (map answer)
- Northridge California Earthquake 1994 (map answer)
If youd like to measure the Earths Magnetic Pulse, you can do that here.
[/am4show]