 This is an overview course of Biology that came about due to a huge number of requests I’ve had from parents that report their kids/students are either “not getting it” or just so bored that they are resisting learning science at all. Even if you haven't done biology at all yet, you can still work your way through this course and get a lot out of it using the experiments described below.
 If you've got a student who's struggling to even like biology at all, I suggest starting this quick and easy Getting Started in Biology Guide to get them going before starting this overview course. This PDF guidebook works well for even students who are already excited and ready to go with biology! Inside you'll learn how to make a laser microscope so you can see the critters swimming around in pond water, measure the size of a molecule using dish soap, extract DNA with rubbing alcohol, and more!
The Course The videos and experiments listed below are in sequence, so all you have to do is click the links below in order and watch the step-by-step instructional videos for each experiment. Most experiments have data logs and worksheets with them as well in addition to exercises to answer with each one. After you've completed this course, you will dive into Units 16 through 19 for the remainder of the content. Again, this course is a bird's eye overview of biology before you dive into each area.
This Biology overview course is ideal for junior high and high school students who are working on their first-year biology course. The course focuses on general biology. the scientific method, classifications, microscopy, biochemistry, cellular biology, genetics, dissection, and ecosystems. We’ve added extra experiments in addition to the ones in the book, so look them over and see which experiments you’d like to do, and then see if you can figure out way to perform the experiment with the materials and equipment you already have. Have fun!
[am4show have='p153;' guest_error='Guest error message' user_error='User error message' ]
 If you love plants, animals, insects, and strange puzzling challenges, then this is the area of science for you. We’re about to see and do the kind of science that was not in your typical textbooks. Without biology, there would be no cure for diseases, and we wouldn’t understand which foods are the right ones to eat, why we have to brush our teeth and wash our hands, which water we can drink without getting sick, and athletes couldn’t figure out how to improve their performance. Biology helps us understand how life works so we can make the most effective use of that information, like how to clean up our environment or grow better crops without exhausting the soil.
In this course, you’ll get to discover how plants detect not only sunsets but also gravity, how to make a live cell laser microscope and observe organisms in their natural environment, how to extract DNA from food in your kitchen, how bacteria can be used to turn motors to generate energy, new types of biological energy conversion scientist have discovered, measure the size of a molecule using dish soap, and so much more! We’re going to cover quite areas of biology in this course, including zoology, biochemistry, molecular biology, ecology, botany, astrobiology, marine biology and more. We are going to discover how to be a real biologist in the field as well as learn the big concepts in biology and how they tie into both physics and chemistry.
You don’t have to be a genius in order to do this – anyone that works through this course step by step can do it, and I am here to help you every step of the way. If you’re in middle school or high school and have never done biology before, you can do this overview course! No previous experience is required.
Biology does contain some math. Now before you panic or roll your eyes, note that you don’t need a high level of math in order to complete this course. I am going to walk you through every step of the way, and it’s best if you learn the math right alongside the science so that you can really understand why you’re learning that math stuff in the first place.
What is Biology?
Biology is the science that studies all living organisms. There are tons of different ways you can do if you’re interested in biology at all, and quite of few of these overlap! We’re going to cover quite a few of these in today’s class, including zoology, biochemistry, molecular biology, ecology, botany, astrobiology and more.
So this is a big area of science, and I could spend all day going through every kind of living thing on the planet and bore you with all the details about its special habits and where to find it, but honestly, you’d forget about most of what I talk about, and it’s really just too much information to squeeze into an overview course. A lot of typical biology classes deal with memorizing lots of little facts and details about a huge amount of things, and those are things you can easily find in a biology textbook.
Instead what I thought I would do is hit the highlights about what a real biologist is and how they spend their time, show you the big concepts in biology and how they tie into both physics and chemistry, and if you find there’s something you’d like to know more about, just make a note and you can go look up after class. You can get a good high school or college level biology textbook as a reference book from your local library so you have it to help answer your questions as we go along together.
So how do we start? First...
Step 1: Get organized.
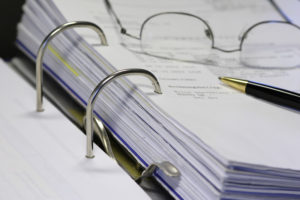 You'll need a three-ring binder, a pencil, and a printer, because this course has a lot of biology experiments, many of which have downloadable worksheets and data sheets that you can print out. I recommend building your science notebook incrementally as you go along, using a three hole punch on the worksheets you print out and complete and sticking it in a binder. You can also print out the individual homework sets that accompany each section, complete those and also stick them in the binder. Snap photos of yourself doing the experiments and paste them in, and you'll have one amazing science notebook journal at the end of the year!
If you'd like to keep a more rigorous science journal, you'll want to check out my complete How to Keep Scientific Journal instructions. These are the ones I had my college students prepare with every lab they performed.
Step 2: Download the workbook and shopping list for the course.
Science isn't really science without equipment to perform your experiments, and biology is full of them because it has its roots (sorry for the pun!) in both physics and chemistry! But that doesn't mean it has to be expensive or extensive. You'll find most of these items are things you already have around your house or you can pick up from the grocery store in town.
The worksheet includes a shopping list of materials for the experiments outlined in the video below. It also includes places to write down ideas and answers to questions during the videos of this course. In addition to printing out the worksheet, you'll also want to print out the lab worksheets that go with the experiments (links are right under each video as appropriate) and stick those in your binder also.
Step 3: Watch videos below in order.
You can jump around within this course, however it's important to watch the first two videos before you launch into the rest of the course. All the videos below include instructional content and most of them also include hands-on experiments to further illustrate what we just learned with the content. They are both interspersed together so you get to do experiments as you learn about the concepts and academics at the same time.
You'll also learn how to design experiments so you can measure and take data, make sense of your data and turn it into not only results to a problem, but make solutions and recommendations based on scientific evidence through the experiments they set up themselves. (If you've already started and need to jump to the next page, click one of these: Part 2 or Part 3.)
Are you ready to get started on your journey in Biology? Let's go!
Lesson 2: Why Classify?
Lesson 3: Entomology
Lesson 4: Birds & Flight
Lesson 5: Airfoils
Lesson 6: How to Fly a Real Airplane
Lesson 7: Botany 1
Lesson 8: Gummy Bears Experiment
Lesson 9: Botany 2
Lesson 10: Plant Color & Chemistry
Lesson 11: Taxonomy
Lesson 12: Viruses & Bacteria
Lesson 13: Laser Microscope experiment
Quick Links:
Biology Part 2
Biology Part 3
Lesson 2: Why Classify?
(Where's Lesson 1? You just watched it above in the "What is Biology" section!) Scientists don’t just classify things based on how they look. For example, alligators and crocodiles both look similar, and how they look actually depends on which part of the world they came from.
Lesson 3: Entomology
Entomologists study insects, including what they look like and how they react and behave, and also the environment they like to live in.
Lesson 4: Birds & Flight
If you’ve ever watched a bird take off, you know it flaps its wings first, then somehow lifts itself off the ground. Some birds need to get a running start, and overs can just hover straight up. What about an airplane – how does an airplane take off? Does it need to flap its wings? Let's find out!
Lesson 5: Airfoils
The Ancient Chinese discovered that kites with curved surfaces flew better than kites with flat surfaces. A wing needs to have camber: the top needs to be slightly curved, like a bump, and the bottom is straight.
This is called an airfoil. Airfoils are designed to generate as much lift as possible with as little drag as possible. Here’s how you make an airfoil:
Materials:
- index card
- tape
- skewer or pencil
First, you set up how wide you want your wing to be. This is a chord line. One point on the chord line is the leading edge and one is the trailing edge.
Now add camber by pushing up the top surface until it curves. Now push that bump to the left so it’s more curved at the leading edge. How thick you make this will depend on how fast your wing is going to go and how much lift you need.
Now add the same thickness under the camber line to make the lower surface. Now you have an airfoil!
The airfoil uses Bernoulli’s principle. The top surface of the wing has more camber than the bottom surface, which means that air will flow faster over the top than it does underneath. This means that there’s less air pressure above the wing than under it, and this difference in air pressure makes lift.
How much lift? Well that depends on the airfoil shape, the size and shape of the wing, the angle it makes with the air, the density of the air, and how fast it’s going. Airplanes designed to fly slow have thicker airfoils than supersonic aircraft because the air flows slightly differently at fast versus slow speeds. Airplanes flying at high altitudes have less air molecules to generate lift in the same amount of air as lower flying planes.
If you’ve ever heard of “stalls”, it’s different when an airplane stalls than when a car stalls. What happens when a car stalls? The engine stops, right? If the engine stops in an airplane, it’s called an engine failure, not a stall. A stall is when the air stops flowing over the wing. The engine in an airplane can stop but air can still go over the wing, right? During an engine failure, a propeller airplane turns into a glider, which still can fly. So a stall happens when the wing tips up so high that air can’t flow over the top, so there’s no lower pressure and therefore no lift. If there’s no lift, the airplane turns basically into a rock and falls.
Lesson 6: How to Fly a Real Airplane
If your kids are hog-wild about flying and can't seem to get enough of paper airplanes, flying kites, and rockets, here's something that will really spark their interest.
One of the best ways to introduce kids into the world of aeronautics and aviation is to get them inside a small airplane. By having the kids actually FLY, they get a chance to interact with a real pilot, see how the airplane responds to the controls, and get a taste for what their future can really be like if they keep up their studies in aerodynamics.
We're going to learn how to fly an airplane from a certified flight instructor. He's going to walk you through every step, from pre-flight to take-off to landing. You'll hear the radio transmissions from other aircraft flying in the area, how the control tower directs traffic, and more. We've used a special microphone inside the cockpit to cut down on the engine noise (which actually was rigged up to only record when it heard voice sounds), so the sound might seem different than you expected.
Are you ready?
Want to fly a REAL airplane? There are a few different ways you can do this:
- Get a First Flight from the Young Eagles group in your area.
- Rent this video from the library or video rental store: One-Six Right
- Check out Flight Training to find local pilots and magazines you can really learn from.
- Visit your local airport and ask for a list of CFIs (Certified Flight Instructors) who can provide you with your first flight. It's usually much less expensive than you think!
When we teach our Summer Science Camps, one of the first things we do is give away a free airplane lesson. We do this for a number of reasons, but first and foremost, to reinforce that when you teach science, you must do it by starting with the experiment first, then follow it up with the academic content. I know it sounds backwards from most approaches to teaching science, and it is! BUT it's the best way that kids learn in the long-term.
With this method, you are able to introduce a topic that really gets kids excited because now they have a real-world, hands-on application of it that really makes sense to them. When kids are excited about a subject, it's much easier for them to pick up the academics. Once they start asking you questions, they've signaled you that they are ready to learn more about it (like lift, drag, aerodynamics, wing design, etc.)
It's also such a wonderful thing to see the kids come up to us, years later, with their eyes still twinkling over the memory of their first flying lesson!
Lesson 7: Botany 1
Botany (plant biology) studies the nature of plants and their environment. Take a look at some of the things you get to study when you’re a botanist!
BONUS CONTENT: Measuring Photosynthesis
Here’s a neat experiment you can do to measure the rate of photosynthesis of a plant, and it’s super-simple and you probably have most of what you need to do it right now at home!
You basically take small bits of a leaf like spinach, stick it in a cup of water that has extra carbon dioxide in it, and shine a light on it. The plant will take the carbon dioxide from the water and the light from the lamp and make oxygen bubbles that stick to it and lift it to the surface of the water, like a kid holding a bunch of helium balloons. And you time how long this all takes and you have the rate of photosynthesis for your leaf.
Lesson 8: Gummy Bears Experiment
 Gummy bears are a great way to bust one of the common misconceptions about light reflection. The misconception is this: most students think that color is a property of matter, for example if I place shiny red apple of a sheet of paper in the sun, you’ll see a red glow on the paper around the apple.
Where did the red light come from? Did the apple add color to the otherwise clear sunlight? No. That’s the problem. Well, actually that’s the idea that leads to big problems later on down the road. So let’s get this idea straightened out.
Materials:
- flashlight
- laser
- red and green gummy bear
Download your student worksheet here! This download is provided by Laser Classroom. Check out their website for more free downloads and really cool lasers!
It’s really hard to understand that when you see a red apple, what’s really happening is that most of the wavelengths that make up white light (the rainbow, remember?) are absorbed by the apple, and only the red one is reflected. That’s why the apple is red.
When the light hits something, it gets absorbed and either converted to heat, reflected back like on a mirror, or transmitted through like through a window.
When you shine your flashlight light through the red gummy bear, the red gummy is acting like a filter and only allowing red light to pass through, and it absorbs all the other colors. The light coming from out the back end of the gummy bear is monochromatic, but it’s not coherent, not all lined up or in synch with each other. What happens if you shine your flashlight through a green gummy bear? Which color is being absorbed or not absorbed now?
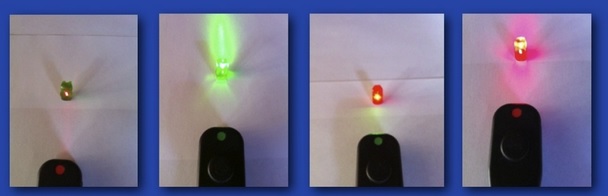 Now remember, the gummy bear does NOT color the light, since white light is made up of all visible colors, red and green light were already in there. The red gummy bear only let red through and absorbed the rest. The green gummy bear let green through and absorbed the rest.
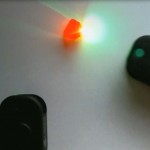
Now...take out your laser. There’s only one color in your laser, right? Shine your laser at your gummy bears. Which gummy bear blocks the light, and which lets it pass through? Why is that? I’ll give you one minute to experiment with your gummy bears and your lasers.
In the image above, the two on the left are green gummy bears, and the two on the right are red gummy bears. The black thing is a laser. The dot on the black laser tells you what color the laser light is, so the laser on the far left is a red laser shining on a green gummy bear. Do you see how the light is really visible out the back end of the gummy bear in only two of the pictures? What does that tell you about light and how it gets transmitted through an object?
Lesson 9: Botany 2
Plants have the ability to detect light, touch and different types of gases, and also record that information so it can recall it later!
Lesson 10: Plant Color & Chemistry
Acids are sour tasting (like a lemon), bases are bitter (like unsweetened cocoa powder). Substances in the middle are more neutral, like water. Scientists use the pH (power of hydrogen, or potential hydrogen) scale to measure how acidic or basic something is. Hydrochloric acid registers at a 1, sodium hydroxide (drain cleaner) is a 14. Water is about a 7. pH levels tell you how acidic or alkaline (basic) something is, like dirt. If your soil is too acidic, your plants won't attract enough hydrogen, and too alkaline attracts too many hydrogen ions. The right balance is usually somewhere in the middle (called 'pH neutral'). Some plants change color depending on the level of acidity in the soil - hydrangeas turn pink in acidic soil and blue in alkaline soil.
Some things you can test (in addition to the ones in the video) include: Sprite, distilled white vinegar, baking soda, Vanish, laundry detergent, clear ammonia, powdered Draino, and Milk of Magnesia. DO NOT mix any of these together! Simply add a bit to each cup and test it with your pH strips. Here's a quick video demonstration:
z
There are many different kinds of acids: citric acid (in a lemon), tartaric acid (in white wine), malic acid (in apples), acetic acid (in vinegar), and phosphoric acid (in cola drinks). The battery acid in your car is a particularly nasty acid called sulfuric acid that will eat through your skin and bones. Hydrochloric acid is found in your stomach to help digest food, and nitric acid is used to make dyes in fabrics as well as fertilizer compounds.
Lesson 11: Taxonomy
There’s a special way scientists classify and name all living things – it’s called “taxonomy”. All living things are divided into the following groups, called kingdoms. All kingdoms are made up of smaller groups which are made of even smaller groups, and so on. A series of groups within one system is called a hierarchy. It’s how you find your serving spoon in a drawer with a million other silverware pieces – it makes it easy and fast to find out about what you want.
Lesson 12: Viruses & Bacteria
A virus is like when you catch a cold or the chicken pox – the virus uses the cells in your body to make copies of itself so it can spread throughout your body. Bacteria on the other hand, are living microorganisms, most of which don’t harm people at all (there are exceptions, like when they cause strep throat and tuberculosis).
Lesson 13: Laser Microscope experiment
 Did you know that you can use a laser to see tiny paramecia in pond water? We're going to build a simple laser microscope that will shine through a single drop of water and project shadows on a wall or ceiling for us to study.
Here's how it works: by shining a laser though a drop of water, we can see the shadows of objects inside the water. It's like playing shadow puppets, only we're using a highly concentrated laser beam instead of a flashlight.
If you're wondering how a narrow laser beam spreads out to cover a wall, it has to do with the shape of the water droplet. Water has surface tension, which makes the water want to curl into a ball shape. But because water's heavy, the ball stretches a little. This makes the water a tear-drop shape, which makes it act like a convex lens, which magnifies the light and spreads it out:
Here's how to make your own laser microscope:
Materials:
- red or green laser (watch video for laser tips)
- large paperclip
- rubber band
- stack of books
- white wall
- pond water sample (or make your own from a cup of water with dead grass that's been sitting for a week on the windowsill)
Download Student Worksheet & Exercises
Click Here to go to Next Lesson!
[/am4show]