These homemade pulleys work great as long as they glide freely over the coat hanger wire (meaning that if you give them a spin, they keep spinning for a few more seconds).  You can adjust the amount of friction in the pulley by adjusting the where the metal wire bends after it emerges from the pulley.

[am4show have='p8;p9;p14;p41;p88;p92;' guest_error='Guest error message' user_error='User error message' ] All you need is a wire coathanger, a thread spool, and a pair of vice grips... and the video below.


Download Student Worksheet

Cut a wire coat-hanger at the lower points (at the base of the triangular shape) and use the hook section to make your pulley. Thread both straight ends through a thread spool, crossing in the middle, and bend wire downwards to secure spool in place. Be sure the spool turns freely. Use hook for easy attachment. (These pulleys work well for the return-pulley system experiment in this section.)
If you still have trouble, you can purchase pulleys from the hardware store, or more inexpensively, from a farm supply store. (We get ours from the chicken coup section – no kidding!) If you really want to go hog-wild with pulleys, get a bunch and clip them onto climbing-rated carabineer. [/am4show]

Silly as our application for this experiment may sound, we use this system to keep pens handy near the shopping list on the fridge.  It’s saved us from many pen-searches over the years!

We install these at various places around the house (by the telephone, fridge, front door, anywhere that you usually need a pen at the last minute), and have even seen them at the counters of local video-rental stores.

[am4show have='p8;p9;p14;p41;p88;p92;' guest_error='Guest error message' user_error='User error message' ]

Download Student Worksheet

Troubleshooting: It’s important to note that the weight needs to slide freely both up and down the length of the cord (which is why fishing line is a great choice – the surface of the line is very low friction). Another important tip: the weights you use must weigh more than the object at the end of the string plus the force of friction in the lines (and the pulley).  Hollow, metal objects work great like nuts (for bolts).

You’ll need to practice to find just the right balance point: where the pen flies up to its resting position when you let go of the pen.

This is a great addition to any tree house or playground structure!  Hang a loop of rope from a tree branch (don't forget to thread the pulleys onto the rope before you tie the knot!  Connect one pulley to the basket handle made from a circle of short rope.  Tie a length of rope to the basket handle, then up through one tree pulley, down through the basket pulley, and up through the second tree pulley. Thread a 6" length of PVC pipe onto the end and tie the rope back onto itself to form a handle.

[/am4show]

Simple machines make our lives easier. They make it easier to lift, move and build things. Chances are that you use simple machines more than you think. If you have ever screwed in a light bulb, put the lid on a jam jar, put keys on a keychain, pierced food with a fork, walked up a ramp, or propped open a door, you've made good use of simple machines. A block and tackle setup is also a simple machine.

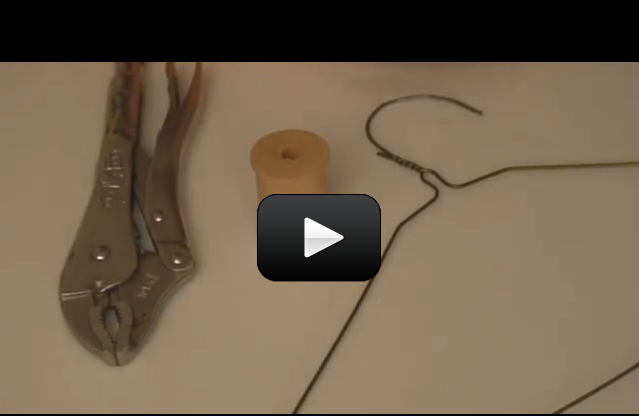
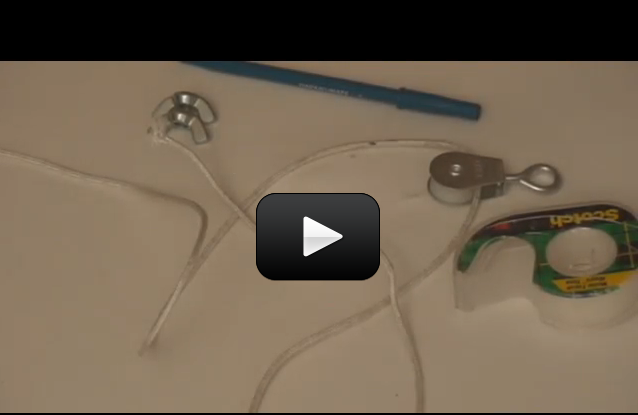
Block and tackle refers to pulleys and rope (in that order). One kid can drag ten adults across the room with this simple setup – we've done this class lots of times with kids and parents, and it really works! Be careful with this experiment - you'll want to keep your fingers away from the rope and don't pull too hard (kids really get carried away with this one!)

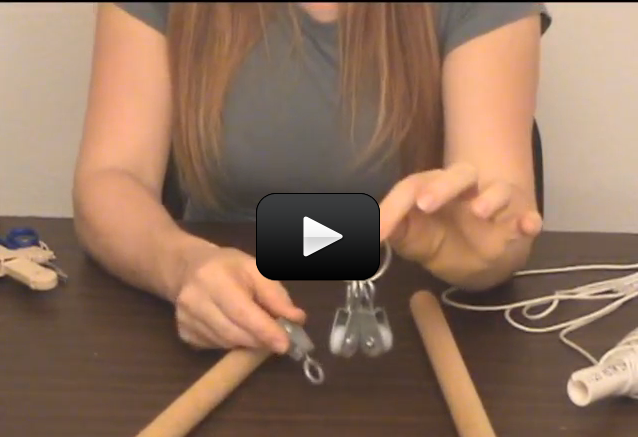
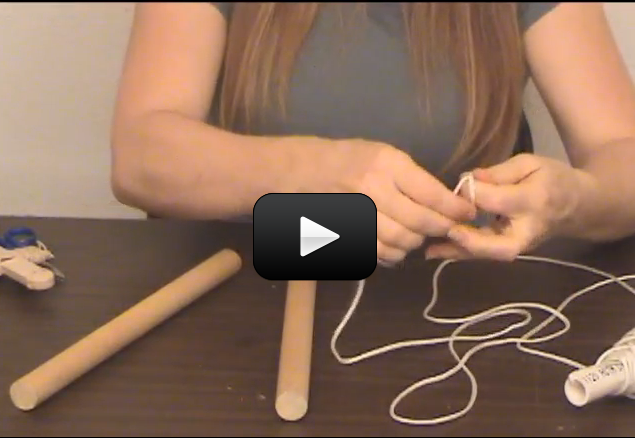
If you haven't already, make sure you try out the broomstick version of this activity first.

[am4show have='p8;p9;p14;p41;p88;p92;' guest_error='Guest error message' user_error='User error message' ] Materials:
  • Rope
  • pulleys
  • chain link fence (or a broom)
  • three people
Cut off about 12" of rope and circle a loop around a strong support, like a chain link fence. Before you tie a knot, thread three pulleys onto the rope… and now tie it off.

Make another circle of rope and add three more pulleys onto it. Loop the rope over the handle of a mop or broom. Thread the rest of the nylon rope through zigzag fashion first through one pulley on the fence, then through a pulley on the mop, then to an open pulley back on the fence, then another free pulley on the mop, etc… Knot the end of the rope to the mop. You should have one free end of rope left.

Attach a kid to the free end of the rope by adding a handle.  You can thread a rope through a 6" piece of PVC pipe and tie the rope back on itself.  Attach adults to the mop, holding it straight out in front of their chest.  The adults' job is to resist the pull they will feel as the kid pulls with his end of the rope.


Download Student Worksheet [/am4show]

We're going to be using pulleys to pull two (or more) kids with one hand. You will be using something called ‘Mechanical Advantage’, which is like using your brains instead of brute strength. When you thread the rope around the broom handles, you use 'mechanical advantage' to leverage your strength and pull more than you normally could handle.

How can you possibly pull with more strength than you have? Easy - you trade ‘force’ for ‘distance’ - you can pull ten people with one hand, but you have to pull ten feet of rope for every one foot they travel.

Here's what you do: [am4show have='p8;p9;p14;p41;p88;p92;' guest_error='Guest error message' user_error='User error message' ]
  • nylon rope (at least 50')
  • two strong dowels (like the handle from a broomstick)
  • friends and you

Download Student Worksheet

Have two people face each other and each hold a smooth pipe or strong dowel (like a mop or broom) horizontally straight out in front of their chest.   Tie a length of strong nylon rope (slippery rope works best to minimize friction) near the end of the mop.

Drape the rope over the second handle (broom), loop around the bottom, then back to the top of the broom.  You're going to zigzag the rope back and forth between the mop and broom until you have four strings on each handle.

Attach a third person to the free end of the rope.  Make a quick handle for a third person: Thread a 6" length of PVC pipe onto the end and tie the rope back onto itself to form a handle.

The two people hold the dowels will not be able to resist the pull you give when pulling on the end of the rope! Be careful with this one - there's a lot of force going through your rope, and that's usually the first thing to break. If everyone pulls gently, you don't have to worry.

Troubleshooting Tip: If you’re finding there’s just too much friction between the rope and the broomstick (meaning that the rope doesn’t slide smoothly over the broom handles, then click here to learn how to upgrade to pulleys. [/am4show]

Are you curious about pulleys? This set of experiments will give you a good taste of what pulleys are, how to thread them up, and how you can use them to lift heavy things.

We'll also learn how to take data with our setup and set the stage for doing the ultra-cool Pulley Lift experiments.

Are you ready? [am4show have='p8;p9;p14;p41;p75;p85;p88;p92;' guest_error='Guest error message' user_error='User error message' ] For this experiment, you will need:

  • One pulley (from the hardware store... get small ones that spin as freely as possible. You’ll need three single pulleys or if you can find one get a double pulley to make our later experiment easier.)
  • About four feet of string
  • 2 paper cups
  • many little masses (about 50 marbles, pennies, washers etc.)
  • Yardstick or measuring tape
  • A scale (optional)
  • 2 paper clips
  • Nail or some sort of sharp pokey thing
  • Table
Download Student Worksheet & Exercises

Advanced students: Download your Simple Pulley Experiments

1. Take a look at the video to see how to make your “mass carriers”. Use the nail to poke a hole in both sides of the cup. Be careful to poke the cup...not your finger! Thread about 4 inches of string or a pipe cleaner through both holes. Make sure the string is a little loose. Make two of these mass carriers. One is going to be your load (what you lift) and the other is going to be your effort (the force that does the lifting).

2. Dangle the pulley from the table (check out the picture).

3. Bend your two paper clips into hooks.

4. Take about three feet of string and tie your paper clip hooks to both ends.

5. Thread your string through the pulley and let the ends dangle.

6. Put 40 masses (coins or whatever you’re using) into one of the mass carriers. Attach it to one of the strings and put it on the floor. This is your load.

7. Attach the other mass carrier to the other end of the string (which should be dangling a foot or less from the pulley). This is your effort.

8. Drop masses into the effort cup. Continue dropping until the effort can lift the load.

9. Once your effort lifts the load, you can collect some data. First allow the effort to lift the load about one foot (30 cm) into the air. This is best done if you manually pull the effort until the load is one foot off the ground. Measure how far the effort has to move to lift the load one foot.

10. When you have that measurement, you can either count the number of masses in the load and the effort cup or if you have a scale, you can get the mass of the load and the effort.

11. Write your data into your pulley data table in your science journal.

Double Pulley Experiment

You need:

Same stuff you needed in Experiment 1, except that now you need two pulleys.


1. Attach the string to the hook that’s on the bottom of your top pulley.

2. Thread the string through the bottom pulley.

3. Thread the string up and through the top pulley.

4. Attach the string to the effort.

5. Attach the load to the bottom pulley.

6. Once you get it all together, do the same thing as before. Put 40 masses in the load and put masses in the effort until it can lift the load.

7. When you get the load to lift, collect the data. How far does the effort have to move now in order to lift the load one foot (30 cm)? How many masses (or how much mass, if you have a scale) did it take to lift the load?

8. Enter your data into your pulley table in your science journal.

Triple Pulley Experimentitem7

You Need

Same stuff as before If you have a double pulley or three pulleys you can give this a shot. If not, don’t worry about this experiment.

Do the same thing you did in experiments 1 and 2 but just use 3 pulleys. It’s pretty tricky to rig up 3 pulleys so look carefully at the pictures. The top pulley in the picture is a double pulley.

1. Attach the string to the bottom pulley. The bottom pulley is the single pulley.item8
2. Thread the string up and through one of the pulleys in the top pulley. The top pulley is the double pulley.

3. Take the string and thread it through the bottom pulley.

4. Now keep going around and thread it again through the other pulley in the top (double) pulley.

5. Almost there. Attach the load to the bottom pulley.

6. Last, attach the effort to the string.

7. Phew, that’s it. Now play with it!

Take a look at the table and compare your data. If you have decent pulleys, you should get some nice results. For one pulley, you should have found that the amount of mass it takes to lift the load is about the same as the amount of mass of the load. Also, the distance the load moves is about the same as the distance the effort moves.

All you’re really doing with one pulley, is changing the direction of the force. The effort force is down but the load moves up.

Now, however, take a look at two pulleys. The mass needed to lift the load is now about half the force of the load itself! The distance changed too. Now the distance you needed to move the effort, is about twice the distance that the load moves. When you do a little math, you notice that, as always, work in equals work out (it won’t be exactly but it should be pretty close if your pulleys have low friction).

What happened with three pulleys? You needed about 1/3 the mass and 3 times the distance right? With a long enough rope, and enough pulleys you can lift anything! Just like with the lever, the pulley, like all simple machines, does a force and distance switcheroo.

The more distance the string has to move through the pulleys, the less force is needed to lift the object. The work in, is equal to the work out (allowing for loss of work due to friction) but the force needed is much less.

Exercises Answer the questions below:
  1. What is the load and effort of a pulley? Draw a pulley and label it.
  2. What is the best way to say what a simple machine helps us do?
    1. Do work without changing force applied
    2. Change the direction or strength of a force
    3. Lift heavy shipping containers
    4. None of these
  3.  Name one other type simple machine and an example:
[/am4show]