Now let’s talk about the other ever present force on this Earth, and that’s friction. Friction is the force between one object rubbing against another object. Friction is what makes things slow down.


Without friction things would just keep moving unless they hit something else. Without friction, you would not be able to walk. Your feet would have nothing to push against and they would just slide backward all the time like you’re doing the moon walk.


Friction is a very complicated interaction between pressure and the type of materials that are touching one another. Let’s do a couple of experiments to get the hang of what friction is.
Here’s what you need:


Please login or register to read the rest of this content.

First Law of Motion: Objects in motion tend to stay in motion unless acted upon by an external force. Force is a push or a pull, like pulling a wagon or pushing a car. Gravity is a force that attracts things to one another. Gravity accelerates all things equally. Which means all things speed up the same amount as they fall.


Materials: ball
Please login or register to read the rest of this content.


Click here to go to next lesson on Newton’s Law of Motion in Detail.

Ok, sort of a silly experiment I admit. But here’s what we’re going for – there is an invisible force acting on you and the ball. As you will see in later lessons, things don’t change the way they are moving unless a force acts on them. When you jump, the force that we call gravity pulled you back to Earth. When you throw a ball, something invisible acted on the ball forcing it to slow down, turn around, and come back down. Without that force field, you and your ball would be heading out to space right now!
Please login or register to read the rest of this content.


Please login or register to read the rest of this content.

Click here to go to next lesson on Inertia.

Ever wonder how magicians work their magic? This experiment is worthy of the stage with a little bit of practice on your end.


Here’s how this activity is laid out: First, watch the video below. Next, try it on your own. Make sure to send us your photos of your inventions here!


Please login or register to read the rest of this content.

Next time you watch a drag race, notice the wheels. Are they solid metal discs, or do they have holes drilled through the rims? I came up with this somewhat silly, but incredibly powerful quick science demonstration to show my 2nd year university students how one set of rims could really make a difference on the racetrack (with all other things being equal).

Please login or register to read the rest of this content.

Please login or register to read the rest of this content.


Click here to go to next lesson on Introducing the Idea of Net Forces.


It is very rare, especially on Earth, to have an object that is experiencing force from only one direction. A bicycle rider has the force of air friction pushing against him. He has to fight against the friction between the gears and the wheels. He has gravity pulling down on him. His muscles are pushing and pulling inside him and so on and so on.


Even as you sit there, you have at least two forces pushing and pulling on you. The force of gravity is pulling you to the center of the Earth. The chair is pushing up on you so you don’t go to the center of the Earth. So with all these forces pushing and pulling, how do you keep track of them all? That’s where net force comes in.


The net force is when you add up all of the forces on something and see what direction the overall force pushes in. The word “net”, in this case, is like net worth or net income. It’s a mathematical concept of what is left after everything that applies is added and subtracted. The next activity will make this clearer.


Here’s what you need:


Please login or register to read the rest of this content.

Click here to go to next lesson on Forces.

We’re going to learn about kinematics, which is the words scientists use to explain the motion of objects. By learning about scalars, vectors, speed, velocity, acceleration, distance, and more, you’ll be able to not only accurately describe the motion of objects, but be able to predict their behavior. This is very important, whether you’re planning to land a spaceship on a moon, catapult a marshmallow in your mouth from across the room, or win a round of billiards.


Be sure to take out a notebook and copy down each example problem right along with me so you take good notes as you go along. It’s a totally different experience when you are actively involved by writing down and working through each problem rather than passively sitting back and watching.


Click here to start the first lesson in kinematics.


If you jump out of an airplane, how fast would you fall? What’s the greatest speed you would reach? In a moment, we’re going to find out, but first let’s take a look at objects that are allowed to fall under the influence of just gravity. There are two important things to keep in mind for free falling objects. First, the object doesn’t experience air resistance. Second, the acceleration of the object is a constant value of 9.8 m/s2 or 32.2 ft/s2.
Please login or register to read the rest of this content.


This lesson may give you a sinking sensation but don’t worry about it. It’s only because we’re talking about gravity. You can’t go anywhere without gravity. Even though we deal with gravity on a constant basis, there are several misconceptions about it. Let’s get to an experiment right away and I’ll show you what I mean.


If I drop a ping pong ball and a golf ball from the same height, which one hits the ground first? How about a bowling ball and a marble?


Here’s what you need:


Please login or register to read the rest of this content.

Click here to go to next lesson on Velocity.

If acceleration is constant, is velocity also constant? Nope. The image at the top of this page shows that the object is speeding up every second by a certain rate, so velocity is not a constant value. The question is, can we figure out what the speed is at different intervals of time? Of course we can! Here’s how…
Please login or register to read the rest of this content.


Do you expect a curved or a straight line on a p-t graph for free falling objects? A straight line is the slope of the graph, which is also the velocity. A straight line would mean that the velocity is constant, we we already see from the experiment that it isn’t. So we can expect a curve on our p-t graph that looks like a downhill bunny slope… the object starts out slow, then increases speed so the slope will also increase in “steepness” as time goes on. If we indicate the positive direction as upwards, then the slope on the p-t graph will be negative.
Please login or register to read the rest of this content.


For constant acceleration, we can expect a straight line on our v-t graph to have a slope of 9.8 m/s2  in the negative quadrant of the graph, starting at the origin. The object started at rest, then finished with a large negative velocity, meaning that the object is speeding up in the downward direction. The constant negative slope means constant negative acceleration. Remember, that negative sign doesn’t mean it’s slowing down, but rather the minus sign indicates which direction the acceleration is happening in.
Please login or register to read the rest of this content.


If you jump out of an airplane, how fast would you fall? What's the greatest speed you would reach? Let's practice figuring it out without jumping out of a plane.

This experiment will help you get the concept of velocity by allowing you to measure the rate of fall of several objects. It's also a great experiment to record in your science journal.

First, you'll need to find your materials: Please login or register to read the rest of this content.

Please login or register to read the rest of this content.

You have just taken in a nice bunch of information about the wild world of gravity. This next section is for advanced students, who want to go even deeper. There's a lot of great stuff here but there's a lot of math as well. If you're not a math person, feel free to pass this up. You'll still have a nice understanding of the concept. However, I'd recommend giving it a try. There are some fun things to do and if you're not careful, you might just end up enjoying it!

Here's what you need: Please login or register to read the rest of this content.

If I toss a ball horizontally at the exact same instant that I drop another one from my other hand, which one reaches the ground first? For this experiment, you need: Please login or register to read the rest of this content.


Please login or register to read the rest of this content.

Click here to go to next lesson on Force and Mass.


We're going to learn more about why gravity accelerates all objects equally when we study Newton's Laws in the next section, where you'll discover how force is related to mass. Right now, here's another set of hints on solving physics problems...

Please login or register to read the rest of this content.


The motion of objects can be described by words, with images, as well as with the language of math by using graphs, charts, and equations.

We've already learned about the p-t and v-t graphs in our experiments, and now it's time to figure out the kinematic equations that will describe the motion of objects by relating the time, distance, displacement, velocity, speed, and acceleration. They're a really handy set of four equations that you can use to figure out how fast you're moving in a swing, how far your car will skid, the height your rocket will reach, or how far your baseball will go.

Please login or register to read the rest of this content.


Let’s try another example problem so you can see how to apply the equations to solve for things you really want to know…
Please login or register to read the rest of this content.


Once you get the hang of how to solve the four kinematic equations, you can put this together with your understanding of the v-t and p-t diagrams to make a more complete picture of the motion in your system. Remember how we learned that the slope of the line on a v-t graph is the acceleration of the object, and that you could use the area bounded by the axis and the slope to find the displacement? Now you’ve got two ways of figuring out the displacement, velocity, acceleration, and time in any problem. How can you use the two methods together to make you more efficient and effective at solving physics programs? Here’s how…
Please login or register to read the rest of this content.


Physics is your big chance to show off your inner artist by drawing what you see through a scientists eyes in a special way so others can understand your big ideas. We're going to practice making models in our mind of what's going on in the real world, and learning how to write it down on paper using the language of mathematics so you can communicate with others and work together designing your inventions and predicting what might happen next. All scientists, engineers, technicians, including folks like Feynman and Einstein, learned how to represent the real world on paper in a visual way using diagrams. (Although Nobel prize winner Dr. Richard Feynman got frustrated and invented his own diagrams, which we still use today in quantum mechanics.)

Please login or register to read the rest of this content.


Graphs are used all over the field of physics, and the p-t and v-t graphs are the ones used most for moving objects, especially when describing the projectile motion of objects. With one peek at the graph, you can tell a lot about what's going on, which is one reason they are so useful. You don't have to pour over pages of equations to get a sense of what's going on with the experiment.

Please login or register to read the rest of this content.


The position-time “p-t” graph is one that gets used a lot, and since it's axes are position and time, the slope of the line will give average velocity to describe the motion of an object.  If the velocity is constant, then the slope is constant and you'll see a straight line (either uphill or downhill). If velocity is changing, you'll see a curved rather than straight line for the slope. A steeper line indicates larger velocity. An uphill slope means positive velocity, downhill indicates negative velocity. If the slope is downhill and curved, but it starts out like a skier on a bunny hill, then the negative velocity starts slow and moves fast as time goes on, which is a sign of negative acceleration (starting slow and speeding up). If the slope looks instead like starting at the top of a black diamond run, then the object starts with a high negative velocity but ends with a slower velocity, a indication of positive acceleration.

Please login or register to read the rest of this content.


The velocity-time “v-t” graphs are another common type of graph you'll run across that describe motion of an object. The shape and slope of the lines on the graph will tell you a lot about what's going on with the motion of the object, and here's how you decipher it:  If the line is a straight, horizontal line, then the velocity stayed constant and there's no acceleration, like when you're driving on the freeway. Your car is moving at a steady 65 mph in a straight line.

However, if you're at a stoplight that just turned green, you're going to start changing your velocity by increasing your speed, giving you a positive acceleration. The graph will be a straight line starting at the origin and moving uphill. The slope of the line is positive, indicating your positive acceleration.

So can you tell if an object is moving in a positive or negative direction? Yes! A positive velocity means an object is moving in a positive direction, so if the line is in the positive region of the graph, you know it's traveling in a positive direction.  By the same logic, if the slope is in the negative regions of the graph, the object is traveling in a negative direction. For slopes crossing the axis, the object is changing directions.

Can you figure out if an object is speeding up or slowing down? Yes again! Speeding up means that the magnitude of the velocity is increasing in value (the number only, ignoring the plus or minus sign), so if the line is moving away from the x-axis, it's speeding up. And if it's approaching the x-axis, it's slowing down.

Please login or register to read the rest of this content.


soccerball1
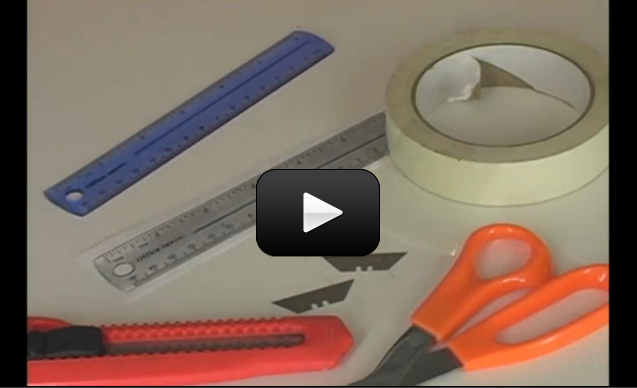
This experiment is one of my favorites in this acceleration series, because it clearly shows you what acceleration looks like. The materials you need is are:

  • a hard, smooth ball (a golf ball, racket ball, pool ball, soccer ball, etc.)

  • tape or chalk

  • a slightly sloping driveway (you can also use a board for a ramp that's propped up on one end)
For advanced students, you will also need: a timer or stopwatch, pencil, paper, measuring tape or yard stick, and this printout.

Grab a friend to help you out with this experiment - it's a lot easier with two people.

Are you ready to get started really discovering what acceleration is all about?

Here's what you do: Please login or register to read the rest of this content.

Please login or register to read the rest of this content.

Click here to go to next lesson on Describing Motion with Equations


Mechanics is the study of the motion of objects. This is a great place to start your studies in physics since it’s such a BIG idea. We’ll be learning the language, laws, concepts, and principles that explain the motion of objects. We’re going to learn about kinematics, which is the words scientists use to explain the motion of objects. By learning about scalars, vectors, speed, velocity, acceleration, distance, and more, you’ll be able to not only accurately describe the motion of objects, but be able to predict their behavior. This is very important, whether you’re planning to land a spaceship on a moon, catapult a marshmallow in your mouth from across the room, or win a round of billiards.


Please login or register to read the rest of this content.

We can describe how something moves with words, numbers, graphs, charts, or equations. To do that, we need to measure things with rulers and stopwatches. If I asked you how fast your car goes on the freeway, you could say fast or you could also say 55 mph. That 55 mph is a quantitative number that describes the motion of your car. The car travels 55 miles every hour. It’s also a scalar quantity, since you only mentioned the magnitude (how fast the car is going) and not it’s direction. A vector quantity is when you’d say 55 mph southeast. Vectors include a number and a direction. Scalars deal only with numbers.


Please login or register to read the rest of this content.

Distance and displacement sound the same, don’t they? But they’re just a little different from each other, and here’s how: distance is a scalar quantity, like 5 miles. Displacement is a vector quantity that describes how far out of place an object is, like going up and down the same flight of 8 steps. Your distance is 16 steps, but your displacement is zero, since you physically traveled 8 steps up and 8 steps down, but your total is zero since we also take into account the direction of travel, and everything cancels out.


Please login or register to read the rest of this content.

Have you noticed that scalar quantities ignore direction, and vector quantities take direction into account? Speed and velocity also sound the same, don’t they? But again, one is a vector and one is a scalar. Speed is the scalar quantity that describes how fast something is moving, like 100 mph. It’s the rate that something covers over a distance.


Rockets are fast, so they have high speeds, which means they cover large distances in a short amount of time. Compared to the speed of light, however, rockets are quite slow. (You always have to keep in mind what you are comparing to.) Velocity is a vector quantity that has a magnitude and a direction, like 100 mph north. It doesn’t matter if your speeding up or slowing down (we take that into account when we look at acceleration of an object). Velocity is the change in distance over a given time, or v = d / t. If a jet travels 600 miles in an hour, then it’s moving at 600 mph. A car going 25 miles in a half hour is moving at 50 mph. A snail crawling an inch every four minutes is moving at 0.25 inches per minute. You can mix up the units of distance and time to be whatever is most useful to you, whether it’s miles per hour, feet per minute, or meters per second. Most objects don’t just travel at one speed, however.


When you travel in a car, sometimes it’s on the freeway (65 mph), sometimes you’re at a stoplight (zero mph), sometimes you’re driving through the neighborhood (25 mph), and so forth. Your car has a lot of speed changes, so it’s useful to be able to calculate the average speed and average velocity of your car. It’s also useful to know the speed or velocity at a given instant in time, called your instantaneous speed or instantaneous velocity.


Please login or register to read the rest of this content.

Acceleration is defined as a change in velocity. In other words, it is a change in speed or a change in direction. It is how much time it takes something to go from one velocity to another. Remember that velocity is speed and direction. If you go straight ahead on your bike at a constant speed of 5 mph, you are not accelerating because neither your speed nor your direction is changing. Now, if you are stopped at a stop light and it turns green, you are accelerating as your speed increases from zero to 10 mph.


The word ‘acceleration’ is a little confusing, since sometimes people say someone is ‘accelerating’ when they really mean that they are ‘moving really fast’. Acceleration simply means changing speed or direction, not if they are going fast or not. Also, in physics we don’t use the word deceleration. We use positive and negative acceleration. So if you went from 10 mph to zero, you’d say that you have a negative acceleration, not deceleration.


Now what happens if you are in a car and it turns a corner at a constant speed of 15 mph? Is it accelerating or not? Well, the speed is not changing but its direction is, so it is indeed accelerating.Remember back when we talked about gravity? We learned that gravity accelerates things at 32 feet per second². Now this may make a little more sense. Gravity made something continue to increase in speed so that after one second of having the force of gravity pull on something, that something has reached a speed of 32 feet per second. When that thing started falling it was at 0 velocity, after a second it’s at 32 feet per second after 2 seconds it’s at 64 feet per second and so on.It’s the old formula v = gt or velocity equals the gravitational constant (32 ft/s²) times time.


Please login or register to read the rest of this content.

If you need a refresher on how to convert units, here’s a video on how to do it:
Please login or register to read the rest of this content.


If something has an acceleration of 5 ft/s² how fast will it be going after 1 second…2 second…3 seconds? After one second it will be going 5 ft/s; after two seconds 10 ft/s; and after three seconds 15 ft/s. Again, it’s just like v = gt (v is velocity, g is the gravitational constant, t is time) but put the rate of acceleration of the object in place of g to get the formula v = at or velocity equals acceleration times time.

Once in a while, an object will change its velocity by the same amount at the same rate, and when this happens, it's called constant acceleration, since the velocity is changing by the same amount each time. Note that constant acceleration is not the same as constant velocity. If an object is changing speed, no matter how consistently it does it, it's still accelerating since it doesn't have a constant velocity. Objects in free fall motion, like a sky diver, experiences constant acceleration and may also eventually reach a constant velocity, but this is a very special case (we'll talk more about that later).

Average acceleration is found by dividing the average velocity (the difference between the initial and final velocity points) by the time lapsed between the two points. Acceleration is measured in a variety of units, but the most common are "meters per second squared" (m/s2) or "feet per second squared" (ft/s2).

Please login or register to read the rest of this content.


Download Student Worksheet & Exercises

Take a look at your marks. See how they get farther and farther apart as the ball continues to accelerate? Your ball was constantly increasing speed and as such, it was constantly accelerating. By the way, would it have mattered what the mass of the ball was that you used? No. Gravity accelerates all things equally. This fact is what Galileo was proving when he did this experiment. The the weight of the ball doesn’t matter but the size of the ball might. If you used a small ball and a large ball you would probably see differences due to friction and rotational inertia. The bigger the ball, the more slowly it begins rolling. The mass of the ball, however, does not matter.

Exercises
  1. Was the line a straight line?

  2. It should be close now, and the slope represents the acceleration it experienced going down the ramp. Calculate the slope of this line.

  3. What do you think would happen if you increased the height of the ramp?

  4. Knowing what you do about gravity, what is the highest acceleration it can reach?

For Advanced Students...

Please login or register to read the rest of this content.

Is acceleration a scalar or a vector quantity? You could argue that it's both actually, but in physics it's usually a vector. This means that acceleration has a magnitude and a direction. The direction is either "+" or "-", depending on if an object is increasing or decreasing speed. Usually, objects that speed up have their acceleration vector in the same direction as the object is moving in. If it's slowing down, then the arrow flips to be in the opposite direction.


Click here to go to next lesson on Vector Diagrams


Chemistry is all about studying chemical reactions and the combinations of elements and molecules that combine to give new stuff.  Chemical reactions can be written down as a balanced equation that shows how much of each molecule and compound are needed for that particular reaction. Here’s how you do it:


Please login or register to read the rest of this content.

If you’re into magic shows, this is a good one to perform for an audience, because the solution goes from purple to pink to green to blue and back again!


Le Chatelier’s principle states that when the temperature is raised, an equilibrium will shift away from the side that contains energy. When temperature is lowered, the reaction shifts toward the side that contains the energy. That’s a little hard to understand, so that’s why there’s a really cool experiment that will show you exactly what we see happening with this principle.


Remember that exothermic reactions are chemical reactions that give off energy. In this experiment, this reaction is exothermic, which is going to be an important key in predicting which way the system will balance itself as it gets subjected to temperature changes.


Please login or register to read the rest of this content.

We’re going to do an experiment where it will look like we can boil soda on command… but the truth is, it’s not really boiling in the first place! If you drink soda, save one for doing this experiment. Otherwise, get one that’s “diet” (without the sugar, it’s a lot easier to clean up).


Please login or register to read the rest of this content.

How many seconds in an hour?
How tall are you in centimeters?
How big is your house?


If it sounds confusing to convert miles to inches or years to seconds, then this video will show you how to convert them easily:
Please login or register to read the rest of this content.


Molecules are the building blocks of matter.


You’ve probably heard that before, right? But that does it mean? What does a molecule look like? How big are they?


While you technically can measure the size of a molecule, despite the fact it’s usually too small to do even with a regular microscope, what you can’t do is see an image of the molecule itself. The reason has to do with the limits of nature and wavelengths of light, not because our technology isn’t there yet, or we’re not smart enough to figure it out. Scientists have to get creative about the ways they do about measuring something that isn’t possible to see with the eyes.


Here’s a cool experiment you can do that will approximate the size of a molecule. Here’s what you need:


Please login or register to read the rest of this content.

This experiment is for advanced students.

Potassium permanganate (KMnO4) in water turns an intense, deep, purple. It is important in the film industry for aging props and clothing to make them look much older than they are.

Also, artists use it in bone carving. People who carve antlers and bone use KMnO4 to darken the surface of the bone to make it look aged. They make the carving, soak it in potassium permanganate, then carve more, and repeat. The end result is a carving that has a light golden brown color. More dipping will darken the carving even more.

Potassium permanganate is going to undergo a chemical change with this activity. In this experiment, we will be able to witness several indicators of chemical change. Color changes, bubbles from gas generation, temperature change, and color disappearance are all indicators of chemical changes.

Please login or register to read the rest of this content.


This experiment is for advanced students.

How do you know if your brother is stealing your candy? Unwrap a wrapped hard candy that he likes a lot. Roll the candy around in the powdered food dye that matches the candy. (Push the powder into the candy so it “disappears”.) Re-wrap the candy. Set the candy in the place where it usually disappears from. Wait ten minutes after the candy disappears. Find your brother. He will be sporting a new color on his hands and mouth. Dye is hard to remove. It will have to be worn every day at school until it fades away as the skin cells slough off. The dye he now wears is in indicator that he has been taking your candy.

Please login or register to read the rest of this content.


WARNING!! THIS EXPERIMENT IS PARTICULARLY DANGEROUS!! (No kidding.) This experiment is for advanced students.

We've created a video that shows you how to safely do this experiment, although if you're nervous about doing this one, just watch the video and skip the actual experiment.

Bromine is a particularly nasty chemical, so be sure to very carefully follow the steps we've outlined in the video. You MUST do this experiment outdoors. We'll be making a tiny amount to show how the chemical reactions involving bromine work.

Please login or register to read the rest of this content.


Chemical Data & Safe Handling Information Sheet

What do I really need to know first? First of all, the chemicals in this set should be stored out of reach of pets and children. Grab the chemicals right now and stuff them in a safe place where accidents can’t happen. Do this NOW!


If you haven’t already done so, make sure to watch the introductory video for the Intermediate Chemistry and Advanced Chemistry lessons. They contain important information about the chemicals and lab equipment you’ll be using. When you’re done storing your chemicals out of reach, watch this video:


Please login or register to read the rest of this content.

You can go your whole life without paying any attention to the chemistry behind acids and bases. But you use acids and bases all the time! They are all around you. We identify acids and bases by measuring their pH.


Every liquid has a pH. If you pay particular attention to this lab, you will even be able to identify most acids and bases and understand why they do what they do. Acids range from very strong to very weak. The strongest acids will dissolve steel. The weakest acids are in your drink box. The strongest bases behave similarly. They can burn your skin or you can wash your hands with them.


Acid rain is one aspect of low pH that you can see every day if you look for it. This is a strange name, isn’t it? We get rained on all the time. If people were dissolving, if the rain made their skin smoke and burn, you’d think it would make headlines, wouldn’t you? The truth is acid rain is too weak to harm us except in very rare and localized conditions. But it’s hard on limestone buildings.


Please login or register to read the rest of this content.

This experiment is for advanced students.


Purple and white colors, making the whitewash that Tom Sawyer used, and produce an exothermic chemical reaction…..does it get any better?


Limewater is one of the compounds we work with in this experiment. Limewater was used in the old days of America. We’re talking about the 80’s…..the 1880’s.


Traveling medicine shows sold what was called “patent medicines”. These usually had no medicinal properties at all. The man in charge, the salesman of the operation, was called a “huckster”. He would have the one of the people gathered around to listen to him blow into limewater. Their exhaled breath contains carbon dioxide, and the lime water turned cloudy, just like in our experiment.


The man would hold up the glass with the cloudy limewater in it and pour in some of his fantastic remedy. As long as the “medicine” was acidic, it would turn the cloudy limewater clear. This was proof that the remedy would cure whatever ailed the person.


Please login or register to read the rest of this content.

This experiment is for advanced students. This is a repeat of the experiment: Can Fish Drown? but now we’re going to do this experiment again with your new chemistry glassware.


The aquarium looked normal in every way, except for the fish. They were breathing very fast and sinking head first to the bottom of the tank. They would sink a few inches, then jerk into proper movement again.


The student had to figure out what was wrong. He had set up the aquarium as an ongoing science project, and it was his responsibility to maintain the fish tank. His grade depended on it.


He went to his mom for help. She looked over the setup. “Have you tested the water?”


A quizzical look on his face, the boy said, “Everything is normal nitrates, nitrites, hardness, alkalinity, and pH. The pH was a little acidic, but not outside the proper range.”


Please login or register to read the rest of this content.

This experiment is for advanced students.


Don’t put this in your car….yet. Hydrogen generation, capture, and combustion are big deals right now. The next phase of transportation, and a move away from fossil fuels in not found in electric cars. Electric cars are waiting until hydrogen fuel cell vehicles become practical. It can be done and is being done.


Cars being powered by hydrogen are here, but not on the market yet. Engineers and chemists are always finding new ways to improve the chemical reaction that produces hydrogen and making the vehicles more efficiently use the fuel. Hydrogen fuel is not just easy to make, it is inexpensive, and the “exhaust” is water.


We will generate hydrogen in this lab. We will also see how combustible it is. Just let your imagination wander….just a bit and you will see noiseless cars and trucks zipping along the streets and interstates, carrying people and cargo. The Indianapolis 500 wouldn’t be quite the same, though. “And there they go, roaring, I mean quietly entering turn two…”


Please login or register to read the rest of this content.

This experiment is for advanced students.


In industry, hydrogen peroxide is used in paper making to bleach the pulp before they form it into paper. Biologists, when preparing bones for display, use peroxide to whiten the bones.


At home, 3% peroxide combined with ammonium hydroxide is used to give dark-haired people their desired blonde moment. Peroxide is also used on wounds to clean them and remove dead tissue. Peroxide slows the flow from small blood vessels and oozing in wounds as well.


Please login or register to read the rest of this content.

This experiment is for advanced students.


This time we’re going to use a lot of equipment… really break out all the chemistry stuff. We’ll need all this stuff to generate oxygen with potassium permanganate (KMNO4). We will work with this toxic chemical and we will be careful…won’t we?


Please login or register to read the rest of this content.

This experiment is for advanced students.


Zinc (Zn), is a metal and it is found as element #30 on the periodic table. We need a little zinc to keep our bodies balanced, but too much is very dangerous.


Zinc is just like the common, everyday substance that we all know as di-hydrogen monoxide (which is the chemical name for water). We need water to survive, but too much will kill us.


DHMO: In chemistry, “Di” equals the number 2; hydrogen is H; mono equals the number one; and oxide is derived from oxygen, and its symbol is O. Put these together and you have Di-hydrogen (H2), and mono oxygen (O). Put them together, what do you have? Water!


Please login or register to read the rest of this content.

This experiment is for advanced students.


Lewis and Clark did this same experiment when they reached the Oregon coast in 1805. Men from the expedition traveled fifteen miles south of the fort they had built at the mouth of the Columbia River to where Seaside, Oregon now thrives.


In 1805, however, it was just men from the fort and Indians. They built an oven of rocks. For six weeks, they processed 1,400 gallons of seawater, boiling the water off to gain 28 gallons of salt.


Please login or register to read the rest of this content.

This experiment is for advanced students.


Glo-sticks! Parents hang them from their trick or treaters, backpackers read with them light late at night in a tent. Glo-sticks work on the principle of chemiluminescence.  Chemiluminescence is defined as emitting light without heat as the result of a chemical reaction.


Please login or register to read the rest of this content.

This experiment is for advanced students. This lab builds on concepts from the previous carbon dioxide lab.


Limewater….carbon dioxide…indicators. We don’t know too much about these things. Sure, we know a little. Carbon dioxide is exhaled by us and plants need it to grow. Burning fossil fuels produces carbon dioxide.


Indicators…something we observe that confirms to us that something specific is happening. Lime water turns cloudy and forms a precipitate in the presence of carbon dioxide. Blue litmus paper turns red in the presence of an acid. The dog barking at the door and dancing around indicates that you better let the dog out, and quick, to avoid….a pet spill?


Please login or register to read the rest of this content.

This experiment is for advanced students.


Who gets to burn something today? YOU get to burn something today!


You will be working with Zinc (Zn). Other labs in this kit allow us to burn metal, but there is a bit of a twist this time. We will be burning a powder.


Why a powder instead of a solid ribbon or foil as in the other labs?  Have you heard of surface area being a factor in a chemical reaction? The more surface area there is to burn, the more dramatic the chemical change. So, with this fact in mind, a powder should burn faster or be more likely to burn than a large solid.


Please login or register to read the rest of this content.

Magnesium is one of the most common elements in the Earth’s crust. This alkaline earth metal is silvery white, and soft. As you perform this lab, think about why magnesium is used in emergency flares and fireworks. Farmers use it in fertilizers, pharmacists use it in laxatives and antacids, and engineers mix it with aluminum to create the BMW N52 6-cylinder magnesium engine block. Photographers used to use magnesium powder in the camera’s flash before xenon bulbs were available.


Most folks, however, equate magnesium with a burning white flame. Magnesium fires burn too hot to be extinguished using water, so most firefighters use sand or graphite.


We’re going to learn how to (safely) ignite a piece of magnesium in the first experiment, and next how to get energy from it by using it in a battery in the second experiment. Are you ready?


Please login or register to read the rest of this content.

This experiment is for advanced students.


Brimstone is another name for sulfur, and if you’ve ever smelled it burn…..whoa….I’m telling you ….you will see for yourself in this lab. It is quite a smell, for sure. Sulfur is element #6 on the periodic table. Sulfur is used in fertilizer, black powder, matches, and insecticides. In pioneer times sulfur was put into patent medicines and used as a laxative.


To further the evil reputation of sulfur, or brimstone, when sulfur is burned in a coal fired power plant, sulfur dioxide is produced. The sulfur is spewed into the air, where it is reacts with moisture in the air to form sulfuric acid. The clouds get full and need to let go of this sulfuric acid. Down comes the acid rain to wreak havoc on the masonry and plant life below.


Please login or register to read the rest of this content.

In this lab, we’re going to investigate the wonders of electrochemistry. Electrochemistry became a new branch of chemistry in 1832, founded by Michael Faraday. Michael Faraday is considered the “father of electrochemistry”. The knowledge gained from his work has filtered down to this lab. YOU will be like Michael Faraday. I imagined he would have been overjoyed to do this lab and see the results. You are soooo lucky to be able to take an active part in this experiment. Here’s what you’re going to do…


You will be “creating” metallic copper from a solution of copper sulfate and water, and depositing it on a negative electrode. Copper is one of our more interesting elements. Copper is a metal, and element 29 on your periodic table. It conducts heat and electricity very well.


Many things around you are made of copper. Copper wire is used in electrical wiring. It has been used for centuries in the form of pipes to distribute water and other fluids in homes and in industry. The Statue of Liberty is a wonderful example of how beautiful 180,000 pounds of copper can be. Yes, it is made of copper, and no, it doesn’t look like a penny…..on the surface. The green color is copper oxide, which forms on the surface of copper exposed to air and water. The oxide is formed on the surface and does not attack the bulk of the copper. You could say that copper oxide protects the copper.


Please login or register to read the rest of this content.

If we don’t have salt, we die. It’s that simple. The chemical formula for salt is NaCl. Broken down, we have Na (sodium) and Cl (chlorine). Either one of these can be fatal in sufficient quantities. When chemically combined, these two deadly elements become table salt. What once could kill now keeps us alive. Isn’t chemistry awesome?


Chlorine, element 17, is called a halogen as are all the elements in the 17th row. All halogens have similar chemical properties. They are highly reactive nonmetals, and react easily with most metals. Sodium is a metal, and is bonded with sodium in the table salt used in this lab. Besides being found in salt, chlorine has many uses in our world such as killing bacteria in our water, making plastic, cleaning products, and the list goes on. A very useful chemical, and is among the top ten chemicals produced in the United States. Ever since its discovery in 1774, chlorine has been very useful. It is found in nature in sodium chloride, but in very small concentrations. Seawater, the most abundant source of chlorine, has a concentration of only 19g of chlorine per liter.


Please login or register to read the rest of this content.

Electricity. Chemistry. Nothing in common, have nothing to do with each other. Wrong! Electrochemistry has been a fact since 1774. Once electricity was applied to particular solutions, changes occurred that scientists of the time did not expect.


In this lab, we will discover some of the same things that Farraday found over 300 years ago. We will be there as things tear apart, particles rush about, and the power of attraction is very strong. We’re not talking about dancing, we’re talking about something much more important and interesting….we’re talking about ELECTROCHEMISTRY!


Please login or register to read the rest of this content.

Ammonia has been used by doctors, farmers, chemists, alchemists, weightlifters, and our families since Roman times. Doctors revive unconscious patients, farmers use it in fertilizer, alchemists tried to use it to make gold, weightlifters sniff it into their lungs to invigorate their respiratory system and clear their heads prior to lifting tremendous loads. At home, ammonia is used to clean up the ketchup you spilled on the floor and never cleaned up.


The ammonia molecule (NH3) is a colorless gas with a strong odor – it’s the smell of freshly cleaned floors and windows. Mom is not cleaning with straight ammonia (it’s gas at room temperature because it boils at -28oF, so the stuff she cleans with is actually ammonium hydroxide, a solution of ammonia and water).  Ammonia is found when plans and animals decompose, and it’s also in rainwater, volcanoes, your kidneys (to neutralize excess acid), in the ocean, some fertilizers, in  Jupiter’s lower cloud decks, and trace amounts are found in our own atmosphere (it’s lighter than air).


Please login or register to read the rest of this content.

This experiment is for advanced students.


ACID!!! The word causes fear to creep in and get our attention.


BASIC!!! The word causes nothing to stir in most of us.


The truth is, a strong acid (pH 0-1) is dangerous, but a strong basic (pH 13-14) is just as dangerous. In this lab, we will get comfortable with the basics of bases and the acidity of acids along with how you can use both and tell the difference between them.


Please login or register to read the rest of this content.

This experiment is for advanced students.


Ever use soap? Sodium hydroxide (NaOH) is the main component in lye soap. NaOH is mixed with some type of fat (vegetable, pig, cow, etc).  Scent can be added for the ‘pretty’ factor and pumice or sand can be added for the manly “You’re coming off my hands and I’ll take no guff” factor. Lots of people still make their own soap and they enjoy doing it.


Please login or register to read the rest of this content.

This experiment is for advanced students.


Potassium permanganate (KMnO4) in water turns an intense, deep, purple. It is important in the film industry for aging props and clothing to make them look much older than they are.


Also, artists use it in bone carving. People who carve antlers and bone use KMnO4 to darken the surface of the bone to make it look aged. They make the carving, soak it in potassium permanganate, then carve more, and repeat. The end result is a carving that has a light golden brown color. More dipping will darken the carving even more.


Potassium permanganate is going to undergo a chemical change with this activity. In this experiment, we will be able to witness several indicators of chemical change. Color changes, bubbles from gas generation, temperature change, and color disappearance are all indicators of chemical changes.


Please login or register to read the rest of this content.

This experiment is for advanced students.


How do you know if your brother is stealing your candy? Unwrap a wrapped hard candy that he likes a lot. Roll the candy around in the powdered food dye that matches the candy. (Push the powder into the candy so it “disappears”.) Re-wrap the candy. Set the candy in the place where it usually disappears from. Wait ten minutes after the candy disappears. Find your brother. He will be sporting a new color on his hands and mouth. Dye is hard to remove. It will have to be worn every day at school until it fades away as the skin cells slough off. The dye he now wears is in indicator that he has been taking your candy.


Please login or register to read the rest of this content.

This experiment is for advanced students.


Sparks flying off in all directions…that’s fun. In this lab, we will show how easy it is to produce those shooting sparks. In a sparkler you buy at the store, the filings used are either iron or aluminum.


The filings are placed in a mixture that, when dry, adheres to the metal rod or stick that is used in making the sparkler. The different colors are created by adding different powdered chemicals to the mixture before it dries. When they burn, we get red, blue, white, and green.


Please login or register to read the rest of this content.

This experiment is for advanced students.


In gas form, element #59 is deadly. However, when iodine is in  liquid form, it helps heal cuts and scrapes. The iodine molecule occurs in pairs, not as a single atom (many halogens do this, and it’s called a diatomic molecule). It’s hard to find iodine in nature, though it’s essential for staying healthy… too little iodine in the body takes a heavy toll on how well the brain operates.


A chunk of iodine is blackish-blue, and will sublimate (go from a solid straight to a gas, as seen in the photo here).  Iodine is the heaviest element needed by living things. Iodized salt is sodium chloride fortified with iodine to prevent people from not getting enough iodine in their daily diets.


Iodine is found in seaweed (kelp) and seafood as well as vegetables that are grown in dirt that has high iodine levels. People that live inland and do not eat fish often have lower iodine levels than their coastal, fish-eating neighbors. The trick is not to get too much or too little iodine in your diet, because the symptoms of deficiency and excess levels are quite similar.


Starch (like cornstarch) are used as an indicator for detecting iodine in chemistry experiments. When combined with iodine, starch forms a blue-black color in the solution. We’re going to do this and many other activities in this lab, because this experiment is actually several labs rolled into one. First, we have to make iodine, store it, and then we get to use it in several experiments. Are you ready?


Please login or register to read the rest of this content.

This experiment is for advanced students.


Zinc and Hydrogen are important elements for all of us. Zinc (Zn) metal is element #30 on the periodic table. Lack of zinc in our diets will delay growth of our bodies and can kill.


Hydrogen gas (H) is element #1 on the periodic table. Hydrogen was discovered in the 1500s. In a pure state, hydrogen combustion (in small quantities) is interesting. In large amounts, mixed with oxygen, the explosion can be devastating.


Please login or register to read the rest of this content.

WARNING!! THIS EXPERIMENT IS PARTICULARLY DANGEROUS!! (No kidding.) This experiment is for advanced students.


We’ve created a video that shows you how to safely do this experiment, although if you’re nervous about doing this one, just watch the video and skip the actual experiment.


Bromine is a particularly nasty chemical, so be sure to very carefully follow the steps we’ve outlined in the video. You MUST do this experiment outdoors. We’ll be making a tiny amount to show how the chemical reactions involving bromine work.


Please login or register to read the rest of this content.

WARNING!! THIS EXPERIMENT IS PARTICULARLY DANGEROUS!! (No kidding.) This experiment is for advanced students.


We’ve created a video that shows you how to safely do this experiment, although if you’re nervous about doing this one, just watch the video and skip the actual experiment.


The gas you generate with this experiment is lethal in large doses, so you MUST do this experiment outdoors.  We’ll be making a tiny amount to show how the chemical reactions of chlorine and hydrogen work.


Please login or register to read the rest of this content.

Always have a FIRE EXTINGUISHER and ADULT HELP handy when performing fire experiments. NO EXCEPTIONS.

This video will show you how to transform the color of your flames. For a campfire, simply sprinkle the solids into your flames (make sure they are ground into a fine powder first) and you’ll see a color change. DO NOT do this experiment inside your house – the fumes given off by the chemicals are not something you want in your home!


One of the tricks to fire safety is to limit your fuel. The three elements you need for a flame are: oxygen, spark, and fuel.  To extinguish your flames, you’ll have to either wait for the fuel to run out or smother the flames to cut off the oxygen. When you limit your fuel, you add an extra level of safety to your activities and a higher rate of success to your eyebrows.


Here’s what we’re going to do: first, make your spectrometer: you can make the simple spectrometer or the more-advanced calibrated spectrometer. Next, get your chemicals together and build your campfire. Finally, use your spectrometer to view your flames.


Please login or register to read the rest of this content.

Ever play with a prism? When sunlight strikes the prism, it gets split into a rainbow of colors. Prisms un-mix the light into its different wavelengths (which you see as different colors). Diffraction gratings are tiny prisms stacked together.

When light passes through a diffraction grating, it splits (diffracts) the light into several beams traveling at different directions. If you’ve ever seen the ‘iridescence’ of a soap bubble, an insect shell, or on a pearl, you’ve seen nature’s diffraction gratings.

Scientist use these things to split incoming light so they can figure out what fuels a distant star is burning. When hydrogen burns, it gives off light, but not in all the colors of the rainbow, only very specific colors in red and blue. It’s like hydrogen’s own personal fingerprint, or light signature.

While this spectrometer isn't powerful enough to split starlight, it's perfect for using with the lights in your house, and even with an outdoor campfire.  Next time you're out on the town after dark, bring this with you to peek different types of lights - you'll be amazed how different they really are. You can use this spectrometer with your Colored Campfire Experiment also.

SPECIAL NOTE: This instrument is NOT for looking at the sun. Do NOT look directly at the sun. But you can point the tube at a sheet of paper that has the the sun’s reflected light on it.

Here's what you do:

Please login or register to read the rest of this content.


This experiment is for advanced students.


One of my best teaching tools for science developed from a brain freeze one afternoon in class. I went to the board to draw the chlorophyll wheel and drew a complete blank.


“Let’s say I forgot how to draw the wheel.” I turned to the class, marker in hand, and scanned the room. Puzzled faces, the blank faces I expected, but, what was that? A few smiles scattered about the room.


As I pulled out and some volunteered info, we got into that wheel. They also found that it was easier to know what to do next than to have me tell them to find it in their book and be prepared…I was coming back to them. Students frantically finding the wheel in their biology books so they were armed when I came to them.


It was a great experience, and my lectures were a lot more fun and interactive from then on.


Please login or register to read the rest of this content.

No kidding! You’ll be able to show your friends this super-cool magic show chemistry trick with very little fuss (once you get the hang of it). This experiment is for advanced students. Before we start, here are a few notes about the setup to keep you safe and your nasal passages intact:

The chemicals required for this experiment are toxic! This is not an experiment to do with little kids or pets around, and you want to do the entire experiment outside or next to an open window for good ventilation, as the fumes from the sodium hydroxide/zinc solution should not be inhaled.


This experiment is not dangerous when you follow the steps I’ve outlined carefully. I’ll take you step by step and show you how to handle the chemicals, mix them properly, and dispose of the waste when you’re done.


Goggles and gloves are a MUST for this experiment, as the sodium hydroxide (in both liquid and solid form) is caustic and corrosive and will burn your skin on contact.


Please login or register to read the rest of this content.

This experiment is just for advanced students. If you guessed that this has to do with electricity and chemistry, you’re right! But you might wonder how they work together. Back in 1800, William Nicholson and Johann Ritter were the first ones to split water into hydrogen and oxygen using electrolysis. (Soon afterward, Ritter went on to figure out electroplating.) They added energy in the form of an electric current into a cup of water and captured the bubbles forming into two separate cups, one for hydrogen and other for oxygen.

This experiment is not an easy one, so feel free to skip it if you need to. You don’t need to do this to get the concepts of this lesson but it’s such a neat and classical experiment (my students love it) so you can give it a try if you want to. The reason I like this is because what you are really doing in this experiment is ripping molecules apart and then later crashing them back together.

Have fun and please follow the directions carefully. This could be dangerous if you’re not careful. The image shown here is using graphite from two pencils sharpened on both ends, but the instructions below use wire.  Feel free to try both to see which types of electrodes provide the best results.

Please login or register to read the rest of this content.