Indoor Rain Clouds
Making indoor rain clouds demonstrates the idea of temperature, the measure of how hot or cold something is. Here’s how to do it:
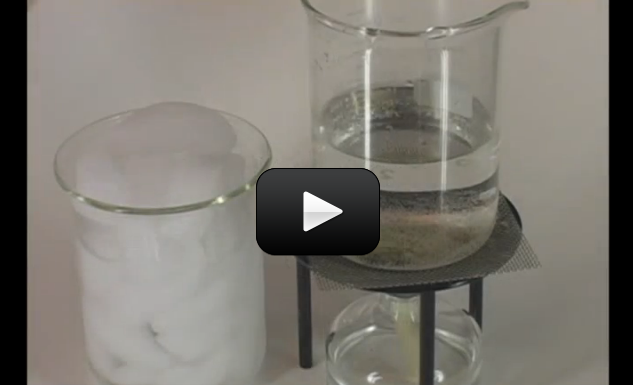
Take two clear glasses that fit snugly together when stacked. (Cylindrical glasses with straight sides work well.)
Fill one glass half-full with ice water and the other half-full with very hot water (definitely an adult job – and take care not to shatter the glass with the hot water!). Be sure to leave enough air space for the clouds to form in the hot glass.
[am4show have=’p8;p9;p23;p50;p151;p67;p73;p82;p84;p88;p30;p57;’ guest_error=’Guest error message’ user_error=’User error message’ ]
Place the cold glass directly on top of the hot glass and wait several minutes. If the seal holds between the glasses, a rain cloud will form just below the bottom of the cold glass, and it actually rains inside the glass! (You can use a damp towel around the rim to help make a better seal if needed.)
Materials:
- glass of ice water
- glass of hot water (see video)
- towel
- adult help
Download Student Worksheet & Exercises
Bottling Clouds
On a stormy, rainy afternoon, try bottling clouds — using the refrigerator! Here’s what you do: Place an empty, clean 2-liter soda bottle in the fridge overnight. Take it out and get an adult to light a match, letting it burn for a few seconds, then drop it into the bottle. Immediately cap the bottle and watch what happens (you should see smoke first, then clouds forming inside). Squeeze the sides of the bottle. The clouds should disappear. When you release the bottle, the clouds should reappear. Materials:
- 2L soda bottle
- rubbing alcohol
- bicycle pump
- car tire valve (drill a 1/2 inch hole through a 2L soda bottle cap and pull the valve gently through with pliers)
Advanced Idea: You can substitute rubbing alcohol and a bicycle pump for the matches to make a more solid-looking cloud. Swirl a bit of rubbing alcohol around inside the bottle, just enough to coat the insides, and then pour it out. Cap your bottle with a rubber stopper fitted with a needle valve (so the valve is poking out of the bottle), and apply your pump. Increase the pressure inside the bottle (keep a firm hand on the stopper or you’ll wind up firing it at someone) with a few strokes and pull out the stopper quickly. You should see a cloud form inside.
What’s going on? Invisible water vapor is all around us, all the time, but they normally don’t stick together. When you squeezed the sides of the bottle, you increased the pressure and squeezed the molecules together. Releasing the bottle decreases the pressure, which causes the temperature to drop. When it cools inside, the water molecules stick to the smoke molecules, making a visible cloud inside your bottle.
Did you know that most drops of water actually form around a dust particle? Up in the sky, clouds come together when water vapor condenses into liquid water drops or ice crystals. The clouds form when warm air rises and the pressure is reduced (as you go up in altitude). The clouds form at the spot where the temperature drops below the dew point.
The alcohol works better than the water because it evaporates faster than water does, which means it moves from liquid to vapor more easily (and vividly) than regular old water.
Questions to ask:
- How many times can you repeat this?
- Does it matter what size the bottle is?
- What if you don’t chill the bottle?
- What if you freeze the bottle instead?
Exercises
- Which combination made it rain the best? Why did this work?
- Draw your experimental diagram, labeling the different components:
- Add in labels for the different phases of matter. Can you identify all three states of matter in your experiment?
[/am4show]
This experiment only uses water, not rubbing alcohol.
Do you need to add the rubbing alcohol to the bottle if you are putting the bottle in the freezer overnight?
Yes – that’s fine!
is it okay if i have a different size bottle?
Try it! Color the water first so you can see what happens, since they are both clear.
What if you mixed alcohol and water together in the bottle?
Not really, but if you really want to, do it with adult supervision, and do NOT cap the bottle. Always leave it open so it can vent, other wise it explodes and may cause serious injury.
Could I use dry ice instead of regular ice in the 1st experiment?
Get a broom? 🙂
Only kidding. If you’re cautious about using glass, then try clear plastic containers.
What should I do if the glass shatters?
Yes heat is the transfer of thermal energy. Heat is really hard to define. Some teachers use the definition that head is energy in transit, to help students understand that heat is not the internal energy of an object. I’ll review the wording in my documents to see if I can clarify that up a bit. 🙂
Hi Aurora! Thank you and your team for putting together such an awesome and engaging program! We are learning so much as a family! It’s been awesome!
Question: In the Thermodynamics reading (pgs 8-9),you say that heat is “the movement of thermal energy from one object to another.” You say that nothing can really “have heat.” However, under Highlights (p.8-9), you say “heat can be transferred from one object to another through conduction, convection, and radiation.” Should I actually teach that “thermal energy” is the thing being transferred through these processes? Also when you say, “When an object absorbs heat, it does not necessarily change temperature,” should I actually use the term “thermal energy” rather than “heat”? OR is heat an entity that really can be absorbed, released, transferred, etc? I am thinking that perhaps heat is just the speed of the molecules that can impact other molecules??? In sum, if you can shed light on whether I should use the term “thermal energy” or “heat” when teaching ideas like conduction, convection, radiation, heat capacity, and specific heat, I would be grateful! 🙂
We had so much fun making “indoor rain.”
You’ll want to make sure you are logged in first. If you still have trouble, our team can help out quickly!
This is the first experiment page I am checking out with my 30 day trial. I can only see the Indoor Rain Clouds, and it stops at “Be sure to leave enough air space for the clouds to form in the hot glass.” But it doesn’t say before that which way to stack the glasses (although I assume the hot goes on the bottom since the cloud forms in that one?). Am I seeing the full experiment or am I missing something?
We used quart and pint canning jars. Worked beautifully! Kids loved it and did it several times ; )! Fun, fun!
Bottling clouds using the smoke didnt work too well for us…I think its because I used a 16 oz bottle? But when I took the cap off puffs of smoke (ie clouds) came out and made the kids very happy so in a way it was a success.
Fun experiment we just did #1 the kids had a blast.
I found out that when the cold water drops into the hot water the cold water kinda acts like food dye but doesn’t change the color if you try it just to let you know I use filtered water maybe it only affects filtered water!
I use filtered water for cold and hot I did tap water
It looks like a thin fog layer in the top of the lower glass, like a wispy haze.
On the first experiment….
Can you show us what a cloud looks like?