Coding Arduino with Brian
Welcome to Brian's legacy computer science and coding page for the Arduino microcontroller. These lessons were recording during the 2023-24 school year.
Click here for the current school year.
These lessons are divided by month and each month includes video lessons, as well as coding and circuit examples where appropriate.
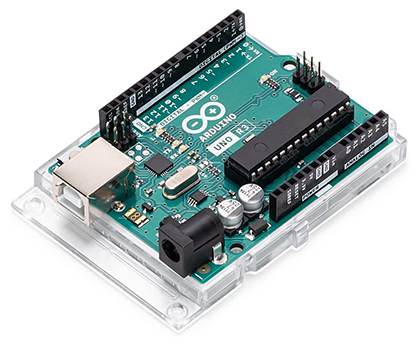
During these lessons, you'll learn how to write computer programs to control a device called the Arduino Uno R3.
By writing Arduino computer code, called sketches, you'll learn how to help digital computers interact with our analog world. You'll use electronic devices to read temperature, light levels, distance, and more. You'll also learn how to control electronic devices such as LEDs (Light Emitting Diodes), motors, and relays.
Throughout the course, you'll also learn general programming concepts, such as how to work with binary numbers and how to work with programming variables.
By using coding examples and the creation of your own programs, you'll learn about functions, loops, conditionals, libraries and Boolean logic.
You'll also increase your problem solving skills as you learn the history of debugging and how to catch common coding mistakes.
By the end of this course, you'll have an excellent foundation to help you write your own programs.
[am4show have='p8;p9;p11;p38;p92;p161;' guest_error='Guest error message' user_error='User error message' ]


The Arduino Uno R3
In addition to the electronics parts, this course requires an Arduino Uno R3. Be sure that you order an Uno that is labeled "R3". (R3 stands for Revision 3).
Click here to order an Arduino Uno R3 from Amazon.
You will also need a USB-A to USB-B cable.
Step 1. Watch the video "Getting Organized and Preparing for Coding the Arduino with Brian."
We highly recommend using Harbor Freight’s Storehouse 10 Utility Boxes to organize your parts. You’ll need two boxes for the electronics supplies and one box for the programming hardware supplies (three boxes total if you are doing both of Brian's courses this year).
You can add these boxes to your order from Brian, and he will include “ready-to-cut” label cards to help you organize your parts. Alternatively, you can order the boxes directly from Harbor Freight and then purchase the cards from Brian, or print your own.
Step 2. Watch the video "How to Use the Arduino Web Editor"
This shows how to create an online Arduino account and how to use the Arduino Web Editor, which we'll use each day in class.
Correction: Do not create a "junior" Arduino account. You must create an adult account in order to use the Arduino Web Editor.
Click here for a written set of instructions.
Step 3. Participate in the video lessons provided below.
Lessons are organized by month. Be sure to build any projects provided with each month's lessons.
Subscribe to Brian's class update email list (through substack.com)
to receive updates on resources and upcoming projects.
Recordings of 2023 - 2024 Classes
Note: All coding examples have been moved to a GitHub repository for easy access. Links to the appropriate sketches are provided under each month. You can access the full repository here.
