- Lesson 13: How Generators Make Electricity
- Lesson 14:Galvanometer
- Lesson 15: Electromagnetic Nail
- Lesson 16: Electromagnetic Crane
- Lesson 17: How do Generators Work?
- Lesson 18: Wind Turbines
- Lesson 19: Wind Turbine Experiment
- Lesson 20: Wave and Tidal Technology
- Lesson 21: Dams
- Lesson 22: Geothermal Power
- Lesson 23: Thermal Energy, Heat & Temperature
- Lesson 24: Steam Powered Boat
- Lesson 25: Ocean Thermal Energy
- Lesson 26: How can water be used to store energy?
- Lesson 27: Biofuels
- Lesson 28: Can a fuel be made from plant material?
Quick Links:
Renewable & Alternative Energy 1
Renewable & Alternative Energy 3
[am4show have='p149;' guest_error='Guest error message' user_error='User error message' ]
Lesson 13: How Generators Make Electricity
Lesson 14: Galvanometer
Galvanometers are coils of wire connected to a battery. When current flows through the wire, it creates a magnetic field. Since the wire is bundled up, it multiplies this electromagnetic effect to create a simple electromagnet that you can detect with your compass.
Here's what you need to do:
Materials:
- magnet wire
- sand paper
- scissors
- compass
- AA battery case
- 2 AA batteries
- 2 alligator clip wires
Download Student Worksheet & Exercises
1. Remove the insulation from about an inch of each end of the wire. (Use sandpaper if you're using magnet wire.)
2. Wrap the wire at least 30-50 times around your fingers, making sure your coil is large enough to slide the compass through.
3. Connect one end of the wire to the battery case wire.
4. While looking at the compass, repeatedly tap the other end of the wire to the battery. You should see the compass react to the tapping.
5. Switch the wires from one terminal of the battery to the other. Now tap again. Do you see a difference in the way the compass moves?
You just made a simple galvanometer. “Oh boy, that’s great! Hey Bob, take a look! I just made a....a what?!?” I thought you might ask that question. A galvanometer is a device that is used to find and measure electric current. “But, it made a compass needle move...isn’t that a magnetic field, not electricity?” Ah, yes, but hold on a minute. What is electric current...moving electrons. What do moving electrons create...a magnetic field! By the galvanometer detecting a change in the magnetic field, it is actually measuring electrical current! So, now that you’ve made one let’s use it!
More experiments with your galvanometer
You will need:
- Your handy galvanometer
- The strongest magnet you own
- Another 2 feet or more of wire
- Toilet paper or paper towel tube
1. Take your new piece of wire and remove about an inch of insulation from both ends of the wire.
2. Wrap this wire tightly and carefully around the end of the paper towel tube. Do as many wraps as you can while still leaving about 4 inches of wire on both sides of the coil. You may want to put a piece of tape on the coil to keep it from unwinding. Pull the coil from the paper towel tube, keeping the coil tightly wrapped.
3. Hook up your new coil with your galvanometer. One wire of the coil should be connected to one wire of the galvanometer and the other wire should be connected to the other end of the galvanometer.
4. Now move your magnet in and out of the the coil. Can you see the compass move? Does a stronger or weaker magnet make the compass move more? Does it matter how fast you move the magnet in and out of the coil?
Taa Daa!!! Ladies and gentlemen you just made electricity!!!!! You also just recreated one of the most important scientific discoveries of all time. One story about this discovery, goes like this:
A science teacher doing a demonstration for his students (can you see why I like this story) noticed that as he moved a magnet, he caused one of his instruments to register the flow of electricity. He experimented a bit further with this and noticed that a moving magnetic field can actually create electrical current. Thus tying the magnetism and the electricity together. Before that, they were seen as two completely different phenomena!
Now we know, that you can’t have an electric field without a magnetic field. You also cannot have a moving magnetic field, without causing electricity in objects that electrons can move in (like wires). Moving electrons create a magnetic field and moving magnetic fields can create electric currents.
“So, if I just made electricity, can I power a light bulb by moving a magnet around?” Yes, if you moved that magnet back and forth fast enough you could power a light bulb. However, by fast enough, I mean like 1000 times a second or more! If you had a stronger magnet, or many more coils in your wire, then you could make a greater amount of electricity each time you moved the magnet through the wire.
Believe it or not, most of the electricity you use comes from moving magnets around coils of wire! Electrical power plants either spin HUGE coils of wire around very powerful magnets or they spin very powerful magnets around HUGE coils of wire. The electricity to power your computer, your lights, your air conditioning, your radio or whatever, comes from spinning magnets or wires!
“But what about all those nuclear and coal power plants I hear about all the time?” Good question. Do you know what that nuclear and coal stuff does? It gets really hot. When it gets really hot, it boils water. When it boils water, it makes steam and do you know what the steam does? It causes giant wheels to turn. Guess what’s on those giant wheels. That’s right, a huge coil of wire or very powerful magnets! Coal and nuclear energy basically do little more than boil water. With the exception of solar energy almost all electrical production comes from something huge spinning really fast!
Exercises
- Why didn’t the coil of wire work when it wasn’t hooked up to a battery? What does the battery do to the coil of wire?
- How does a moving magnet make electricity?
- What makes the compass needle deflect in the second coil?
- Does a stronger or weaker magnet make the compass move more?
- Does it matter how fast you move the magnet in and out of the coil?
Lesson 15: Electromagnetic Nail
You can wrap wire around an iron core (like a nail), which will intensify the effect and magnetize the nail enough for you to pick up paperclips when it's hooked up. See how many you can lift!
You can wrap the wire around your nail using a drill or by hand. In the picture to the left, there are two things wrong: you need way more wire than they have wrapped around that nail, and it does not need to be neat and tidy. So grab your spool and wrap as much as you can - the more turns you have around the nail, the stronger the magnet.
(We included this picture because there are so many like this in text books, and it's quite misleading! This image is supposed to represent the thing you're going to build, not be an actual photo of the finished product.)
Find these materials:
- Batteries in a battery holder with alligator clip wires
- A nail that can be picked up by a magnet
- At least 3 feet of insulated wire (magnet wire works best but others will work okay)
- Paper Clips
- Masking Tape
- Compass
1. Take your wire and remove about an inch of insulation from both ends. (Use sandpaper if you're using magnet wire.)
2. Wrap your wire many, many times around the nail. The more times you wrap the wire, the stronger the electromagnet will be. Be sure to always wrap in the same direction. If you start wrapping clockwise, for example, be sure to keep wrapping clockwise.
3. Now connect one end of your wire to one terminal of the battery using an alligator clip (just like we did in the circuits from Unit 10).
4. Lastly, connect the other end of the wire to the other terminal of the battery using a second alligator clip lead to connect the electromagnet wire to the battery wire. This is where the wire may begin to heat up, so be careful.
5. Move your compass around your electromagnet. Does it affect the compass?
6. See if your electromagnet can pick up paper clips.
7. Switch the wires from one terminal of the battery to the other. Electricity is now moving in the opposite direction from the direction it was moving in before. Try the compass again. Do you see a change in which end of the nail the north side of the compass points to?
What happened there? By hooking that coil of wire up to the battery, you created an electromagnet. Remember, that moving electrons causes a magnetic field. Well, by connecting the two ends of your wire up to the battery, you caused the electrons in the wire to move through the wire in one direction.
Since many electrons are moving in one direction, you get a magnetic field! The nail helps to focus the field and strengthen it. In fact, if you could see the atoms inside the nail, you would be able to see them turn to align themselves with the magnetic field created by the electrons moving through the wire. You might want to test the nail by itself now that you’ve done the experiment. You may have caused it to become a permanent magnet!
Lesson 16: Electromagnetic Crane
An electromagnet is a magnet you can turn on and off using electricity. By hooking up a coil of wire up to a battery, you will create an electromagnet. When you disconnect it, it turns back into a coil of wire. Since moving electrons cause a magnetic field, when connecting the two ends of your wire up to the battery, you caused the electrons in the wire to move through the wire in one direction. Since many electrons are moving in one direction, you get a magnetic field!
Materials:
- Nail
- Wood skewer
- Magnet wire
- D cell battery
- Sandpaper or nail file
- 2 rubber bands
- Foam block
- 2 fat popsicle sticks
- Paperclips
- Drill
- Hot glue or tape
Lesson 17: How do Generators Work?
Have you noticed that stuff sticks to your motor? If you drag your motor through a pile of paperclips, a few will get stuck to the side. What's going on?
Inside your motor are permanent magnets (red and blue things in the photo) and an electromagnet (the copper thing wrapped around the middle). Normally, you'd hook up a battery to the two tabs (terminals) at the back of the motor, and your shaft would spin.
However, if you spin the motor shaft with your fingers, you’ll generate electricity at the terminals. But how is that possible? That's what this experiment is all about.
Materials:
- 9-18V DC motor
- LED (bi-polar)
If you move a magnet along the length of a wire, it will create a very faint bit of electricity inside the wire. If you moved that magnet back and forth fast enough you could power a light bulb. However, by fast enough, I mean like 1000 times a second or more! If you had a stronger magnet, or many more coils in your wire, then you could make a greater amount of electricity each time you moved the magnet past the wire.
A motor has a coil of wire wrapped around a central axis, so instead of rubbing back and forth (which is tough to going fast enough, because you have to stop, reverse direction, and start moving again every so often), it rotates past a set of magnets continuously.
When you add a battery pack to the motor terminals at the back, you energize the coil inside the motor, and it begins to rotate to attempt to line up its north and south poles. But the magnets are lined up in a way that it will continually 'miss' and overshoot, which keeps the shaft spinning over and over, faster and faster.
You can turn your motor into a generator by simply giving the shaft a quick spin with your fingers. Remember that attached to this shaft is a coil of wire. When you spin the shaft, you're also moving a coil of wire past the permanent magnets inside to motor, which will create electricity in your coil and out the terminals.
You can attach a low-voltage LED directly to the motor terminals and spin the shaft to see the LED light up. Depending on the size of the magnets inside your motor, you may need to spin the shaft super fast to see the LED light up. The larger the motor, the easier this activity is. Try using a larger, 12V DC motor from the main shopping list for this section.
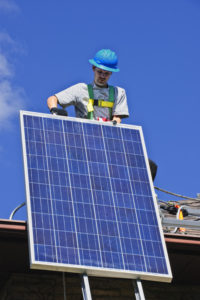
Lesson 18: Wind Turbines
Lesson 19: Wind Turbines

Believe it or not, most of the electricity you use comes from moving magnets around coils of wire! Wind turbines spin big coils of wire around very powerful magnets (or very powerful magnets around big coils of wire) by capturing the flow.
Here's how it works: when a propeller is placed in a moving fluid (like the water from your sink or wind from your hair dryer), the propeller turns. If you attach the propeller to a motor shaft, the motor will rotate, which has coils of wire and magnets inside. The faster the shaft turns, the more the magnets create an electrical current.
The electricity to power your computer, your lights, your air conditioning, your radio or whatever, comes from spinning magnets or wires!
We're going to build a wind turbine that will actually give you different amounts of electricity depending on which way your propeller is facing. Ready?
- A digital Multimeter
- Alligator clip leads
- 1.5-3V DC Motor
- 9-18VDC Motor
- Bi-polar LED
- Foam block (about 6” long)
- Propeller from old toy or cheap fan, or balsa wood airplane
Here's what you do:
Download Student Worksheet & Exercises
Exercises
- True or false: Electricity in a wind turbine is created by magnets in the turbine:
- True
- False
- What is one advantage of using wind for electricity?
- What might be one problem with constructing wind farms to meet all our energy needs?
Lesson 20: Wave and Tidal Technology
Lesson 21: Dams
Lesson 22: Geothermal Power
Lesson 23: Thermal Energy, Heat & Temperature
Lesson 24: Steam Powered Boat
In 1920's, these were a big hit. They were originally called "Putt Putt Steam Boats", and were fascinating toys for adults and kids alike. We'll be making our own version that will chug along for hours. This is a classic demonstration for learning about heat, energy, and how to get your kids to take a bath.
Here's what you need to build your own:
- Copper tubing (1/8”-1/4” dia x 12” long)
- Votive candle
- Foam block
- Scissors or razor (with adult help)
- Bathtub
Here's what you need to do:
Download Student Worksheet & Exercises
- Wrap the copper tubing 2-3 times around a thick marker. You want to create a ‘coil’ with the tubing. Do this slowly so you don’t kink the tubing. End with two 3” parallel tails. (This is easier if you start in the middle of the tubing and work outwards in both directions.)
- Stick each tail through a block of foam. Bend the wires to they run along the length of the bottom of the boat, slightly pointed upwards. (You can also use a plastic bottle cut in half.)
- Position a votive candle on the topside of the boat and angle the coil so it sits right where the flame will be.
- To start your boat, fill the bathtub with water. While your tub fills, hold the tubing in the running water and completely fill the coil with water.
- Have your adult helper light the candle. In a moment, you should hear the ‘putt putt’ sounds of the boat working!
- Troubleshooting: if your boat doesn’t work, it could be a few things:
- The tubing has an air bubble. In this case, suck on one of the ends like a straw to draw in more water. Heating an air bubble will not make the boat move – it needs to be completely filled with water.
- Your coil is not hot enough. You need the water to turn into steam, and in order for this to happen, you have to heat the coil as hot as you can. Move the coil into a better position to get heat from the flame.
- The exhaust pipes are angled down. You want the stem to move up and out of your pipes, not get sucked back in. Adjust the exit tubing tails so they point slightly upwards.
How Do They Work? Your steam boat uses a votive candle as a heat source to heat the water inside the copper tubing (which is your boiling chamber). When the water is heated to steam, the steam pushes out the tube at the back with a small burst of energy, which pushes the boat forward.
Since your chamber is small, you only get a short 'puff' of energy. After the steam zips out, it creates a low pressure where it once was inside the tube, and this draws in fresh, cool water from the tub. The candle then heats this new water until steam and POP! it goes out the back, which in turn draws in more cool water to be heated... and on it goes. The 'clicking' or 'putt putt' noise you hear is the steam shooting out the back. This is go on until you either run out of water or heat.
Bonus! Here's a video from a member that colored the water inside the pipe so they could see when it got pushed out! Note that the boat usually runs as fast as the first video on this page. The boats here are getting warmed up, ready to go, so they only do one or two puffs before they really start up.
Exercises Answer the questions below:
- Name three sources of renewable or alternative energy:
- Why is it important to look for renewable sources of energy?
- What is one example of a fossil fuel?
Lesson 25: Ocean Thermal Energy
Lesson 26: How can water be used to store energy?
Temperature is a measure of the average hotness of an object. The hotter an object, the higher its temperature. As the temperature is raised, the atoms and molecules in an object move faster. The molecules in hot water move faster than the molecules in cold water. Remember that the heat energy stored in an object depends on both the temperature and the amount of the substance. A smaller amount of water will have less heat energy than a larger amount of water at the same temperature.
Increasing the temperature of a large body of water is one way to store heat energy for later use. A large container filled with salt water, called brine, may be used to absorb heat energy during the day when it is warm. This energy will be held in the salt water until the night when it is cooler. This stored heat energy can be released at night to warm a house or building. This is one way to store the sun's heat energy until it is needed.
Solar ponds are used to store energy from the sun. Temperatures close to 100°C (212°F) have been achieved in solar ponds. Solar ponds contain a layer of fresh water above a layer of salt water. Because the salt water is heavier, it remains at the bottom of the pond-even as it gets quite hot. A black plastic bottom helps absorb solar energy from sunlight. The water on top serves to insulate and trap the heat in the pond.
In a fresh water pond, as the water on the bottom is heated from sunlight, the hot water becomes lighter and rises to the top of the pond. This convection or movement of hot water to the top tends to carry away excess heat. However, in a salt water pond, there is no convection so heat is trapped. In Israel a series of salt water, solar ponds were developed around the Dead Sea. The heat stored in these solar ponds has been used to run turbines and generate electricity.
Materials
- Two paper cups
- Measuring cups
- Hot water
- Watch or clock
- Sink
- Refrigerator (with freezer compartment)
Download Student Worksheet & Exercises
Procedure
Turn on the hot water faucet of a sink and wait several minutes until the water is hot. Be careful not to burn yourself with this hot water. Add one-fourth cup of this hot water to the first paper cup. Add one cup of hot water to the second paper cup. Place both of these cups in the freezer compartment of a refrigerator.
After thirty minutes check the water in each cup. Return the cups to the freezer compartment and check them again after fifteen minutes. Keep checking the cups each fifteen minutes until the water in one of the cups is frozen.
Observations
Does the water in the cups freeze at the same time? Does the water in one of the cups freeze first? How long does it take for the water to freeze?
Discussion
You will probably observe that the smaller amount of water in the first cup freezes prior to the larger amount of water in the second cup. Both cups were filled with the same hot water. However, even though the water in both cups was at the same temperature, they did not freeze at the same time. The amount of heat energy stored by the water depends on both the temperature and the amount of water.
We expect that the more heat energy stored in the cup, the longer it takes the water in the cup to freeze. Since one cup of water has more heat energy than one-fourth cup of water, it takes the larger amount of water longer to freeze.
Other Things to Try
Place one-half cup of hot tap water in one cup. Place one-half cup of cool tap water in a second cup. Put both cups in the freezer compartment of a refrigerator and check them every fifteen minutes until the water freezes solid. Which cup of water do you think has more heat energy? Which cup of water do you think will freeze first?
Place one cup of water in one paper cup and one-fourth cup of water in a second paper cup. Put both cups in the freezer of a refrigerator and leave overnight. The next day remove both cups of frozen water. Set the two cups out in the room. Observe the time it takes each piece of ice to melt. Which piece of ice do you think will melt first? Which piece will require more heat energy to cause it to melt?
Exercises
- What type of heat transfer is at work in a solar pond?
- Kinetic
- Conduction
- Potential
- Convection
- Radiation
- What units do we use to measure energy?
- Kilowatts
- Joules
- Newtons
- Kilowatt-hours
- Draw a diagram of a solar pond in the space below:
Lesson 27: Biofuels
Lesson 28: Can a fuel be made from plant material?
Yeast is a simple living organism that can break down sugars into ethyl alcohol (ethanol) and carbon dioxide. The process by which yeast breaks down sugars into ethyl alcohol and carbon dioxide is called fermentation.
The tiny gas bubbles rising in the liquid mixture in the bottle are carbon dioxide gas bubbles that are made during the fermentation. The balloon on the bottle expands and becomes inflated because it traps the carbon dioxide gas being produced.
The ethyl alcohol that is made during fermentation stays in the liquid mixture. When fermentation is finished, the liquid mixture usually contains about 13 percent ethyl alcohol. The rest of the liquid is mostly water.
The ethyl alcohol can be concentrated by a process called distillation. During distillation, the liquid fermentation mixture is heated to change the ethyl alcohol and some of the water into a vapor. The vapor is then cooled to change it back into a liquid. This distilled liquid contains 95 percent ethyl alcohol and 5 percent water. The remaining water can be removed by special distillation methods to give pure ethyl alcohol.
In some areas of the United States, ethyl alcohol is blended with gasoline to make a motor fuel known as gasohol. About 8 percent of the gasoline sold in the United States is gasohol.
Gasohol burns more cleanly than pure gasoline. This results in fewer pollutants being released into the air. The use of gasohol as a motor fuel is particularly important in cities that have a lot of smog.
Corn syrup is a mixture of simple and complex sugars and water. It is made by breaking down the starch in corn into sugars. The process is called digestion. In this experiment you changed the sugars in corn syrup using yeast. Much of the ethyl alcohol used to prepare gasohol is made by fermenting corn and corn sugar.
Over one billion gallons of ethyl alcohol are made each year by fermentation of sugars from grains such as corn. Ethyl alcohol is a renewable energy source when it is made by fermenting grains such as corn. This is because the grains, such as corn, are easily grown.
Materials
- One package of yeast
- Balloon
- Water
- Measuring spoons
- Corn syrup
- Measuring cup
- Empty, two-liter plastic drink bottle
- Funnel (optional)
- Sink or bucket
Procedure
Remove the paper label from around an empty, two-liter, plastic drink bottle. Add two cups of water and one package of yeast to the bottle. Swirl the bottle to mix the water and yeast.
Next, add one-quarter cup of corn syrup to the bottle. You may want to use a small funnel to help you add the corn syrup to the bottle. Swirl the bottle to mix the contents.
Place a deflated balloon over the neck of the bottle. Make sure the balloon fits securely over the neck. Place the bottle in a sink or bucket. Check the bottle and balloon after two hours, and then again after four hours. Finally, check the bottle and balloon after twenty-four hours.
When you have finished with the experiment, pour the contents of the bottle down the sink. Then rinse the bottle and sink with water.
Observations
What color is the yeast mixture? Does the balloon start to inflate after an hour or two? Can you see gas bubbles rising to the surface of the yeast mixture? Does the balloon grow larger with time?
Discussion
You should find that soon after you mix together the yeast, water, and corn syrup, changes start to take place in the bottle. You should notice that a foam forms on top of the liquid mixture. You should also see tiny gas bubbles rising to the surface of the liquid. Also, you should notice that the balloon begins to inflate and become large.
Other Things to Try
Repeat this experiment using one tablespoon of table sugar instead of corn syrup. You should find that yeast can also ferment table sugar into ethyl alcohol and carbon dioxide. Table sugar is made from sugar cane and sugar beets. Since sugar cane and sugar beets are renewable plants, ethyl alcohol made from fermenting sugar from these plant products is another renewable energy source.
Click Here to go to Next Lesson !
[/am4show]