Getting Started

This is an introduction to the microscope, and we’re going to not only how to use a microscope but also cover the basics of optics, slide preparation, and why we can see things that are invisible to the naked eye. Microscopes are basically two lenses put together to make things appear larger.

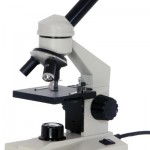
The first thing you need to do is select a compound microscope. While you can do these lessons without one, it’s really a totally different experience doing it with a scope. Cheap microscopes are going to frustrate you beyond belief, so here are the ones we recommend that will last your kids through college. You’ll want one with the optional mechanical stage (instead of stage clips), fine and coarse adjustment knobs, and at least three objectives. Click  here for our microscope equipment recommendations.

If you’ve just purchased a microscope, keep it in its packaging until you watch the videos in this section. We’ll show you how to handle it, store it, and where not to touch.  Your first job is to start collecting as many interesting windowsill insects as you can find.

Please login or register to read the rest of this content.


Select a Lesson

Microscopes and Telescopes
Hans Lippershey was the first to peek through his invention of the refractor telescope in 1608, followed closely by Galileo (although Galileo used his telescope for astronomy and Lippershey’s was used for military purposes).  Their telescopes used both convex and concave lenses. A few years later, Kepler swung into the field and added his own …
Slide Preparation: Heat Fixes
Make sure you’ve completed the How to Use a Microscope and also the Wet Mount and Staining activities before you start here! If you tried looking at animal cells already, you know that they wiggle and squirm all over the place. And if you tried looking when using the staining technique, you know it only …
Slide Preparation: Staining
Make sure you’ve completed the How to Use a Microscope and also the Wet Mount activities before you start here! If your critter is hard to see, you can use a dye to bring out the cell structure and make it easier to view.  There are lots of different types of stains, depending on what …
Preparing a Wet Mount Slide
Make sure you've completed the How to Use a Microscope activity before you start here!Anytime you have a specimen that needs water to live, you'll need to prepare a wet mount slide. This is especially useful for looking at pond water (or scum), plants, protists (single-cell animals), mold, etc. When you keep your specimen alive …
Preparing a Dry Mount Slide
Make sure you’ve completed the How to Use a Microscope activity before you start here! This is simplest form of slide preparation!  All  you need to do is place it on the slide, use a coverslip (and you don’t even have to do that if it’s too bumpy), and take a look through the eyepiece.  …
How to Use a Microscope: Optics, Observing, and Drawing Techniques
How do the lenses work to make objects larger? We’re going to take a closer look at optics, magnification, lenses, and how to draw what you see with this lesson. Here’s a video to get you started: Here’s what you do:
Anatomy of the Microscope
Nose? Objective? Stage? What kind of class is this?  Well, some of the names may sound a bit odd, but this video will show you what they are and how they are used. As you watch the video, touch the corresponding part of your microscope to get a feel for how it works.
Microwhat?
Welcome to our unit on microscopes! We’re going to learn how to use our microscope to make things appear larger so we can study them more easily. Think about all the things that are too small to study just with your naked eyeballs: how many can you name? Let’s start from the inside out – …