 In eukaryotes there is a nucleus, so a more complex process called mitosis is needed with cell division. Mitosis is divided into four parts, or phases:
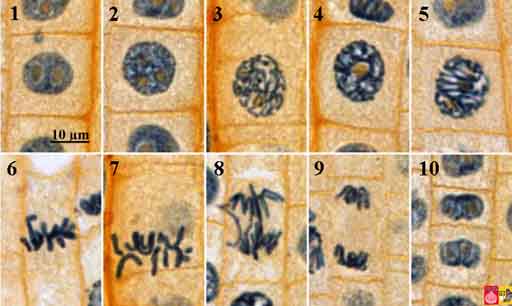
Phase 1 – Prophase: In this phase the nuclear membrane begins to break down and the DNA forms structures called chromosomes.
Phase 2 – Metaphase: In this phase the chromosomes line up along the center of the parent cell
Phase 3 – Anaphase: In this phase, the chromosomes break apart, with a complete set of DNA going to each side of the cell
Phase 4 – Telophase: In this phase, a new nuclear membrane forms around each of the sets of DNA
The four stages of mitosis (the cell at the top has not started mitosis) lead to two daughter cells.
A little after telophase, the cytoplasm splits and a new cell membrane forms. Once again, two daughter cells have formed. Take a look at this animation for a good overview of mitosis and see if you can identify all the phases.
Please login or register to read the rest of this content.
Iodine binds with starch and can be used to see the cytoplasm with white and yellow onions. If you don’t have iodine, use a red onion which is already pigmented naturally. You can stain the nuclei using one drop of methylene blue, but you should not let kids handle this as it’s a toxin.
The stain isn’t working. Did you have success with Iodine? On-line I read that Methylene blue binds with DNA and makes the chromosones visible. I can’t see anything, except cell walls, wit iodine.
It sounds like your technique is correct. By not heat mounting the slide, you should be able to see cell division happening. Even if you don’t, you’ll still be able to see a very cool image of cells in various stages of mitosis. When you think about how small cells are, and the fact that your microscope is a fairly simple tool, this is kind of remarkable (at least I think so). As discussed in the lab, seeing the stages of mitosis will allow you to make some conclusions about the relative length of time the cell is in each stage of this process.
As far as the size of the cut, you’ll want it to be thin enough that it appears translucent; otherwise you’ll have a hard time seeing it through the compound microscope. A razor blade is a good tool for this, as long as you are very careful of course.
Another question to check before we do this to avoid messing it up. Am I correct that we are to cut a very narrow cross section off of the root (right near the cap), then cut that cross section in half length-wise? And, if we put that piece on our slide and stain it, we should hopefully see the cell division process happening (if we don’t heat mount it). Finally, how skinny should a cross section be to be able to see cell division, and is the best cutting device a razor blade for skinny cuts? Thanks!
Yes, you can try a green onion’s root tip and see what it looks like. For the video question, have you always had this issue, or is this new? is it just this video or all of them?
Hi Aurora, Is it OK to use a green onion for this experiment? (the skinny kind) Also, I am getting an error message when I try to play the video my browser (Firefox). Thank you!