If you love the idea of mixing up chemicals and dream of having your own mad science lab one day, this one is for you. You are going to mix up each solid with each liquid in a chemical matrix.


In a university class, one of the first things you learn in chemistry is the difference between physical and chemical changes. An example of a physical change happens when you change the shape of an object, like wadding up a piece of paper. If you light the paper wad on fire, you now have a chemical change. You are rearranging the atoms that used to be the molecules that made up the paper into other molecules, such as carbon monoxide, carbon dioxide, ash, and so forth.


How can you tell if you have a chemical change? If something changes color, gives off light (such as the light sticks used around Halloween), or absorbs heat (gets cold) or produces heat (gets warm), it’s a chemical change.


What about physical changes? Some examples of physical changes include tearing cloth, rolling dough, stretching rubber bands, eating a banana, or blowing bubbles.


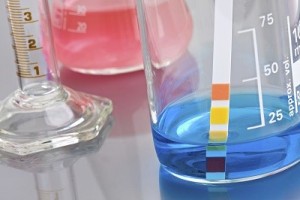
About this experiment: Your solutions will turn red, orange, yellow, green, blue, purple, hot, cold, bubbling, foaming, rock hard, oozy, and slimy, and they’ll crystallize and gel — depending on what you put in and how much!


This is the one set of chemicals that you can mix together without worrying about any lethal gases. I do recommend doing this OUTSIDE, as the alcohol and peroxide vapors can irritate you. Always have goggles on and gloves on your hands, and a hose handy in case of spills. Although these chemicals are not harmful to your skin, they can cause your skin to dry out and itch. Wear gloves (latex or similar) and eye protection (safety goggles), and if you’re not sure about an experiment or chemical, just don’t do it. (Skip the peroxide and cold pack if you have small kids.)


Materials:
• sodium tetraborate (borax, laundry aisle)
• sodium bicarbonate (baking soda, baking aisle)
• sodium carbonate (washing soda, laundry aisle)
• calcium chloride (AKA “DriEz” or “Ice Melt”)
• citric acid (spice section, used for preserving and pickling)
• ammonium nitrate (single-use disposable cold pack)
• isopropyl rubbing alcohol
• hydrogen peroxide
• acetic acid (distilled white vinegar)
• water
• liquid dish soap (add to water)
• muffin tin or disposable cups
• popsicle sticks for stirring and mixing
• tablecloths (one for the table, another for the floor)
• head of red cabbage (indicator)


[am4show have=’p8;p9;p18;p45;’ guest_error=’Guest error message’ user_error=’User error message’ ]


Download Student Worksheet & Exercises


Step 1: Cover your kitchen table with a plastic tablecloth (and possibly the floor). Place your chemicals on the table. A set of muffin cups make for an excellent chemistry experiment lab. (Alternatively, you can use empty plastic ice cube trays.) You will mix in these cups. Leave enough space in the cups for your chemicals to mix and bubble up — don’t fill them all the way when you do your experiments!


Step 2: Set out your liquid chemicals in easy-to-pour containers, such as water bottles (be sure to label them, as they all will look the same): alcohol, hydrogen peroxide, water, acetic acid, and dish soap (mixed with water). Set out small bowls (or zipper bags if you’re doing this with a crowd) of the powders with the tops of your water bottles as scoopers. The small scoopers regulate the amounts you need for a muffin-sized reaction. Label the powders, as they all look the same.


Step 3: Prepare the indicator by coarsely chopping the head of red cabbage and boiling the pieces for five minutes in a pot full of water. Carefully strain out all the pieces with a fine-mesh strainer; the reserved liquid is your indicator (it should be blue or purple).


When you add this indicator to different substances, you will see a color range: hot pink, tangerine orange, sunshine yellow, emerald green, ocean blue, velvet purple, and everything in between. Test out the indicator by adding drops of cabbage juice to something acidic, such as lemon juice, and see how different the color is when you add indicator to a base, such as baking soda mixed with water.


Have your indicator in a bottle by itself. An old soy sauce bottle with a built-in regulator that keeps the pouring to a drip is perfect. You can also use a bowl with a bulb syringe, but cross-contamination could be a problem. Or it could not be — depending on whether you want the kids to see the effects of cross-contamination during their experiments. (The indicator bowl will continually turn different colors throughout the experiment.)


Step 4: Start mixing it up! When I teach this class, I let them have at all the chemicals at once (even the indicator), and of course, this leads to a chaotic mix of everything. When the chaos settles down, and they start asking good questions, I reveal a second batch of chemicals they can use. (I have two identical sets of chemicals, knowing that the first set will get used up very quickly.)


Step 5: After the initial burst of enthusiasm, your kids will instinctively start asking better questions. They will want to know why their green goo is creeping onto the floor while someone else’s just bubbled up hot pink, seemingly mixed from the same stuff. Give them a chance to figure out a more systematic approach, and ask if they need help before you jump in to assist.


What’s happening with the indicator? An indicator is a compound that changes color when you dip it in different things, such as vinegar, alcohol, milk, or baking soda mixed with water. There are several extracts you can use from different substances. You’ll find that different indicators are affected differently by acids and bases. Some change color only with an acid, or only with a base. Turmeric, for example, is good only for bases. (You can prepare a turmeric indicator by mixing 1 teaspoon turmeric with 1 cup rubbing alcohol.)


Why does red cabbage work? Red cabbage juice has anthocyanin, which makes it an excellent indicator for these experiments. Anthocyanin is what gives leaves, stems, fruits, and flowers their colors. (Did you know that certain flowers, such as hydrangeas, are blue in acidic soil but turn pink when transplanted to a basic soil?) You’ll need to get the anthocyanin out of the cabbage and into a more useful form so you can use it as a liquid indicator.


Tip for Testing Chemical Reactions: Periodically hold your hand under the muffin cups to test the temperature. If it feels hot, it’s an exothermic reaction (giving off energy in the form of heat, light, explosions …). The chemical-bond energy is converted to thermal energy (heat) in these experiments. If it feels cold, you’ve made an endothermic reaction (absorbing energy, where the heat from the mixture converts to bond energy). Sometimes you’ll find that your mixture is so cold that it condenses the water outside the container (like water drops on the outside of an ice-cold glass of water on a hot day).


Variations for the Indicator: Red cabbage isn’t the only game in town. You can make an indicator out of many other substances, too. Here’s how to prepare different indicators:
• Cut the substance into smaller pieces. Boil the chopped substance for five minutes. Strain out the pieces and reserve the juice. Cap the juice (indicator) in a water bottle, and you’re ready to go.
• What different substances can you use? We’ve had the best luck with red cabbage, blueberries, red and green grapes, beets, cherries, and turmeric. You can make indicator paper strips using paper towels or coffee filters. Just soak the paper in the indicator, remove and let dry. When you’re ready to use one, dip it in partway so you can see the color change and compare it to the color it started out with.
• Use the indicator both before and after you mix up chemicals. You will be surprised and dazzled by the results!


Teaching Tips: You can make this lab more advanced by adding a postage scale (to measure the solids in exact measurements), small beakers and pipettes for the liquid measurements, and data sheets to record temperature, reactivity, and acid/base indicator levels. (Hint: Make the data sheet like a matrix, to be sure you get all the possible combinations.)


For the student: Your mission is to mix up solutions that:
• Generate heat (exothermic)
• Get ice-cold on their own (endothermic)
• Crystallize
• Are self-gelling
• Bubble up and spit
• Ooze creepy concoctions
• Are the most impressive (the ooohhhh-aaahhhhh factor).


For the parent: Your mission is to:
• Make sure everything in reach is covered with plastic tablecloths, drop cloths, or tarps
• Open all the windows and turn on the fans (or just do this experiment outside near the hose)
• Keep all small children and pets away
• Slap on a pair of rubber gloves
• Encourage the kids to try it and test it
• Remember that there are no such things as mistakes, only learning opportunities. (Don’t forget that we usually learn more from mistakes than we do when we’re successful!)


For the truly exceptional parent: Your mission is also to:
• Secretly get an identical second set of chemicals from the grocery store (see shopping list above) and hide them in a bin nearby
• Have all the chemicals out and ready for the kids to use
• Be sure the kids know your rules before you let them loose (no eating, running, or horseplay; all goggles must stay on; etc.)
• Have a bin full of water nearby for washing up
• Let the kids loose to experiment and play without expectation
• Play with the kids, get into the act (“Wow! It turned green! How did you do that?!” instead of “Well, I’m not going to clean THAT up.”)
• Expect kids to dump everything and mix it all together at the same time without much thought about what they are trying to accomplish
• When their supplies run out, pull out your second bin and smile
• Encourage the kids to try their ideas out
o When they ask, “Will this work?” you can reply
with confidence, “I don’t know — try it!”


Click here to view another version of this experiment: Acids & Bases.
[/am4show]


Click here to go to next lesson on Precipitation Reactions.


Have a question ?

Tell us what you're thinking...