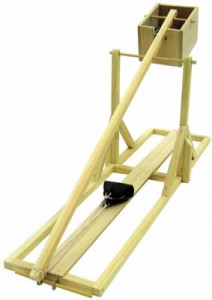
trebuchet23This experiment is for Advanced Students. For ages, people have been hurling rocks, sticks, and other objects through the air. The trebuchet came around during the Middle Ages as a way to break through the massive defenses of castles and cities. It’s basically a gigantic sling that uses a lever arm to quickly speed up the rocks before letting go. A trebuchet is typically more accurate than a catapult, and won’t knock your kid’s teeth out while they try to load it.


Trebuchets are really levers in action. You’ll find a fulcrum carefully positioned so that a small motion near the weight transforms into a huge swinging motion near the sling. Some mis-named trebuchets are really ‘torsion engines’, and you can tell the difference because the torsion engine uses the energy stored in twisted rope or twine (or animal sinew) to launch objects, whereas true trebuchets use heavy counterweights.


[am4show have=’p9;p41;p88;p92;p103;’ guest_error=’Guest error message’ user_error=’User error message’ ]


This is a serious wood-construction project. If you have access to scrap wood and basic tools (and glue!), you have everything you need to build this project. You will need to find heavy objects (like rocks or marbles) for the weights.


We want kids to discover that science isn’t in the special parts that come with a kit, but rather in the imagination and skill of the kid building it. We strive to avoid parts that are specially made just for a kit, molded plastic pieces, etc. and instead use parts that any kid could buy from the store. This means that kids can feel free to change things around, use their own ideas to add improvements and whatever else their imagination can come up with. So on this note, let’s get started.


WARNING: This project requires the use of various hand tools. These tools should only be used with adult supervision, and should not be used by children under 12 years of age.


Tools you’ll need:


  •   Hammer
  •   Electric drill with ¼” bit
  •   Hot glue gun & glue sticks
  •   Measuring tape or ruler
  •   Hand saw & clamp (or miter box)
  •   Scissors
  •   Screwdriver (flathead) or wood chisel

Materials:


  • 7 pieces of ½” x ½” x 24″ pieces of wood stock
  • 2 pieces of ¾” x 24″ wood
  • 1 piece of 3″ x 24″ wood
  • 18″ Wooden dowel
  • Screw eye
  • Nails
  • String
  • Clear tube
  • Rubber mesh

Note: wood pieces may be slightly larger or smaller than specified. Just use your best judgment when sizing.


From ½” x ½” x 24″ pieces of wood stock cut:


  • 3 pieces 5″ long
  • 2 pieces 9″ long
  • 3 pieces 3-1/2″ long
  • 4 pieces 5-1/2″ long

From the dowel cut:


  • 2 pieces 7″ long
  • 1 piece 4″ long

From the 3″ x 24″ flat piece of wood cut:


  • 2 pieces 3″ long (one of these has a 1″ square notch in it)
  • 2 pieces 5″ long
  • 1 piece 4-1/2″ long

AND…


  • String should be cut into 2 pieces 14-16″ long
  • The pouch is cut from the rubber mesh and is 5″ x 1-1/2″


Advanced Students: Download your Student Worksheet Lab here!


[/am4show]


Click here to go to next lesson on Helpful Hints.

Have a question ?

Tell us what you're thinking...