 An “Arduino” is a micro-controller that really makes robotics a lot easier and fun to create. First designed in 2005 by an Italian company, these single boards were originally intended for students learning robotics.
The board consists of standardized connectors, which allow a whole host of interchangeable add-on modules (shields) to be used. It’s like the brains of a computer that you can add inputs (like sensors) and outputs connections (like motors) to.
Arduinos are not limited to student robotics. In fact, you’ll find them anywhere there’s automation, from telescope observatories to weather stations to smart home functions.
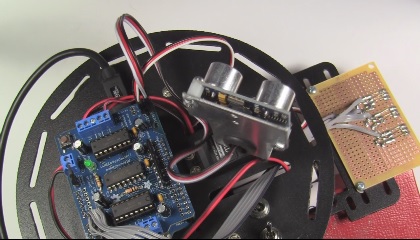
We’re going to learn how to transform an inexpensive Arduino board into a fully functioning autonomous robot with sensors, just like the one in the image above. This will take several steps, so watch the videos in order so you don’t miss a thing.
Please login or register to read the rest of this content.
You can get both of those from Jameco. I would connect with them directly (they have excellent support service by phone) and tell them exactly what you need and they should be able to give you the right part number. Just read the info from the sheet and they can look it up in their huge catalog and make suggestions. If you can wait a week, I will be returning to my computer and help you with this if you need it.
Great! Thank you! Last 2 items that don’t have links and I can’t figure out where to get the exact ones-hookup wire in the appendix list and the 2 types of ribbon cable mentioned.
I am sorry you’re having trouble getting parts. I didn’t realize they had discontinued so many of the parts so quickly. I’ll see if I can update the missing links for you. The DF robot 2WD link should work (hit REFRESH to get the latest page updates). I was able to put one in my shopping cart just now. And yes, the 4WD one you found will work also. Is there anything else you’re unable to find?
As you can see, I am totally challenged in this area but my son is not and so I am spending the time to order all of these parts! Looks like I found everything in different places but still can’t find what would be the exact match for the ribbon cable 5 way 10″. Also, is this the four wheeled chassis we can use: https://www.jameco.com/webapp/wcs/stores/servlet/ProductDisplay?storeId=10001&langId=-1&catalogId=10001&productId=2229212 ? Thanks so much for your patience and help!
Some of the parts listed are discontinued (QTR-1A Reflectance sensor), DFRobot chassis- both links say unavailable. A few others have either no links listed or when you click on the MAKER link it doesn’t have a product linked to it.
Yikes! Didn’t realize that we still had broken links. Also make sure you look at the Radio Shack replacement sheet, and I’ll get you updated info for the Arduino.
Are you still working on an updated shopping list with links for this project? Some of the links don’t link to an actual product. Thank you!
We had to update the parts list due to the manufacturer discontinuing certain parts. You should be able to do the video with the new parts list and the old video. If you have questions, just ask!
header pins are $16 each on amazon and you need three but they are $.40 on this site https://www.pololu.com/checkout?cart_id=1J436097&guest_ok=1&session_id=c08af5b84a7bba84861ec9c10b44cd1c
the video says to use the Leonardo chip but the parts list shows the uno. which are we using?
Yes, and we are working on info for you as well as new parts list and order links. 🙂
apparently the motor control shield for arduino is no longer made. they have a new one http://www.adafruit.com/products/1438 but it looks different. can this be used as well?
Thanks for letting us know! I am in the middle of creating a new parts list that replaces all the Radio Shack parts on our website, and I can add this to our list as well. We do have kits that have everything you need for most of the electronics projects (it’s in the Science Mastery Diamond), however since the Arduino project is new (and expensive), it has not been added to the program. However, all the other projects in Unit 14 are included in this program.
We have been attempting to get the parts for this project, but have had the worst time. The Makeshed robot was out of stock, so we attempted to piece it together. I do not speak electronics. My boys do not have experience. I did get a couple sets that together would make a robot–with additional kits. Of course, we didn’t get the Leonardo. Or the motor shield. We are now waiting on these.
May I suggest a more detailed shopping list?
In the hours I have spent on Jameco I have discovered that you could make a kit for your projects and they would ship them out with what is needed. This would be a God send even if it cost more.
I’m still not sure if we will have everything once our latest order arrives. Is there a way for you to put up a detailed list?
I’ll have my team contact you right away!
I have received a message that I do not have access to the advanced project pages. How do I get access? Thanks.
Looks like they’ve moved the page. It’s been updated now… thanks for your eagle eye!
Hi, Aurora!
The link you showed for the Arduino kit for MAKE does not work.
All it shows is “404
Page not found
Looks like that link is broken. This might be because you mistyped the URL, we moved a file, or you’re following a bad link.
Try a search to find what you’re looking for”.
Is there any other website that sells the kit?
Sure thing! You can order one from Jameco at this link.
Hello! The Arduino Leonardo w/Headers is listed as out of stock on the Make and Arduino websites. I prefer to shop for parts rather than purchase a Maker kit. Can we use an alternative Arduino board for the project? Thank you!