Magnesium is one of the most common elements in the Earth’s crust. This alkaline earth metal is silvery white, and soft. As you perform this lab, think about why magnesium is used in emergency flares and fireworks. Farmers use it in fertilizers, pharmacists use it in laxatives and antacids, and engineers mix it with aluminum to create the BMW N52 6-cylinder magnesium engine block. Photographers used to use magnesium powder in the camera’s flash before xenon bulbs were available.
Most folks, however, equate magnesium with a burning white flame. Magnesium fires burn too hot to be extinguished using water, so most firefighters use sand or graphite.
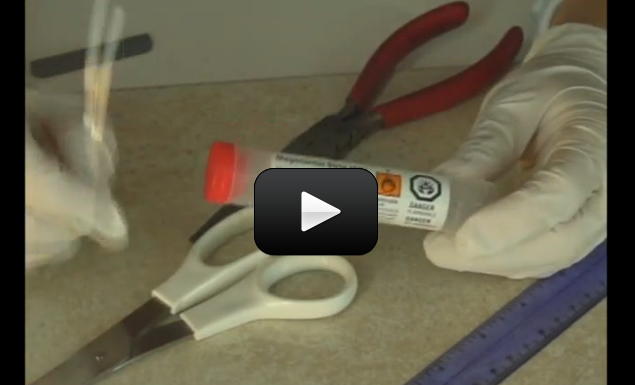
We’re going to learn how to (safely) ignite a piece of magnesium in the first experiment, and next how to get energy from it by using it in a battery in the second experiment. Are you ready?
Please login or register to read the rest of this content.
Hi Jaden,
Thanks for writing! I am sorry that you’re having trouble getting the experiments to work out, so here’s something to think about as you work through the program. First, we’re totally here to help you, and that includes live help just like this. I also have live video conference q&a calls that are especially for folks who have our Diamond program (which it sounds like you do) so you are always welcome to connect through those as well. Students will save up their questions and experiment setup so they can actually show me what’s going on so I can help… it’s really the best way I can think of to help since I can’t stand right next to you as you work through the program.
One of the things students learn through the program isn’t memorizing facts and figures (you could use a textbook for that), but how to think and how to learn effectively. That means that you can expect things to “go wrong” or to not do what you thought it would do… and it’s how you handle this unexpectedness that really separates you from the average person. Learning how to stop, think, and ask questions in addition to focus on what specifically happened is one of the main reasons for doing experiments in the first place. We’re developing your curiosity, out-of-the-box thinking skills, resilience and determination through the program.
That said, here are things to think about when doing the magnesium ignition experiment:
1. You need to place the magnesium in the hottest part of the flame. The flame gives it a a heat source so it can overcome the activation energy (the amount of energy you need in order for the chemical reaction to happen).
2. When the magnesium ignites, it takes oxygen from the air to form magnesium oxide (the white powder). Sometimes it does take a couple of minutes for the flame to ignite the ribbon. I’ve also tried the gas stove in the kitchen as a flame source.
3. Be sure you are using the Mg from the same strip. Another possibility is that I used a different alcohol than you did. Did you use methanol, ethanol or propanol? Also if you did this outside, that could have resulted in a cooler flame even if there was a slight breeze.
Hi Aurora,
I have tried the Magnesium experiment where you ignite it with an alcohol burner, and nothing actually happened, I made sure there was no oxide on the strip, everything was perfect, I tried it outside, it was approximately 50 degrees Fahrenheit, nothing happened, I stood there for a good several minutes, nothing, I tried doing it inside under my stove vent for several more minutes, with no results. My father is becoming increasingly agitated at the fact he spent $2000 on your program and I have not had many experiments where I actually obtained the same results as you in your videos. I am also becoming very frustrated because of my less than optimal results. What are all the possible reasons why the Magnesium strip would not ignite, I shouldn’t have to use a propane torch because I saw you use your alcohol burner in your video which seemed to work just fine. Any help would be greatly appreciated. Thanks!
Sincerely,
Jaden Muoio
Oops – you’re right! The wrong experiment video was posted. I’ll get this fixed right away!
Hi Aurora,
I did not see the video for experiment 75. When I selected the video to play, I got experiment 52 again on burning magnesium. It seems this video is here twice. Am I looking in the right place?
Thanks
ive dun this one in a science place
Ignite, not ignore, right? It’d be awful to be ignored by a magnesium strip! 🙂
It doesn’t take much to get them going. What if you get it started with a hotter ignition source, like a propane torch? (Make sure YOU’re not doing this, but get an experienced adult to help you.) Also wipe off any oxide layer that you might have on the surface that might be interfering with it.
Our magnesium strip did not ignore, neither with the alcohol burner nor when we put high hit on it using a gas burner. Any iidea why it would not work?
hi aurora,
i think that the reason that your light bulb didn’t really light up is because, if you look carefully, the magnesium strip and the copper wire were touching when you hooked it up. 🙂 ~jasmin