Make sure you’ve completed the How to Use a Microscope and also the Wet Mount activities before you start here!
If your critter is hard to see, you can use a dye to bring out the cell structure and make it easier to view. There are lots of different types of stains, depending on what you’re looking at.
The procedure is simple, although kids will probably stain not only their specimens, but the table and their fingers, too. Protect your surfaces with a plastic tablecloth and use gloves if you want to.
We’re going to use an iodine stain, which is used in chemistry as an indicator (it turns dark blue) for starch. This makes iodine a good choice when looking at plants. You can also use Lugol’s Stain, which also reacts with starch and will turn your specimen black to make the cell nuclei visible. Methylene blue is a good choice for looking at animal cells, blood, and tissues.
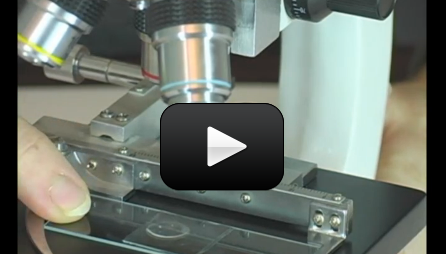
In addition to your specimen, you’ll need to get out your slides, microscope, cover slips, eye dropper, tweezers, iodine (you can use regular, non-clear iodine from the drug store), and a scrap of onion. If you can find an elodea leaf, add it to your pile (check with your local garden store). Here’s what you do:
Please login or register to read the rest of this content.
Each brown dot is the nucleus of a onion cell.
what are the little brown dots?
Dish detergent or ethyl alcohol should do the trick. The slide covers are harder to clean since they are so thin. If the slides are old and dirty, soak them in warm water with detergent overnight, and then wipe them clean with a towel. Wrap the slides in paper until you’re ready to use them again.
This may seem like a silly question. but what is the best way to clean the slides after using them? Just soap and water or do we have to do anything special? What about the slide covers. Do we just throw those away?
I’ll have my team connect with you right away!
Hello!
I am having the same problem as Eric Christiansen. Thanks, Laura
We’ll check into this right away, and if there’s an issue with your account my team will get right back to you! Sorry for the trouble.
We are also having difficulty completing the 7th grade activities for the Life Science unit.
You simply request to get access, and poof! It should happen automatically. I’ll check those particular posts to see if there’s a glitch somewhere. Check back soon and let me know if it’s still an issue.If there are any others, let me know as well. Make sure you log out, then log back in when you check back. Thanks!
I am having similar difficulties in that I’m blocked from the ‘how to use a microscope’ and ”wet mount’ activities. I would very much like to be able to progress through the curriculum for my 7th grader. What do I need to do? Thanks, Christina
Hi, I am trying to navigate the site and preplan my lessons. My problem is that in looking at the 7th grade activities, in order to do the experiments for the Life Science unit, we are to have completed the How to Use a Microscope and Wet Mount activities. However, when I attempt to access those, I get the ‘sorry this is in 9-12th grade content’ message. Again, I am in Life Sciences section under 7th grade level. Please help! 🙂 Thanks, Ramona