shock6Relays are telegraphs, and they both are basically “electrical switches”. This means you can turn something on and off without touching it – you can use electricity to switch something else on or off!


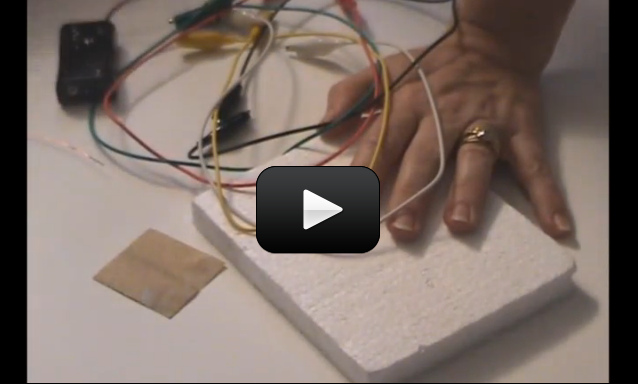
We’re going to build our own relay that will attract a strip of metal to make our telegraph ‘click’ each time we energize the coil.


IMPORTANT! This experiment is very tricky to get working right. You’ll want to pair up with someone who’s handy in the workshop and has a keen eye and a feather touch for adjusting the clicker in the final step. Someone who is a patient, fix-it type of person will be able to help you get this project working well.


Note: There are bonus experiment ideas near the bottom once you’ve mastered this activity.


[am4show have=’p8;p9;p21;p48;p106;p77;’ guest_error=’Guest error message’ user_error=’User error message’ ]


Materials:


  • block of foam
  • sandpaper
  • alligator wires
  • battery case
  • AA batteries
  • film canister or similar
  • nail
  • thin magnet wire (26-28g)
  • brass fasteners
  • 1/2″ strip from a soup can for the clicker (watch video)
  • paper clip
  • hot glue gun
  • scissors
  • tape


Download Student Worksheet & Exercises


1. Make the electromagnet first (the nail turns into a magnet when you add power to the wire): Carefully unwrap your wire and stretch it into a long length. Cut it roughly in half, reserving one half for the next experiment.


2. Wrap the thin insulated wire (called ‘magnet wire’) around the nail. (More wraps mean more power for your magnet, so use a lot!) You can insert a nail into a drill and wind it on slow speed, too. Sand the insulation off the end leads. (We do this so you can attach things to the exposed metal part.)


3. Insert the AA batteries into their case. Using alligator clips, clip onto a brass fastener and insert it into the foam.


4. Attach the other end of the clip lead to the positive battery terminal. Bend a paperclip into a “V” shape. Wind the free end of the exposed metal of the electromagnet wire around another brass fastener and insert through the tip of the “V” shape and into the foam, opened up on other side.


5. Be sure the smaller side of the “V” rests on the foam such that it does not reach the first brass fastener; but the larger side of the “V”, when pressed down, does. (You just made a switch!)


6. Stick the electromagnet pointy-end down into the foam. If it wiggles around, you will need to hot glue it into place later. Wiggling is good for now. Hot glue one end of the clicker (narrow steel strip) to the top of a film canister.


7. Attach the film canister with hot glue, making sure the tip of the clicker is over the nail head. Do not glue the lid to the canister! (It’s a big plus to have it rotate and be adjustable.) Be sure that the electromagnet and nail have a tiny clearance between the nail head and the metal strip. Push your switch to the “ON” position, and the electromagnet should click accordingly!


Troubleshooting: If it doesn’t click, move your electromagnet up or down, changing the nail-head-to-clicker distance until it clicks! If it sticks, it’s too close. If it doesn’t move at all, it’s too far away. Hot glue nail into right position. (Clicker is bendable, too—for future adjustments.)


Take your time – this is a project that requires patience and observation to figure out what’s going on. If you’re frustrated, STOP, try another experiment, and return back later. For a more permanent project, use a small block of wood instead of the foam and hammer in your nail.


Still struggling? Then click here to try an easier relay experiment with shocking results.


Why does this work? Anytime you run electricity through a wire, a magnetic field shows up. We’re multiplying this effect when we coil the wire around a nail. A nail with wire wrapped around it is called an electromagnet. Think of it like a magnet you can turn on and off.


Using a paper-clip switch, we can turn the electricity on and send it through the electromagnet, turning the ordinary nail and wire into a magnet. When we release the paper-clip switch, the current (electricity) stops flowing and our electromagnet turns back into ordinary nail and wire.


When the electromagnet is energized (magnetized), it attracts the metal strip, which causes it to click downwards. Release the paper-clip switch, and the strip is no longer attracted to the nail (because it’s no longer a magnet).


When the switch is on, it’s a magnet. When it’s off, it’s not a magnet. Magnets attract steel, and that’s why the strip bends and clicks. It’s amazing we could communicate over thousands of miles this way, but we did!


For Advanced Students Only!

If you’ve got the relay working and you want more… we’ve got one for you! Dual relays are often called “repeaters”. They take an incoming signal and “repeat” the signal and send it out. You’ll find uses for this when you want to increase the signal strength – you detect the weaker, older one and repeat out a newer, stronger signal identical to it. When radio signals need to traverse long distances, this is the basic idea of how they do it on high mountaintops.


Here’s how you can make your own:


1. Make a telegraph with a switch (previous experiment) first, then make a second telegraph, without the switch, on a new foam slab. Here’s what you do for the telegraph without the switch:


2. The second electromagnet uses the first relay as a switch. One end of the electromagnet goes to the negative battery terminal (don’t forget to sand the magnet wire first!).


3. Connect the positive wire lead to the first telegraph’s ‘clicker’ piece. Wrap it around securely. If it doesn’t stick, wrap the wire onto a paperclip then clip it to the clicker.


4. Connect the second (sanded) electromagnet wire to the first telegraph’s Nail. (It must touch the nail part, not the wire part, in order to work correctly!) Click the switch! The switch controls BOTH relays now. If you make the wires between the two foam slabs longer (say, 50 feet), you could relay messages back and forth!


Troubleshooting Relays: If a clicker doesn’t work, check the clearance. Move the electromagnet up and down, until you find the perfect clicking spot. It needs to be close enough to click, but far enough so it won’t stick.


Can you make several ‘repeaters’? Repeaters are telegraphs (relays) that get switched on by each other (after an initial input from you). Can you connect three or four telegraphs together so that they get switched on in sequence?


Exercises


  1. Why does the soup can clicker move?
  2. Does this circuit use a permanent or electromagnet?
  3. Why do we need multiple turns around a nail? Why not just a couple wraps?
  4. What is the paper-clip switch used for?
  5.  How can a relay be used in real life? Give three examples.

[/am4show]


Have a question ?

Tell us what you're thinking...

Comments

4 Responses to “Relays and Telegraphs”

  1. Aurora Lipper says:

    This setup is rather delicate and really only intended to demonstrate how a telegraph and relay function. So, it would be difficult to make this work reliably between two rooms. However, you could use the paperclip and brass fastener to make a button for each room, then run wires into the next room and use a buzzer in each room to make a reliable beep.

  2. ruthmmartens says:

    Is there a way that I can make it so that me and my friend can converse in Morse code in different rooms?

  3. A lot! The more wire wraps you have, the stronger the magnetic field will be when you apply a voltage. It’s okay for the wire wraps to be dozens of layers thick.

  4. Michelle Palmer says:

    How much wire should we put on the nail?