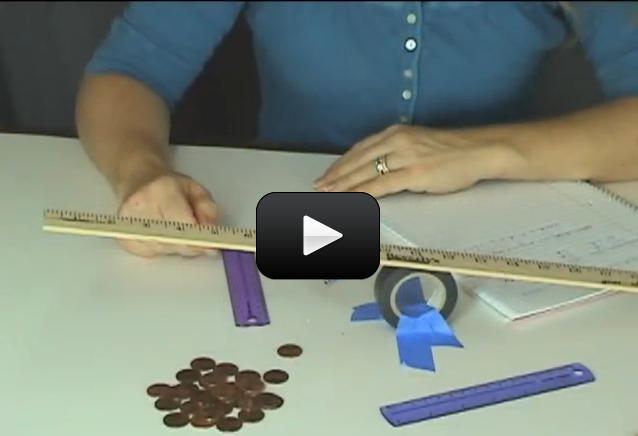
We’re going to use everyday objects to build a simple machine and learn how to take data. Sadly, most college students have trouble with these simple steps, so we’re getting you a head start here. The most complex science experiments all have these same steps that we’re about to do… just on a grander (and more expensive) scale. We’re going to break each piece down so you can really wrap your head around each step. Are you ready to put your new ideas to the test?
This experiment is for Advanced Students.
[am4show have=’p9;p41;p75;p85;p88;p92;’ guest_error=’Guest error message’ user_error=’User error message’ ]
You need:
- A wooden ruler or a paint stick for the lever
- Many pennies, quarters, or washers (many little somethings of the same mass)
- A spool, eraser, pencil (anything that can be your fulcrum)
- A ruler (to be your um….ruler)
- Paper cups
- Optional: A scale that can measure small amounts of mass (a kitchen scale is good)
Download Student Worksheet & Exercises
1. Tape one paper cup to each end of lever. (This allows for an easy way to hold the pennies on the lever.)
2. Set your fulcrum on the table and put your lever (ruler or paint stick) on top of it. Try to get the ruler to balance on the fulcrum.
3. Put five pennies on one side of your lever.
4. Now, put pennies, one at a time on the other side of your lever, this is your effort. Keep adding pennies until you get your lever to come close to balancing. Try to keep your fulcrum in the same place on your lever. You may even want to tape it there.
5. Count the pennies on the effort side and count the pennies on the load side. If you have a scale, you can weigh them as well. With the fulcrum in the middle you should see that the pennies/mass on both sides of the lever are close to equal.
6. This part’s a little tricky. Measure how high the lever was moved. On the load side, measure how far the lever moved up and on the effort side measure how far the lever moved down. Be sure to do the measuring at the very ends of the lever.
7. Write your results in your science journal as shown in the video.
8. Remove the pennies and do it all over again, this time move the fulcrum one inch (two centimeters) closer to the load side.
9. Continue moving the fulcrum closer to the load until it gets too tough to do. You’ll probably be able to get it an inch or two (two to four centimeters) from the load.
10. If you didn’t use a scale feel free to stop here. Don’t worry about the “work in” and “work out” parts of the table. Take a look at your table and check out your results. Can you draw any conclusions about the distance the load moved, the distance the effort moved, and the amount of force required to move it?
11. If you used a scale to get the masses you can find out how much work you did. Remember that work=force x distance. The table will tell you how to find work for the effort side (work in) and for the load side (work out). You can multiply what you have or if you’d like to convert to Joules, which is a unit of work, feel free to convert your distance measurements to meters and your mass measurements to Newtons. Then you can multiply meters times Newtons and get Joules which is a unit of work.
1 inch = .025 meters
1 cm = .01 meter
1 ounce =0.278 Newtons
1 gram = 0.0098 Newtons
By taking a look at your data and by all the other work we did this lesson, you can see the beautiful switcheroo of simple machines. Simple machines sacrifice distance for force. With the lever, the farther you had to push the lever, the less force had to be used to move the load.
The work done by the effort is the same as the work done on the load. By doing a little force/distance switcheroo, moving the load requires much less force to do the work. In other words, it’s much easier. Anything that makes work easier gets a thumbs up by me! Hooray for simple machines!
Exercises
- What is work?
- Force against an object
- Force over distance
- 9 hours and sweat
- Energy applied to an object
- What is the unit we use to measure energy?
- Newton
- Watt
- Joule
- Horsepower
- Describe a first class lever using one example.
[/am4show]
If you are using the program by Topic (see the “Topics” link in the upper nav bar near the top?) then when you select a unit, you’ll also find a shop list link in the menu on the right side after you are inside one of the units. If you are accessing the upper level content (like this one: https://www.sciencelearningspace2.com/grade-levels/advanced-projects-2/advanced-physics/), then the shopping lists are in each section. Does that help?
Note: there’s no main shop list for the grade level section yet, as I am still adding content to each grade at this time. Hope this helps!
Is there a complete materials list that I am overlooking or do we have to click on each individual experiment to access the list? I would like to be able to purchase everything for each experiment so that it is available if my kids get ahead.
If you’d like access to all the experiments in a particular grade level, just let us know and our team will set you up with it so you can do all the experiments in that level.
It appears as though this experiment and the next 3 experiments under 7th grade energy are for advanced students. Are there some other 7th grade level experiments we could do in place of these?
Thanks,
Jami
Yes!
do joules = meters * newtons?
cool
(;
Whoops – yes, it is, actually. It didn’t get flagged right – sorry about that! We’ve fixed it and put it in the right place. Thanks, Sevy! 🙂
Is this expirement for grades 9-12 ?
🙂
sevy keble