 Click here for a printer-friendly version of this page.
Objective You’re going to build on the Flying Machines concepts by building larger airfoils called Kites. The goal is to get them even more excited about fluid mechanics and aerodynamics by building projects that really fly. We’re going to continue learning about air pressure and Bernoulli’s law through the different kite designs. The first thing to do is watch the video on the Kites website page, and then dive into the experiments.
Main Ideas While the kids are playing with the experiments see if you can get them to notice these important ideas. When they can explain these concepts back to you (in their own words or with demonstrations), you’ll know that they’ve mastered the lesson.
- Higher pressure always pushes.
- The faster air travels over a surface, the less time it has to push down on that surface and create pressure. Fast moving air creates low pressure regions. (Bernoulli’s Law).
- The four fundamental forces on a kite are lift, weight, thrust, and drag. (The thrust is the pull on the string, and the lift occurs when wind flows over the top and bottom of the kite.)
About the Experiments The experiments in this section will take more time to put together, as you are building several different kite designs, including the box kite, the dragon, the diamond, and the rotor kite. If your kite doesn’t take off immediately, ask your child how it doesn’t work… did the nose tip over, did it spin, flip, or just tumble? Asking better questions is one of the key ingredients to making a great a scientist. Focus on watching what happens when you make small changes, and try to change only one thing at a time.
Before flight, hold your kite where the main line attaches to the bridle (the part that attaches to the string spool). Adjust the strings so that the kite hangs about 30 degrees into the wind. Use your fingers on the bridle on a windy day to find the “magic spot” or the place where your kite picks right up and flies best.
Moving the bridle forward makes the kite fly higher in smooth winds and moving it backward helps it fly in gusty winds. If your kite fails to rise, try a windier spot or a shorter tail. If it flies then quickly crashes, you may need to shorten your bridle or change the angle. If your kite spins around and around while flying, add more tail length.
The How and Why Explanation Kites are airplanes on a string. They use both high and low pressure to gain altitude and soar skyward. Not all kites need tails—the tail section helps stabilize an otherwise unstable kite design by adding a bit of weight near the bottom. While kites need to be lightweight, the framework needs to be strong, as they can withstand winds greater than 70 mph at higher altitudes.
To launch a kite, you can start with it on the ground and simply start running, hold it in your hands and toss it behind you as you run, or have someone hold it for you and toss it up as you start to run with the string. The best launch method depends on the kind of kite you’re working with. For example, the Bat Kite just needs to be tossed into the air with a kid running in front of it, while the rotor kite is going to require a windy day or a bicycle.
Questions to Ask When you’ve worked through most of the experiments ask your kids these questions and see how they do:
1. Kites need string so: (a) they don’t get lost (b) to hold them at the correct angle to the wind (c) so you can pull the kite in when you’re done (d) all the above
2. Kites can be in the shape of which ones? (a) box (b) pyramid (c) diamond (d) hippos
3. Which part of the kite is the most adjustable? (a) the kite skin (b) the tail (c) the bridle (d) the frame
4. Which kite is collapsible and easy to carry? (a) sled (b) dragon (c) bat (d) rotor (e) tetrahedral (f) diamond
5. If your kite crashes to the ground, what two things can you try changing?
6. How do you get your kite to spin in circles?
7. How much wind does the Rotor kite need? (a) a day at the beach could work (b) zero (c) winds like a hurricane (d) running ought to do it
8. What do you do if your kite doesn’t lift off the ground? (a) run faster (b) find a windier spot (c) let go of the kite (d) stop stepping on it (e) all of the above
9. Where is the higher pressure area on the kite during flight? (a) the topside (b) the underside (c) the tail (d) nowhere
10. What is the frame for on a kite? (a) to keep the kite in the right shape (b) to provide weight in the right places (c) so it can break (d) so you have something to attach the bridle to
11. Which kite works with the least amount of wind?
How many of these items do you already have? We’ve tried to keep it simple for you by making the majority of the items things most people have within reach (both physically and budget-wise).
You do not need to do ALL the experiments – just pick the ones you want to do! Look over the experiments and note which items are needed, and off you go!
Click here for a printer-friendly version of this page.
Materials
- 11”x17” sheet of paper (or tape two 8 ½” x 11” to make this size)
- A big roll of string (enough for six kites)
- 20 donut stickers (also known as page reinforcement stickers)
- 50 straws
- 4 sheets of tissue paper
- 10-20’ crepe paper streamer for kite tail
- 3 wire coat hangers or 36” balloon sticks (these are a better choice if you can find them)
- Five plastic garbage bags
- 2 foam plates (at least 4 inches in diameter)
- 6”x4” clean foam meat tray
Tools
- Stapler
- Tape
- Scissors
- Hot glue gun with glue sticks
- Glue sticks (the retractable kind)
- Duct tape
Want to build a kite in less than 5 minutes? This kite is basically a paper airplane on a string. It’s fast and easy to make. The best thing about this kite is that it needs next to no wind to get airborne, so you can simply run with it to get it up in the sky.
You'll need to get: 11”x17” sheet of paper (you can also tape two 8.5" x 11" sheets together to make this size), 10 feet of string, two donut stickers (also known as page reinforcement stickers), a stapler, and a straw.
Why does this kite fly? This kite soars because you’re holding the kite at the correct angle to the wind. The kite actually has two things (scientifically speaking) going on that help it fly: first, the shape of the wing cause a pressure difference that create lift under the wing surface, the same way that real airplanes generate lift. Second, the angle that the kite hits the wind generates impact lift on the kite, the same way fighter jets generates lift, since fighter jet’s wings are not curved like an airplane’s. In an airplane, the wind flows both over and under the kite, and with this shape, the air flying over the kite is traveling a bit faster than the wind under the kite. Higher wind speed means lower pressure, so the underside of the kite now has a relatively higher pressure, thus pushing the kite upwards into the sky.
Can I add string to any paper airplane and make it into a kite? Anytime someone asks us a question like this, we respond with a very enthusiastic: “I don’t know. Try it!” Then we offer enough tools for the job with a smile. We want kids experimenting with new ideas (even if we’re not entirely sure if they will work). So go ahead, roll up your sleeves, test out your ideas, and prepared to learn.
Here's what you need to do:
Please login or register to read the rest of this content.
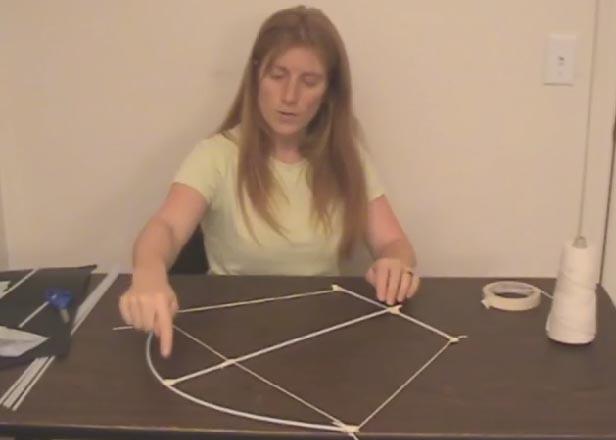
This is a simpler version of the box kite. By making it out of everyday materials and changing the structure so that it's more rigid, all you need is an afternoon to make this simple and colorful kite.
The directions here are for making a single cell (image is a pyramid of four cells), and the largest we've ever made is ten without needing stronger materials. (It's the straws that bend under the weight). You can add a tail to keep it from spinning during flight.
Here's what you do:
I carried one of these kites in my backpack in grade school, as it collapses down very small when not in use. You can make smaller versions from still paper, but the one we're going to do uses plastic.
Here's what you need to get:
Two 24 inch wood dowels (or two 24 inch long plastic balloon sticks), four donut stickers (also known as page reinforcement stickers), string, plastic garbage bags, tape and scissors.
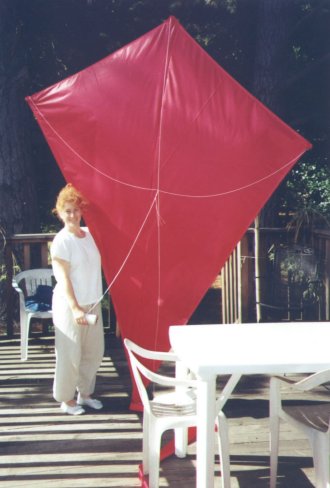
 Did you notice how BIG these kites can get? And yes, that's me in the photo, at full size!
If you're looking for a kite that will lift you off your feet, THIS IS THE ONE! I'm going to show you how to build a smaller version first, so you get the hang of how it goes together.
Afterward, you can make a 6-foot, 9-foot, or 12-foot model. Just keep your proportions right and find strong, lightweight materials (bamboo is a popular choice, but watch the wall-thickness or it too can get heavy).
The photo here is the 9-foot tall version of this kite, which sports a 25-foot tail. To fly this, you'll need a lot of wind, so if you live near the beach, you might be able to get this up. Otherwise, you can try to get it airborne by doing what I used to do with mine - tie it to the bumper of your pickup truck and drive out in the country with about a mile of strong string!
The 6-foot versions in a strong wind will generate enough to lift small kids, so watch out (and get your camera).
If you can find balloon sticks (white plastic stiff tubes about 3 feet long), use them. They’re inexpensive, lightweight, and easy to work with. Otherwise, use wood dowels from a hardware store or 36” bamboo gardening stakes from a nursery.
Did you notice how BIG these kites can get? And yes, that's me in the photo, at full size!
If you're looking for a kite that will lift you off your feet, THIS IS THE ONE! I'm going to show you how to build a smaller version first, so you get the hang of how it goes together.
Afterward, you can make a 6-foot, 9-foot, or 12-foot model. Just keep your proportions right and find strong, lightweight materials (bamboo is a popular choice, but watch the wall-thickness or it too can get heavy).
The photo here is the 9-foot tall version of this kite, which sports a 25-foot tail. To fly this, you'll need a lot of wind, so if you live near the beach, you might be able to get this up. Otherwise, you can try to get it airborne by doing what I used to do with mine - tie it to the bumper of your pickup truck and drive out in the country with about a mile of strong string!
The 6-foot versions in a strong wind will generate enough to lift small kids, so watch out (and get your camera).
If you can find balloon sticks (white plastic stiff tubes about 3 feet long), use them. They’re inexpensive, lightweight, and easy to work with. Otherwise, use wood dowels from a hardware store or 36” bamboo gardening stakes from a nursery.
This kite is sometimes referred to as a "Comet Kite", as it has a main head area and a loooong tail section. We recommend making the kite from lightweight garbage bags, as they tend to hold up better than tissue paper, and don't require sewing they way ripstop nylon material does.
Here's what you need to get: Wire coat hanger or thin plastic dowel, string, straw, plastic garbage bags, tape, and scissors.
Here's what you do:
Please login or register to read the rest of this content.
Rotor kites (often called UFO kites) are one of those unusual kites that require more complex aerodynamics in order to fly. This particular kite flies only when rotating. Make sure you have lots of wind for this kite by either visiting the beach or tying it to your bicycle.
This kite is very picky about wind speed. Make sure the string doesn’t rub on the plates during flight. You can use hollow gardening stakes, empty ballpoint pen tubes taped together into a long straw, or composite tubes instead of the straws described here. Fishing line or nylon string works for kite line as well.
Materials: Two straws, a long length of string (20 feet or more), duct tape, two foam plates (at least 4 inches in diameter, one 6x4-inch clean foam meat tray, hot glue gun, and scissors.
Here's what you do: